Crowfeather
New Member
As you may be able to piece together from the location of this thread, my member title and my post count (if you can't find it, I'll give you a hint - it's less than two, and I'm fairly confident that a negative post count is not possible), I'm new to the forum. I'm really not sure how internet social etiquette dictates that I make my introduction, so I'm going to wing it: hey. Howdy? Sup.
(If I've broken some sort of "code of introduction" here, I'm open to critique. Really, I can handle it. I promise.)
So seeing that I recently found myself with a new job and with my college courses starting in four days, I've decided that this would be an excellent time to start a time-and-budget intensive project. And what better project for an utter beginner to start with than the piece of armor that requires the most building experience? If you answered the helmet, you'd be right! On the bright side, I figured that even if this helmet project crashes and burns in a fiery pile of cardstock, resin and broken dreams, it would at least make wonderful entertainment for the other members of the forum So without further ado, let's do this.
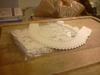
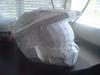
I started yesterday on this endeavor. Now before I go on (and as a note to other beginners) Pepakura is an evil, deceptive program. Sure, it has a happy, paper-folded dragon as the mascot. It's even filled with bright, happy colors. But little are you aware that they've already got you; for while you look at that cute little reptile, reminiscing over cut-and-paste art projects in kindergarten, Pepakura is quietly convincing you that cutting out a file for pep work is going to be EASY. I mean, really, just HOW HARD could cutting out little stencils be? Ohhh hoh hoh, don't even get me started. Here's a brief journal of my first encounter with cutting Pepakura templates:
2:00 PM - Just started. This really isn't so bad, making something from nothing, working with accuracy and precision. In fact, I'm actually enjoying this time to relax and get in touch with my inner-self. I should do this more often.
3:05 PM - The clock must have broken, because there is no conceivable way that all I have to show for an hour's worth of work are four, unrecognizable squiggle shapes. That's all right though; I own Spotify, its easy enough to play some Demetri Martin to get me through this.
3:45 PM - Demetri Martin is a funny guy, funny enough that I can almost forget the cramps developing in my wrists and hand. This can't be normal. That Pepakura dragon looked too happy for this to happen to me. Oh well, just need to power through it.
5:00 PM - Demetri Martin isn't funny.
6:03 PM - No comedians are funny. I think pepping is slowly sucking away my capacity for joy and happiness. My hand is also burning like that evil pep-Dragon doused it in Tabasco sauce. How many pages do I have left.... oh. Ooh. Looking was a mistake.
7:00 PM - Damn it, I messed up the piece. I suppose I should make a new one...
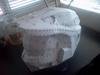
8:00 PM - This thing had better fit my head.
9:30 PM - I've started to have deep, introspective thoughts, such as how viable cardstock is for kindling or whether my neck will be permanently stuck like this after I finish the cutting. Luckily, my hand went numb 10 minutes ago - should make its eventual amputation much easier.
10:30 PM - I think I've exhausted the Spotify library of songs, which is a shame because they were the only thing helping me keep track of reality at this point. Man, I made a bad cut there... oh well, that's what Bondo/hot glue/selective vision are for.
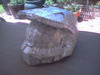
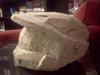
11:30 PM - I think I'm finished, but I'm also in denial - there's no way that there aren't more little shapes to cut out of paper. This isn't possible. I should scrounge around in the trash cans and under the refrigerator to make sure there aren't more templates.
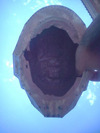
11:35 PM - Okay, so I'm actually done. I could use a hug.

Stupid paper.
(If I've broken some sort of "code of introduction" here, I'm open to critique. Really, I can handle it. I promise.)
So seeing that I recently found myself with a new job and with my college courses starting in four days, I've decided that this would be an excellent time to start a time-and-budget intensive project. And what better project for an utter beginner to start with than the piece of armor that requires the most building experience? If you answered the helmet, you'd be right! On the bright side, I figured that even if this helmet project crashes and burns in a fiery pile of cardstock, resin and broken dreams, it would at least make wonderful entertainment for the other members of the forum
So without further ado, let's do this.I started yesterday on this endeavor. Now before I go on (and as a note to other beginners) Pepakura is an evil, deceptive program. Sure, it has a happy, paper-folded dragon as the mascot. It's even filled with bright, happy colors. But little are you aware that they've already got you; for while you look at that cute little reptile, reminiscing over cut-and-paste art projects in kindergarten, Pepakura is quietly convincing you that cutting out a file for pep work is going to be EASY. I mean, really, just HOW HARD could cutting out little stencils be? Ohhh hoh hoh, don't even get me started. Here's a brief journal of my first encounter with cutting Pepakura templates:
2:00 PM - Just started. This really isn't so bad, making something from nothing, working with accuracy and precision. In fact, I'm actually enjoying this time to relax and get in touch with my inner-self. I should do this more often.
3:05 PM - The clock must have broken, because there is no conceivable way that all I have to show for an hour's worth of work are four, unrecognizable squiggle shapes. That's all right though; I own Spotify, its easy enough to play some Demetri Martin to get me through this.
3:45 PM - Demetri Martin is a funny guy, funny enough that I can almost forget the cramps developing in my wrists and hand. This can't be normal. That Pepakura dragon looked too happy for this to happen to me. Oh well, just need to power through it.
5:00 PM - Demetri Martin isn't funny.
6:03 PM - No comedians are funny. I think pepping is slowly sucking away my capacity for joy and happiness. My hand is also burning like that evil pep-Dragon doused it in Tabasco sauce. How many pages do I have left.... oh. Ooh. Looking was a mistake.
7:00 PM - Damn it, I messed up the piece. I suppose I should make a new one...
8:00 PM - This thing had better fit my head.
9:30 PM - I've started to have deep, introspective thoughts, such as how viable cardstock is for kindling or whether my neck will be permanently stuck like this after I finish the cutting. Luckily, my hand went numb 10 minutes ago - should make its eventual amputation much easier.
10:30 PM - I think I've exhausted the Spotify library of songs, which is a shame because they were the only thing helping me keep track of reality at this point. Man, I made a bad cut there... oh well, that's what Bondo/hot glue/selective vision are for.
11:30 PM - I think I'm finished, but I'm also in denial - there's no way that there aren't more little shapes to cut out of paper. This isn't possible. I should scrounge around in the trash cans and under the refrigerator to make sure there aren't more templates.
11:35 PM - Okay, so I'm actually done. I could use a hug.

Stupid paper.