NK4U
New Member
Hi all I’m new to cosplay and decided to learn the foam workflow by making shoulder pads. After a few attempts I finally have 2 shoulders that are good enough to paint but I’m going to learn to paint on the old ones before I ruin these good ones.
Im using Kwik Seal caulk for the seams on a reject shoulder pad and I really liked how much I could smooth it out. I tried foam clay but as shown in the photo below but it didn’t turn out too well for this application.
After using the Kwik Seal the seams practically vanished and it added some nice rigidity to the foam.
I got some plasti-dip and started applying layers over a few hours. Immediately i noticed that the foam had a noticeably rougher texture than the caulk and the smoothness of the caulk stands out like a sore thumb. (The foam clay stood out so much that using it was out of the question.)
Adding more p-d layers didn’t work so I painted over it with some gloss paint I had lying around to see if it would even out. It didnt…

So last night I made some swatches from my foam and smoothed some caulk on it as much as possible. It was invisible on the foam. Before this I ran one swatch under a heat gun to see if that is what the foam needed to match the smoothness of the caulk.
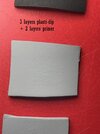
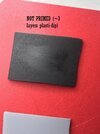
I applied a few layers of p-d to all 3 swatches and some automotive primer to two (including the heat-gunned one) and took a photo of the results to better show what I’m dealing with.
Primed-but-not-heated ended up looking the best but it’s still a little bit visible in different lighting angles. The primer did, however, make the texture much more uniform for painting.

Am I not adding enough layers of something? Between these swatches and the shoulder I’ve used like half the can of p-d and I see a lot of people not using primer at all. I cant just cover the entire thing in Kwik Seal so I guess I should stick with matte? But then again the p-d dried to a matte black and i could see the seam coverup clearly, too.
Does anyone else even use primer or do you just layer the plasti-dip as many times as it takes until it's smooth?
Im using Kwik Seal caulk for the seams on a reject shoulder pad and I really liked how much I could smooth it out. I tried foam clay but as shown in the photo below but it didn’t turn out too well for this application.
After using the Kwik Seal the seams practically vanished and it added some nice rigidity to the foam.
I got some plasti-dip and started applying layers over a few hours. Immediately i noticed that the foam had a noticeably rougher texture than the caulk and the smoothness of the caulk stands out like a sore thumb. (The foam clay stood out so much that using it was out of the question.)
Adding more p-d layers didn’t work so I painted over it with some gloss paint I had lying around to see if it would even out. It didnt…
So last night I made some swatches from my foam and smoothed some caulk on it as much as possible. It was invisible on the foam. Before this I ran one swatch under a heat gun to see if that is what the foam needed to match the smoothness of the caulk.
I applied a few layers of p-d to all 3 swatches and some automotive primer to two (including the heat-gunned one) and took a photo of the results to better show what I’m dealing with.
Primed-but-not-heated ended up looking the best but it’s still a little bit visible in different lighting angles. The primer did, however, make the texture much more uniform for painting.
Am I not adding enough layers of something? Between these swatches and the shoulder I’ve used like half the can of p-d and I see a lot of people not using primer at all. I cant just cover the entire thing in Kwik Seal so I guess I should stick with matte? But then again the p-d dried to a matte black and i could see the seam coverup clearly, too.
Does anyone else even use primer or do you just layer the plasti-dip as many times as it takes until it's smooth?