I'm curious how you all reinforce your prints? I recently had a pretty... let's call it educational experience with using 'rondo' to reinforce my prints, however that method turned out to be a pretty poor way of doing it as it essentially melted any parts that weren't structurally independent. Even those that were have some minor warping that I'm having to correct with a heat gun very carefully. That all said, I'd be open to hearing other's suggestions on what to do? I do plan on wearing my armor to conventions and I want to make sure it's as sturdy as possible. I've seen some resin and fiberglass used, but not sure if that's the best method for my setup, though that may be the defacto method. Anyways feel free to drop your suggestions, I'd love to see how you all make your awesome suits!
You are using an out of date browser. It may not display this or other websites correctly.
You should upgrade or use an alternative browser.
You should upgrade or use an alternative browser.
How do you reinforce your 3D prints, if at all?
- Thread starter RamenN00dl3
- Start date
- Status
- Not open for further replies.
- Member DIN
- S027
You're going to get 20 different techniques - and they're all valid for each person. They wouldn't be doing whatever they're doing if they didn't believe in it and if it didn't work for them.
For me: I'm printing because I don't want to have to re-inforce. Its already a solid material. If I have to reinforce then I printed it badly. Just my perspective. To me, rushing a print with weak walls, high layer height, next to no infil, PLA... all of that racing to get a part off the printer faster doesn't save anything if I spend another 200 hours of labor and other materials on it.
For me: Let the printer take all the time in the world while I sleep, mow the lawn and play with the grand kids. I don't give a darn if the robot takes 6 days to print a big part.
For me: Every hour the printer spends making a strong part is 5 hours *NOT* spent on manual labor.
But I don't have seams in my parts. I'm not printing on a single small printer. I don't have those structural weak point that need to be reinforced. My thighs are printed whole. The chest, even the back, is printed whole and don't have to be seamed.
Oh, I take that back. One of my helmets was resin printed in left/right halves. There is a seam down the center from spine to chin. I did re-enforce that in basically the same way as fiberglass. I laid down cloth over the seam, then epoxy so the cloth became the mesh and the epoxy was the glue and reinforcement for joining the two halves. So kinda part gluing together and part re-enforcing.
But other than this one, I don't have a bunch of seams that need reinforcement.
- Member DIN
- S410
The only printed part on my suit is the helmet which doesn't usually take a beating, so I don't know how well this would work for other parts: I glue the pieces together, and then fill in the seam on the inside either with extra glue, or usually 2-part epoxy. Haven't had a helmet split on me yet! I don't do anything crazy with the print settings; PLA+ 0.2mm height and 20% infill. I printed my helmet in 4 pieces, and used spot putty to fill the seam on the outside. With a bit of sanding you'll never even know it's 4 parts!
I'm thinking I will do something similar to the parts I am reprinting, just use a 2-part epoxy on the backs of the seams to help reinforce, rather than coating the entire inside face. My print settings are a bit tighter than yours, I usually print at 0.15mm height and 20 - 25% infill depending on the part. My helmet was one of the pieces that didn't suffer quite so much from the rondo, but enough warping that the visor doesn't fit quite cleanly anymore so I'll have to heat-adjust as I mentioned. Looking at it straight on you can notice some of the warping but I'm hoping that I can ease it back into shape.The only printed part on my suit is the helmet which doesn't usually take a beating, so I don't know how well this would work for other parts: I glue the pieces together, and then fill in the seam on the inside either with extra glue, or usually 2-part epoxy. Haven't had a helmet split on me yet! I don't do anything crazy with the print settings; PLA+ 0.2mm height and 20% infill. I printed my helmet in 4 pieces, and used spot putty to fill the seam on the outside. With a bit of sanding you'll never even know it's 4 parts!
Fair point about not really needing reinforcement if the pieces are solid. My print settings do make some relatively solid pieces, it's mainly the seams that I'm concerned about. That being said, I have seen some worst-case scenarios that others have posted here, where a slight fall at a convention lead to to significant damage to the finished piece. Obviously I don't plan on falling, but won't put it out of the realm of possibility. I feel like I've already paid the armor gods my toll by having to reprint nearly half my suit due to the mishap with the rondo :TYou're going to get 20 different techniques - and they're all valid for each person. They wouldn't be doing whatever they're doing if they didn't believe in it and if it didn't work for them.
For me: I'm printing because I don't want to have to re-inforce. Its already a solid material. If I have to reinforce then I printed it badly. Just my perspective. To me, rushing a print with weak walls, high layer height, next to no infil, PLA... all of that racing to get a part off the printer faster doesn't save anything if I spend another 200 hours of labor and other materials on it.
For me: Let the printer take all the time in the world while I sleep, mow the lawn and play with the grand kids. I don't give a darn if the robot takes 6 days to print a big part.
For me: Every hour the printer spends making a strong part is 5 hours *NOT* spent on manual labor.
But I don't have seams in my parts. I'm not printing on a single small printer. I don't have those structural weak point that need to be reinforced. My thighs are printed whole. The chest, even the back, is printed whole and don't have to be seamed.
Oh, I take that back. One of my helmets was resin printed in left/right halves. There is a seam down the center from spine to chin. I did re-enforce that in basically the same way as fiberglass. I laid down cloth over the seam, then epoxy so the cloth became the mesh and the epoxy was the glue and reinforcement for joining the two halves. So kinda part gluing together and part re-enforcing.
But other than this one, I don't have a bunch of seams that need reinforcement.
- Member DIN
- S829
For my MKVI suit I did a bunch of reinforcement with fiberglass and epoxy. This made the pieces feel amazingly solid and able to take a beating (though I don't want to test it out).
For my newer project I try to make the part as strong as possible (typically 3 walls and 10% infill). Even with this though I plan on doing some reinforcing in key areas.
For my newer project I try to make the part as strong as possible (typically 3 walls and 10% infill). Even with this though I plan on doing some reinforcing in key areas.
Any chance you'd be willing to share the brand/type of epoxy you used? Any downsides? I have Bondo branded resin but as I mentioned I've had some temperature issues with that, although I'm not certain if that was because I combined it with the body filler or not, but I know resin is generally an exothermic reaction so I'm wondering if the epoxy will be a similar situation. Sounds like you had good success with it so I'd be willing to try it.For my MKVI suit I did a bunch of reinforcement with fiberglass and epoxy. This made the pieces feel amazingly solid and able to take a beating (though I don't want to test it out).
For my newer project I try to make the part as strong as possible (typically 3 walls and 10% infill). Even with this though I plan on doing some reinforcing in key areas.
- Member DIN
- S829
I used the standard Bondo fiberglass resin.
Some details in my build thread starting here:

I managed to use it on raw prints as well as pieces that had already been fully painted.
I can say that in the future I will always be doing this before I start the finishing process.
Some details in my build thread starting here:

I managed to use it on raw prints as well as pieces that had already been fully painted.
I can say that in the future I will always be doing this before I start the finishing process.
- Member DIN
- S319
Probably been said but ima put my 2 cents in.
I get fiberglass sheets from home depot and fiberglass resin, its super messy and i hate it but if you do a layer and let it dry then come back and do a few more layers it makes it really strong and durable. I really only do this for extremely large pieces tho like a entire chest rig or a 8 foot long sword, for smaller pieces it's usually not necessary. make sure you have proper ppe and a well ventilated area.
I get fiberglass sheets from home depot and fiberglass resin, its super messy and i hate it but if you do a layer and let it dry then come back and do a few more layers it makes it really strong and durable. I really only do this for extremely large pieces tho like a entire chest rig or a 8 foot long sword, for smaller pieces it's usually not necessary. make sure you have proper ppe and a well ventilated area.
If you're looking for something a bit more computer-related, you can always interlay sturdier elements into your armor pieces while printing (i.e. putting an aluminum rod in a thigh piece midway through a print. You'd have to measure out and cut the space you want on the stl file itself, then have the printer pause before printing the topmost part of the space so you can insert the support.
It's a little tricky, but did this with both a skateboard and guitar to great success. You can stand on the ABS skateboard")
It's a little tricky, but did this with both a skateboard and guitar to great success. You can stand on the ABS skateboard
- Member DIN
- S027
RamenN00dl3
Nobody plans on falling. Like you said, you already did. I was walking around an outdoor fair in full Klingon when my boots decided to drop one of the soles. Commercially made boots with a 4" sole (Think Herman Munster boots) that just fell off mid step. Well of course I went down like a ton of bricks. That was outdoors, not a crowded convention floor, no helmet to limit my visibility, no little kids behind me to step on, no flight of steps in armored boots... nothing like that. Just a weird freak circumstance. So I totally get where you're coming from.
"Hope for the best. Plan for the worst"
Obviously I don't plan on falling, but
Nobody plans on falling. Like you said, you already did. I was walking around an outdoor fair in full Klingon when my boots decided to drop one of the soles. Commercially made boots with a 4" sole (Think Herman Munster boots) that just fell off mid step. Well of course I went down like a ton of bricks. That was outdoors, not a crowded convention floor, no helmet to limit my visibility, no little kids behind me to step on, no flight of steps in armored boots... nothing like that. Just a weird freak circumstance. So I totally get where you're coming from.
"Hope for the best. Plan for the worst"
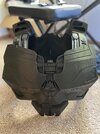
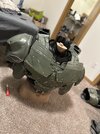
Another alternative that I have personally found useful is utilizing TPU to make armor that is a little flexible. Since my main suit gets a LOT of abuse, I figured it was worth the trouble to try and dial in some TPU to replace what I call "at risk parts" such as knees and thighs. I know a lot of people hate using TPU, but if you get a high Shore value (98A or something close, I use Priline TPU off of Amazon), it'll print very similar to PLA, but have the flexibility to tank hits and scrapes.
My most recent Mk IV build, I went all out and basically printed the entire thing from TPU. Certainly lots of sanding and flexible bondo needed, but I know that the glue and mounts I use will break before the armor does
My most recent Mk IV build, I went all out and basically printed the entire thing from TPU. Certainly lots of sanding and flexible bondo needed, but I know that the glue and mounts I use will break before the armor does
Attachments
- Member DIN
- S319
I want to start using tpu but its very daunting, its almost alien, maybe ill give it a go, thanks for the info.Another alternative that I have personally found useful is utilizing TPU to make armor that is a little flexible. Since my main suit gets a LOT of abuse, I figured it was worth the trouble to try and dial in some TPU to replace what I call "at risk parts" such as knees and thighs. I know a lot of people hate using TPU, but if you get a high Shore value (98A or something close, I use Priline TPU off of Amazon), it'll print very similar to PLA, but have the flexibility to tank hits and scrapes.
My most recent Mk IV build, I went all out and basically printed the entire thing from TPU. Certainly lots of sanding and flexible bondo needed, but I know that the glue and mounts I use will break before the armor does
It's tricky to start with, but once you get comfortable with it, it's really nice. Direct drive is obviously a must, and I'd recommend starting with Priline TPU. It's less flexible than other varieties, but it is still TPU, and I use the same parameters for that as I do for my PLA prints.I want to start using tpu but its very daunting, its almost alien, maybe ill give it a go, thanks for the info.
Start small, start slow, and work your way up! I clocked that TPU at 80mm/s on my CR10s, and now I run it at Ludicrous Speed on my Bambu, so it can handle almost any project you throw at it.
Priline should really be paying me at this point
- Member DIN
- S319
do you run it thru ams on your bambu?It's tricky to start with, but once you get comfortable with it, it's really nice. Direct drive is obviously a must, and I'd recommend starting with Priline TPU. It's less flexible than other varieties, but it is still TPU, and I use the same parameters for that as I do for my PLA prints.
Start small, start slow, and work your way up! I clocked that TPU at 80mm/s on my CR10s, and now I run it at Ludicrous Speed on my Bambu, so it can handle almost any project you throw at it.
Priline should really be paying me at this point
That's really interesting, I hadn't even considered TPU for the armor itself. I've always been under the impression that TPU is so flexible it's almost like rubber, so sanding and finishing it like a typical filament would be very difficult, if not impossible. I haven't worked with it myself yet but I know my printer is capable of using it. I'm a bit far along in my current build to consider it, but good to know for future reference.Another alternative that I have personally found useful is utilizing TPU to make armor that is a little flexible. Since my main suit gets a LOT of abuse, I figured it was worth the trouble to try and dial in some TPU to replace what I call "at risk parts" such as knees and thighs. I know a lot of people hate using TPU, but if you get a high Shore value (98A or something close, I use Priline TPU off of Amazon), it'll print very similar to PLA, but have the flexibility to tank hits and scrapes.
My most recent Mk IV build, I went all out and basically printed the entire thing from TPU. Certainly lots of sanding and flexible bondo needed, but I know that the glue and mounts I use will break before the armor does
Nope! Didn't get an AMS with my P1S cause I generally just use filament en masse rather than using a bunch of different colors. Maybe in the future I'll get it, but I've heard that TPU in the AMS is a nono right now.do you run it thru ams on your bambu?
I've actually found its hard to find TPU thats too soft! I play around with 3D printing undersuits, and my TPU discoveries have stemmed from that. It all has to do with the shore value, or how flexible the material is rated. The TPU I use is 98A, which I believe is comparable to the material shopping cart wheels are made of! I'm trying to use some in the 82A range to see if I can 3D print some gloves rnThat's really interesting, I hadn't even considered TPU for the armor itself. I've always been under the impression that TPU is so flexible it's almost like rubber, so sanding and finishing it like a typical filament would be very difficult, if not impossible. I haven't worked with it myself yet but I know my printer is capable of using it. I'm a bit far along in my current build to consider it, but good to know for future reference.
I will say, flexible spackle is easy to find and very useful for sanding TPU. Just absolutely cover your print in the stuff, then sand down till you barely see print lines
For my halo 3 masterchief and infinite mk7 I've also used fiberglass and epoxy, but specifically for the joins. It adds a nice weight and makes it a lot more shock resistant. I still wouldn't want to go rolling around in it though. Unsure if it'd be me that breaks first, or the fiberglassFor my MKVI suit I did a bunch of reinforcement with fiberglass and epoxy. This made the pieces feel amazingly solid and able to take a beating (though I don't want to test it out).
For my newer project I try to make the part as strong as possible (typically 3 walls and 10% infill). Even with this though I plan on doing some reinforcing in key areas.
Also, if anything in my prints breaks at a layer line that hasn't been reinforced, I'll often run superglue between the layers and back it by sanding it with 80 grit, cleaning the area, then applying a generous amount of hot glue. Sometimes flexibility and ability to absorb impacts is key.
Rock Lobbster
Sr Member
- Member DIN
- S098
Bondo branded fiberglass epoxy & mesh for me. Glue together with 5 min epoxy & then plastic weld & staple it. After that apply the fiberglass and you've got a super sturdy suit.
For those of you that do use fiberglass sheets and resin, do you have any trouble working with it? I think that's one thing that has kept me away is the apprehensivness I have around the process and nervousness I have in messing something up.
- Status
- Not open for further replies.
Similar threads
- Replies
- 10
- Views
- 511
- Replies
- 3
- Views
- 220
- Replies
- 0
- Views
- 165