Ironman Suit. Mk4. Pic heavy.

Status
Not open for further replies.
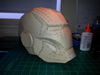
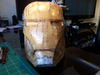
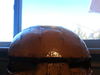
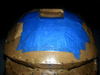
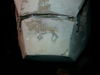
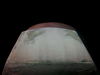
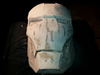
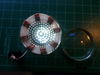
Oh yeah! That Arc Reactor is awesome! I love it when household items are used to make something as impressive as that! Also, (just because I have to say it!) your duct tape dummy seems to have a bit o' gansta lean goin' on! I probably shouldn't say anything though, I have yet to make mine, and it will probably look like a duck-billed platypus when I am done!

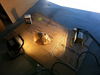
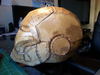
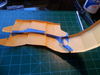
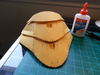
Lmao yeah I didn't quite get the stand completed before bed so I just set it up like that! Hopefully it'll have a nice solid stand here soon so I can sand it up straight and start setting some pieces onto it!
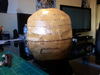
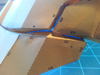
I changed the reactor a little too, I'll post some more pics later :]
Thanks for the encouraging words!! Good luck with your dummy!
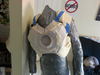
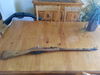
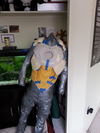
 
Alright, update! Chest AND back done now, starting on the Abs and the 'under-chest'.

20131227_114039_zps34821beb.jpg


20131227_114049_zps77a02f54.jpg


I feel as though the back piece was full of very redundant folds and cuts, such as this piece. Kinda unnecessary.

20131227_112238_zpsca64b1e6.jpg


Managed to wire an external switch onto the Arc reactor, changed it up a little, and even found a nice lens to put onto the front. Just need to make some kind of housing for it all now.

20131227_115317_zpsb521592a.jpg
 

Attachments

  • 20131227_114039_zps34821beb.jpg
    20131227_114039_zps34821beb.jpg
    86 KB · Views: 204
  • 20131227_115317_zpsb521592a.jpg
    20131227_115317_zpsb521592a.jpg
    81.9 KB · Views: 218
  • 20131227_112238_zpsca64b1e6.jpg
    20131227_112238_zpsca64b1e6.jpg
    91.2 KB · Views: 225
  • 20131227_114049_zps77a02f54.jpg
    20131227_114049_zps77a02f54.jpg
    97.3 KB · Views: 235
I seem to have run into a snag that I need help with.
For the abs piece, the sections don't see to join up, so I'm manually having to put them together with masking tape to get them into place. There just aren't any pieces that close the gaps, nor are there edges to join. I'm a little confused. Perhaps it's something I accidentally turned off?
20131227_150013_zps90ec9984.jpg

20131227_150000_zpsee9bd8cd.jpg

20131227_145954_zps6bb00a6d.jpg
 

Attachments

  • 20131227_150013_zps90ec9984.jpg
    20131227_150013_zps90ec9984.jpg
    61.5 KB · Views: 211
  • 20131227_145954_zps6bb00a6d.jpg
    20131227_145954_zps6bb00a6d.jpg
    79.1 KB · Views: 217
  • 20131227_150000_zpsee9bd8cd.jpg
    20131227_150000_zpsee9bd8cd.jpg
    88.6 KB · Views: 199
Hi, your build is looking quite good! I'm currently doing some digging for PEP files for an Iron Man armor. I'm doing a first helmet with a PDF unfold I've found just to get some experience with folding and glueing, but I've set my goals...

I've found a couple for MKVII peps, but I wanted to build a circular ARC reactor armor, maybe a MKIV or similar, and yours seem quite nice!

Is it possible for you to send me your full-armor files?

Thanks!

Sure, here's the armor files I used. They're in the .rar file at the bottom, it contains everything to build the suit :]
 
In regards to the abdominal pieces, I would just keep plugging along. To get the edges to line up tightly, try using black metal binder clips:
http://www.walmart.com/search/searc...y=binder clips medium, black&_tt=binder clips

They work like a charm for applications like this.

-Matt


Thanks for the heads up :] I'll keep on with them! Weather should be starting to warm soon so I can start hardening some of this stuff!

As for the lapse in progress, I apologize. I was gifted a Mosin Nagant 91/30 for Christmas, so I took a few days out to restore it to its original condition, which looks beautiful, and then i took it out for some test shooting :]
I'll get back to modeling right away!!
20131231_112748_zps5b8c88ab.jpg
 

Attachments

  • 20131231_112748_zps5b8c88ab.jpg
    20131231_112748_zps5b8c88ab.jpg
    85.5 KB · Views: 180
Front abs piece is proving to be a little tricky to put together, all these individual plates are driving me nuts! I figure the reason they did that was for increased mobility in the suit, but it really is a pain!
Anyways, almost done with this one!

20140107_105132_zps8739ba23.jpg
 

Attachments

  • 20140107_105132_zps8739ba23.jpg
    20140107_105132_zps8739ba23.jpg
    79 KB · Views: 174
Alright, abs piece is complete. Not quite got around to putting a stand on my dummy yet to it's still got the gangsta lean.
Next up is pitting the stand on, and pepping the chest brace, neck brace, and then arms.

20140107_151214_zps1c0d5a42.jpg
 

Attachments

  • 20140107_151214_zps1c0d5a42.jpg
    20140107_151214_zps1c0d5a42.jpg
    99 KB · Views: 184
This is coming along nicely! I still have completed Iron Man helmet just waiting for a suit... maybe one day I will see to that:) LOL, still got the gangsta lean!
 
This is coming along nicely! I still have completed Iron Man helmet just waiting for a suit... maybe one day I will see to that:) LOL, still got the gangsta lean!

Yeah lmao. I'm doing the helmet next, I made a deal with my wife. If I can do the helmet to her standards, she'll trust me with the finances to do the rest of the suit. Still got that lean though! Gotta get a stand on that leg lol.
 
Helmet is pepped! Took a little longer than expected but hey, it's done!
Gonna hit it with resin as soon as I've finished this post, time to start making progress.
I have a bet going with my wife, so I'm going to be doing the helmet to completion before I can continue on the rest of the suit so keep posted for updates on that, hopefully they come a little more frequent now.

I finally went with the "ironmansmallchin" model by Samuray, it worked really well and went together perfectly, not like the last one I tried!
This model doesn't seem as edgy either, so I think it'll be easier to finish with the bondo than the last one I did. Scale seems fine, if I did the whole thing over I'd maybe increase the scale by 5% but it's done now so I'm not gonna complain. It fit just great before I put it all together, but I think I'll have to go easy on the foam lining so I can still get my head into it.
20140117_111403_zps556e89c5.jpg
20140117_111351_zps46175c31.jpg
20140117_111328_zps5bab83ae.jpg

UPDATE:
Where there's a will, there's a way.
Stupid 30 degree weather!!

20140117_121433_zps50f07314.jpg
 

Attachments

  • 20140117_111328_zps5bab83ae.jpg
    20140117_111328_zps5bab83ae.jpg
    90.9 KB · Views: 180
  • 20140117_111351_zps46175c31.jpg
    20140117_111351_zps46175c31.jpg
    80.7 KB · Views: 177
  • 20140117_111403_zps556e89c5.jpg
    20140117_111403_zps556e89c5.jpg
    74.1 KB · Views: 180
  • 20140117_121433_zps50f07314.jpg
    20140117_121433_zps50f07314.jpg
    99.1 KB · Views: 164
The halogen light trick worked perfectly, and was considerably less smelly also, perhaps because it dried faster and the fumes escaped all in one, rather than it drying over a period of time. The hardening seems to have worked well, only one real warp to be concerned about but I'm sure I can build that part out to make it symmetrical.

20140118_105342_zps9e099509.jpg

20140118_105350_zps678030a3.jpg

20140118_105356_zps638b08a5.jpg

20140118_105404_zps6f7ca0ad.jpg

Here's the warp I mentioned. One side seems to have risen up slightly. I was considering cutting it and gluing it back down, perhaps I'll try that now and edit this with results. I'll be adding a second coat of resin, a little lighter than the first, just to add a little extra toughness to some more delicate spots, and some tricky parts that I may not be able to get fully with the fiberglass cloth on the inside.
For those following, also, the blue masking tape I used to put the helmet together held up perfectly against the resin, so that answers my previous question about how well it works!

20140118_105423_zps24a9fdbf.jpg

More updates coming soon, have the rest of the day to work on this :]

UPDATE:

Body of the helmet is glassed, not glassing the faceplate due to the detail, and the fact that I absolutely despise fiberglass cloth. I'll rondo that later on once the glass has cured a little, will have pics then!
 

Attachments

  • 20140118_105342_zps9e099509.jpg
    20140118_105342_zps9e099509.jpg
    82.2 KB · Views: 171
  • 20140118_105350_zps678030a3.jpg
    20140118_105350_zps678030a3.jpg
    72.9 KB · Views: 172
  • 20140118_105356_zps638b08a5.jpg
    20140118_105356_zps638b08a5.jpg
    87.4 KB · Views: 179
  • 20140118_105404_zps6f7ca0ad.jpg
    20140118_105404_zps6f7ca0ad.jpg
    83 KB · Views: 173
  • 20140118_105423_zps24a9fdbf.jpg
    20140118_105423_zps24a9fdbf.jpg
    50.2 KB · Views: 176
I managed to level out the top of the face plate some, then hit the whole outside with a second coat of resin. The tape holds up perfectly to the resin so now it's just like new. Once the bondo is on you'll never know!
20140119_205506_zps0855bde0.jpg

I then glassed the inside, and because I couldn't quite get to the face plate details with the cloth (which I hate) I ended up hitting the faceplate with a layer of Rondo, then adding a few small strips of cloth just for additional strength. I'll probably do one more thin layer of rondo tomorrow, finishing the hardening completely, then move onto the bondo.
20140119_205424_zps2f9c470f.jpg
20140119_205409_zpsa1b568b0.jpg

I had a question about glassing though.
Is there any neat way of doing it? I always end up making such a mess... I change my gloves ten times through the process as I keep sticking to everything. I always end up with strands sticking out exactly where I don't want them, and generally having a lot of tidying to do in the end. I pre-cut my squares, lay the resin into the helmet, then begin placing the cloth in piece by piece, pushing it into details with the brush. It sounds neat, but it's a horrible pain and it really just isn
t efficient. Is there another way?
Case in question:
20140119_205453_zpsb4fe5809.jpg
 

Attachments

  • 20140119_205506_zps0855bde0.jpg
    20140119_205506_zps0855bde0.jpg
    86.4 KB · Views: 173
  • 20140119_205424_zps2f9c470f.jpg
    20140119_205424_zps2f9c470f.jpg
    162.1 KB · Views: 157
  • 20140119_205409_zpsa1b568b0.jpg
    20140119_205409_zpsa1b568b0.jpg
    160.7 KB · Views: 184
  • 20140119_205453_zpsb4fe5809.jpg
    20140119_205453_zpsb4fe5809.jpg
    100.3 KB · Views: 187
Fiberglass is always hard. You are making a good decision going with rondo, it is much easier (at least in my opinion). The only problem is weight, but I assume you've got it covered?
 
Fiberglass is always hard. You are making a good decision going with rondo, it is much easier (at least in my opinion). The only problem is weight, but I assume you've got it covered?

Yea I'm being very mindful of the weight added, and therefore using very thin layers of Rondo each time. There's gonna be quite a bit of electronics and mechanics in the helmet once it's complete and I'd have for it to get TOO heavy!

I put the first coat of Bondo onto the helmet tonight, and got about half way through rasping and sanding it down.
20140120_172925_zps1ec9ad0c.jpg
Really happy with how it turned out for this first coat, and can't wait to finish this one up and get the second one going as soon as possible so i can take down a lot of the imperfections and fill out some trouble areas.
I'm trying to maintain those nice crisp, sharp edges that are so prominent in the helmet, but it's working alright so far.
20140120_173850_zpsafb6bc97.jpg
20140120_173859_zps9c328eb0.jpg
20140120_175316_zpsab839855.jpg
20140120_175330_zpsf8c377d2.jpg

The faceplate is already incredibly smooth, so I think i may leave it as is for a time, then throw a very light layer of primer onto it to see where I need to work. The two coats of Resin really helped to smooth things out, and made Bondoing a much easier task.
I need to fill out the right 'cheek' somewhat, and file down the left to keep the symmetry in line.
Tomorow starts my semester though, so I'll be checking in a little less often as of then!
 

Attachments

  • 20140120_173859_zps9c328eb0.jpg
    20140120_173859_zps9c328eb0.jpg
    70.5 KB · Views: 171
  • 20140120_173850_zpsafb6bc97.jpg
    20140120_173850_zpsafb6bc97.jpg
    54.4 KB · Views: 166
  • 20140120_172925_zps1ec9ad0c.jpg
    20140120_172925_zps1ec9ad0c.jpg
    148.2 KB · Views: 155
  • 20140120_175316_zpsab839855.jpg
    20140120_175316_zpsab839855.jpg
    70.1 KB · Views: 165
  • 20140120_175330_zpsf8c377d2.jpg
    20140120_175330_zpsf8c377d2.jpg
    56.7 KB · Views: 164
I commend your progress despite the cold. I have the same issue in pa. Keep working. It looks great.
 
Your work is coming along great!

I commend you on using fiberglass on the inside. I don't know if you did it on purpose, or just because, but I know that on an Iron Man helmet that has the mechanical faceplate, it is (in my opinion) absolutely necessary. Reason being is that once you separate the pieces, the jaw area becomes extremely vulnerable to warping, impact, or stressing. Using a fibrous material embedded in your epoxy seriously strengthens those areas.

Also, I know it is a bit late, but you asked the question earlier about working with fiberglass and limiting the messiness as well as having it lay properly where you want it. I use a spray adhesive first on the inside of the piece I am working with. I let it dry for about 5 minutes so that it becomes tacky. This allows me to position the fiberglass exactly where I want it. Once it is down, I go over it with resin, making sure that all the fibers are encapsulated with it and no air pockets exist.

Looking forward to more progress pics!
 
...use a spray adhesive first on the inside of the piece I am working with. I let it dry for about 5 minutes so that it becomes tacky. This allows me to position the fiberglass exactly where I want it. Once it is down, I go over it with resin, making sure that all the fibers are encapsulated with it and no air pockets...

This is a great tip, this is how I do it when I do use fiberglass.

Your build is still looking GRRRRRRREAT!
 
Status
Not open for further replies.
Back
Top