Jme's H3 MKVI Foam build

Status
Not open for further replies.

Jme

Well-Known Member
Member DIN
S416
Edit

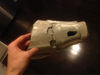
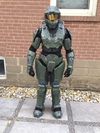
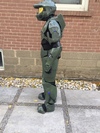
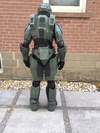
Here is the finished armour

60dbc1c2e2a9f7b8714593f9fef63d00.jpg

be00c773ba078eeb530f04b941a1025f.jpg

ee0ef5833fe60799f15be4798d69e381.jpg

------------------------------


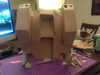
Well it is finally time to start my build. Being married with two kids in lots of activities doesn't leave a lot of time for a build. Over the past couple of months I have stared to prepare templates and cut out pieces.

I have also been playing Halo from the beginning (I received an Xbox One for Christmas). I played the first Halo when it came out, but haven't experienced the whole story until now. I have now played CE, 2, 3 and 4. I am presently playing ODST before moving to 5.

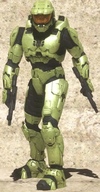
My favourite armour is the iconic MK VI of Halo3 and am really looking forward to this journey. I love to costume and Halo armour is probably my favourite cosplay.

b955a165e7815d3869c5a5f3434baa66.jpg


In advance I really have to give a shout out to LongshotX who's photos I have looked at a hundred times and Spacemeat who's videos are amazingly helpful. Also a big thanks to all of you who are a real inspiration.

In any event, my wife and kids are away this weekend. So here we go..,

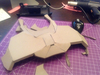
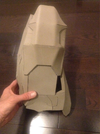
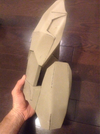
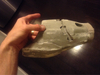
I decided to start with the forearms and am using Flyingsquirel's edit.

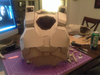
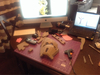
I brought the Mac upstairs to put photos up on (and play Red v. Blue in the background) and set myself up at the dining room table.

a86ce1d98ada897d8f26412383f84def.jpg


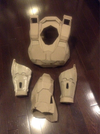
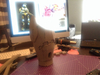
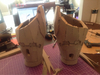
The first forearm took a really long time and is quite a mess. I must have miss-scaled as the forearms were too short. I really didn't want to re-size so I added a cuff at the bottom that I will tapper down with a sander.

39e9dd6bff0a1fb1d61b994f9aad708c.jpg


f899854f0864737bfb5ddf3a0386b6ea.jpg


e34e4140a57127f135dc965c6d753761.jpg


The second one went much faster and is a lot cleaner (although there will still be a lot of sparkle and sanding)

0228f0ab4cbb7e6869ed36d04da81acf.jpg


"I'm just a witness"
 

Attachments

  • 60dbc1c2e2a9f7b8714593f9fef63d00.jpg
    60dbc1c2e2a9f7b8714593f9fef63d00.jpg
    391.2 KB · Views: 301
  • be00c773ba078eeb530f04b941a1025f.jpg
    be00c773ba078eeb530f04b941a1025f.jpg
    389.8 KB · Views: 288
  • b955a165e7815d3869c5a5f3434baa66.jpg
    b955a165e7815d3869c5a5f3434baa66.jpg
    109.8 KB · Views: 211
  • ee0ef5833fe60799f15be4798d69e381.jpg
    ee0ef5833fe60799f15be4798d69e381.jpg
    371.3 KB · Views: 347
  • f899854f0864737bfb5ddf3a0386b6ea.jpg
    f899854f0864737bfb5ddf3a0386b6ea.jpg
    295.8 KB · Views: 273
  • 39e9dd6bff0a1fb1d61b994f9aad708c.jpg
    39e9dd6bff0a1fb1d61b994f9aad708c.jpg
    301.2 KB · Views: 263
  • a86ce1d98ada897d8f26412383f84def.jpg
    a86ce1d98ada897d8f26412383f84def.jpg
    291.6 KB · Views: 282
  • e34e4140a57127f135dc965c6d753761.jpg
    e34e4140a57127f135dc965c6d753761.jpg
    278 KB · Views: 270
  • 0228f0ab4cbb7e6869ed36d04da81acf.jpg
    0228f0ab4cbb7e6869ed36d04da81acf.jpg
    321.2 KB · Views: 258
Apparently I messed up cutting out the biceps (I am too embarrassed to say how) and now am off to print, cut, trace and cut..

(Sigh)


"I'm just a witness"
 
Thanks Chief. I am really pleased with them. They should be nice once filled and sanded. They fit really well over the motorcycle pads.


"I'm just a witness"
 
Oooh! You've finally posted your build! :D
Damn, I really like how you did the forearm gauntlet... and what did you do to the arm piece? O_O
 
Thanks Mara. Actually it's what I didn't do.

I accidentally did the wrong file and ended up with two sets of forearms (different unfolds).

Doh.


"I'm just a witness"
 
This is literally a build in progress...

511e55f1fd264acc30180269ec0d5d71.jpg


"I'm just a witness"
 

Attachments

  • 511e55f1fd264acc30180269ec0d5d71.jpg
    511e55f1fd264acc30180269ec0d5d71.jpg
    338.7 KB · Views: 303
I need to know what foam to use....I was told at Wizard World in Portland, but i totally forgot the name of the foam they told me about, but they said it is relatively cheap..
 
I am using EVA foam mats that I bought at Home Depot

2fff66b5626e27ea34fd0951b7bf7bac.jpg


"I'm just a witness"
 

Attachments

  • 2fff66b5626e27ea34fd0951b7bf7bac.jpg
    2fff66b5626e27ea34fd0951b7bf7bac.jpg
    346.5 KB · Views: 202
Okay, so last night I did one of the bicep pieces.

2dbd71ed3881f9a2e739aa2be0c29d1f.jpg

1af575fe5775a338e55a9c6fbc525a67.jpg


I am not very happy with it though and may re-do it. However today I tried spackle and sanding of one of the forearm pieces. It went really well with the forearm coming out very smooth, so I may keep the shoulder piece and use this technique on it.

a7b6b8716b2fc143e00f14790f6b5708.jpg

6092d4e7a1e70d358b4e154e4805a2cb.jpg


Also today, I got the base chest piece built. I will have to do some detail work, but am very happy with the result.

4f079da1d4a5fa4cc44a9f1a62705083.jpg

c4e1fc18c3668d4c364be594884aa3bd.jpg

8c61ca02eaaf5f3a208df1a14afc937a.jpg


I am really happy that I am using a hot knife as several times I found it necessary to redo pieces. I simply used the hot knife to melt the glue in order to dis-assemble the necessary parts.

Here is what I have so far..

a9fc6957bae6183398092c02f2f451a4.jpg


I am going to cut out the helmet pieces tonight and hopefully get it done tomorrow.
 

Attachments

  • 2dbd71ed3881f9a2e739aa2be0c29d1f.jpg
    2dbd71ed3881f9a2e739aa2be0c29d1f.jpg
    314.5 KB · Views: 226
  • 1af575fe5775a338e55a9c6fbc525a67.jpg
    1af575fe5775a338e55a9c6fbc525a67.jpg
    324.2 KB · Views: 231
  • 6092d4e7a1e70d358b4e154e4805a2cb.jpg
    6092d4e7a1e70d358b4e154e4805a2cb.jpg
    280.3 KB · Views: 297
  • a7b6b8716b2fc143e00f14790f6b5708.jpg
    a7b6b8716b2fc143e00f14790f6b5708.jpg
    261.5 KB · Views: 242
  • c4e1fc18c3668d4c364be594884aa3bd.jpg
    c4e1fc18c3668d4c364be594884aa3bd.jpg
    345.6 KB · Views: 239
  • 4f079da1d4a5fa4cc44a9f1a62705083.jpg
    4f079da1d4a5fa4cc44a9f1a62705083.jpg
    326.2 KB · Views: 234
  • 8c61ca02eaaf5f3a208df1a14afc937a.jpg
    8c61ca02eaaf5f3a208df1a14afc937a.jpg
    327 KB · Views: 278
  • a9fc6957bae6183398092c02f2f451a4.jpg
    a9fc6957bae6183398092c02f2f451a4.jpg
    317.4 KB · Views: 298
Some of the piece safe very rough. I now have a huge appreciation for people who do really clean foam work. However, I am very confident in my ability to fill and sand the rough spots (after doing a stormtrooper build which involved bondo, filling and sanding foam is easy!).


"I'm just a witness"
 
Are, are very rough. Come on auto correct!


"I'm just a witness"
 
Thanks Mesh. I didn't realize how important encouragement is when doing this. It is hard to know if the pieces look good after you have been staring at them for hours. I start to just see the imperfections. Having the opinion of theirs (and stepping away from the build for a bit) really helps.


"I'm just a witness"
 
Yes your doing good! Haven't tried my hand at foam just yet, but I would agree with you that the bicep/shoulder is a little bit on thr rough side. Maybe there is a different file you could use to get the results your looking for. Keep it up!
 
  • Like
Reactions: Jme
1) This will be a great piece of armor when done, no doubt about it. Just keep hammering at it like you're doing now.

2) Don't get me wrong as this is not meant in a negative way : one thing bothered me when looking at the pictures : the "indents" on the chestplate are not the same size. One side looks about twice the size of the other.
Now, normally I would not say anything about this as my armor is far from 100% symmetrical either and depending of the color scheme you're choosing, far more clear "problems" can be "painted into oblivion".
But here's the issue : when your armor is ready, you'll be wanting to put lights in those ports.
Doing so will highlight the size difference.
On my armor, there's a difference of 3mm between left and right side. When the lights are off, it's nearly unnoticalbe due to the dark color scheme I used.
But switched on, I could clearly see the difference. I camouflaged this error by playing with the led diffusor sizes but if you take a moment, you can still tell one side is wider than the other.

Considering the totally fine job you're doing on the rest of the armor, I'd recommend reworking that area prior to processing it further.

Other than that, you could make me an armor any day ! :thumbsup
I suggest reworking both sides a bit to make them look more matched.
 
  • Like
Reactions: Jme
Just what I was thinking. I am going to leave the shoulders until last and look for an easier file. I can always use the templates that I have cut but I had soMe real trouble with this one.

I stared the helmet this morning. I got stuck on the visor but took a good look at Drack's amazing helmet he foamed and figured out a mistake I made. I don't have time to correct it now as the job jar here at the house is calling, but will,pick it back up through the week.


"I'm just a witness"
 
Well, I'll be looking forward to your progress and there's no doubt in my mind you'll do just fine.
I think personally that unless you've got seas of time and money, there's no way to get all the problems out. There will Always be "something" which you don't like. The question is "will others see it".

As you said : after a short while you'll start to see more and more "flaws", and looking at some of the other peoples stuff doesn't help either as they have a tendancy to look _better than your own stuff_ I've noticed.
But I'm sure THEIR stuff has its flaws too, which _only THEY can see_ so do NOT EVER let stuff like that slow you down.

I went to my first con in my suit yesterday, knowing full well it is NOT as good as I tried to make it look and it still has room for improvement. You know what ? Nobody, litterally nobody said or saw anything wrong with my MKVI. I got nothing but praise and "good job man" comments so I guess the lesson in this is : do NOT stare yourself blind at the amount of errors you're making.
They do not really matter unless you're looking for a cosplay competition-level end product, something I'm not nearly good enough for.
But when you're going to highlight certain parts of an armor by putting lights in them, THOSE parts should be as clean as possible as your armor will be judged on the things that have the biggest visual impact.
On my very dark armor, the light port areas are very much 80% of the first impression so put extra effort in those.
 
Kaween touched on a few good points, there.

Jme, you're doing a wonderful job by forking out this much progress in a matter of days. Keep in mind to not rush the project either. That will certainly cause you more headaches than it's worth. There's great potential here, especially from your previous projects. I look forward to following this build. :cool
 
  • Like
Reactions: Jme
Status
Not open for further replies.
Back
Top