Mjolnir Mark VII Build Thread - Halo Infinite

Status
Not open for further replies.
Small update:

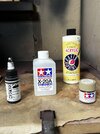
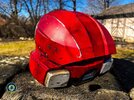
Materials are finally here after almost two weeks of waiting. Now I’ll be able to cast time final plate carrier with its urethane foam backing. I also recently finished my Master Chief helmet (build coming after this) and I wanted to see what it looked like up against my neck seal & plate carrier.
WARNING ITS VERY SEXY!


Next I’ll be getting all the components for the left arm cast along with the side straps and back plate for the plate carrier. Hoping to have the entire upper body done at the end of the month.
 
Onward! The Epoxy back pressure plate is now set, next I’ll be tapping a couple holes in and casting the final Chest section of the plate carrier. This time it’ll be urethane rubber, skinned with foam. Hopefully I’ll be pulling that out this week!

82ECBC56-702D-43CD-B799-654BB55826E0.jpeg


I still need to mold the left forearm, finish the mold jacket on the left bicep and I should have those pulls done too. Hopefully sometime before the end of this month!
 
Last night, well after some thought I decided the plate carrier should be cast in rigid vs rubber. Being that I don’t believe it would cause me any mobility issues. The right one (pictured) is the cast. Made with TC-808 Jet Black Resin.

6F2D7D0C-5D53-46E0-837C-6128563EB285.jpeg


I also cast and skinned the left bicep as well. So now I have both!! These are in rubber. Which work great with overall mobility and the muscle movement in my arms and they’re super durable!

0598CEFF-1AE1-4C88-A27D-9E728EA5B449.jpeg


Still need to clean up the urethane foam on this insides. Next I’ll be casting the left forearm, hand plates and deciding which shoulder attachments I want to go with for my final build. Although I’ll eventually make the majority of attachments to keep things interesting!

E20C1467-C86D-4797-8699-F96FA7A30F51.jpeg
 
Pssst, I did a thing..
Finally had a chance to get my Mark VII helmet under some chrome! I used Imperial Surface Shrapnel for this. Since it’s tougher than Alumaluster, doesn’t require a top coat and I can paint/weather over it and not worry too much about messing up the chrome.

8FBF90C9-88BE-4998-9CD3-E5660E9807AB.jpeg

3699D671-EA4C-47E7-9548-5008A5EC3926.jpeg


Next I’ll be masking off areas for the next year because this helmet has so much detail, haha!
Adding Liquid Latex for that sexy chipping and scraped paint look.

I’m going with the Faded Blush armor coating for my set. I’ll probably end up darkening the pink to a lighter red hue and hopefully (if it works out) adding some Ghost Digital Camo in the white areas for a little extra flair!
 
Started painting the colors on tonight. Not going to lie the latex masking on this helmet was a bit of a pain in the rear, but the pay off is oh so sweet.

3F9EF0B7-9E96-48FA-82E3-EC85E5CE027A.jpeg


After the Liquid Latex was applied I masked with tape and plastic bag the bill to apply the white. Instead of using some expensive paints I opted to use some $2 Acrylic from Hobby Lobby. I thinned it with acrylic thinner 2:1 and darkened it a bit with Golden Carbon Black. The results is a color I dubbed “Cement White”.
6FCDB2FE-9BC0-46AE-8A7B-E5F95A159B30.jpeg

Some back masking and I mixed up the red with some of this “Cement White” and a touch of Shading Grey.
BBFAFC57-9B51-41AA-B947-95E2B6C2F021.jpeg

After letting this all dry I removed the liquid latex, masking tape, blah blah. Since this is very thinned acrylic paint it will need a top coat, BUT the glory in this is you can wet a cotton swap or napkin and essential wipe away the paint and add more chipping, scratches etc…
7BCA82BC-4FDD-44B4-AE0D-E0CA82B6B885.jpeg


Oh I’ve settled on the Faded Blush Armor Coating if I haven’t mentioned it before! I’ll be wrapping this up tomorrow and posting more sexy pics then!
 

Attachments

  • 0CDC7092-C75C-4EEF-BB54-A91418F13738.jpeg
    0CDC7092-C75C-4EEF-BB54-A91418F13738.jpeg
    1.5 MB · Views: 83
Helmet Done! Really pleased with how this turned out!
 

Attachments

  • 2C71DD05-78E2-4BA5-A483-AD4C01B41AA7.jpeg
    2C71DD05-78E2-4BA5-A483-AD4C01B41AA7.jpeg
    542.2 KB · Views: 100
  • 80A14F97-B085-4777-833A-AABDDB976749.jpeg
    80A14F97-B085-4777-833A-AABDDB976749.jpeg
    408.9 KB · Views: 107
  • 1B45A3ED-6A2A-460D-95FE-376788EC7A82.jpeg
    1B45A3ED-6A2A-460D-95FE-376788EC7A82.jpeg
    392.3 KB · Views: 98
  • A6F1CEA9-6EDD-4381-9866-B164F03F4B28.jpeg
    A6F1CEA9-6EDD-4381-9866-B164F03F4B28.jpeg
    472.1 KB · Views: 106
  • 7D160D46-8679-415F-B733-E3DFE4015BCE.jpeg
    7D160D46-8679-415F-B733-E3DFE4015BCE.jpeg
    538.5 KB · Views: 94
  • 46BC8FCF-E5A3-4C95-B926-BFAAD82ECA1C.jpeg
    46BC8FCF-E5A3-4C95-B926-BFAAD82ECA1C.jpeg
    512 KB · Views: 100
  • FC2FC0E2-D45C-431D-8153-E4CABB85A001.jpeg
    FC2FC0E2-D45C-431D-8153-E4CABB85A001.jpeg
    511.5 KB · Views: 102
Status
Not open for further replies.
Back
Top