Multi-Gen Mojlnir armor overhaul (Pep and freehand)

Weekend Update!!

all base work on the boots is done.

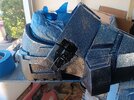
First thing first, I needed to tear down the old boots for their hardware.

20240210_115638.jpg

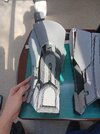
then I needed to do my cutouts.
20240210_115647.jpg20240210_115645.jpg

Then I added the salvaged hardware and finalized any design requirements.
20240210_122124.jpg20240210_122121.jpg20240210_122130.jpg20240210_122824.jpg20240210_134839.jpg20240210_122820.jpg

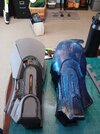
From here it was time to add my rubber soles. (don't forget your PPE)
20240210_144530.jpg20240210_144540.jpg20240210_144431.jpg20240210_145125.jpg

After a full day of being clamped together, I reassemble the boots.
20240211_113543.jpg


From there, things are just kinda history. I do my test fitting and walk around a bit to make sure the mounting is stable and that they are comfortable enough to wear. I am really happy with these and they are a significant improvement from the old boots. I cannot rock my ankles with the new boots so things are much more stable. there is also the advantage of being the right size of shoe. (the old boots were 2 sizes too small and had just stretched out over time)

Any way here are to last of the pictures:
20240211_114952.jpg
20240211_115005.jpg
20240211_115133.jpg
20240211_115204.jpg


Until next time!
 
alright! big weekend update!

I would say I am out 70-80% complete with the build process and then I can move on to the paint.

I am also satisfied with the scale of the boots as they seem to match up all right with my current shins. (which are the next items on my rebuild list)

In any case, have some pictures! I expect that I will be able to finish the build process this week (barring unforeseen problems)

See you guys in the next one!

20240302_191926.jpg20240302_200856.jpg20240302_200851.jpg20240303_180838.jpg20240303_180851.jpg
20240303_211058.jpg
20240303_211047.jpg
20240303_211038.jpg
20240303_211054.jpg
20240303_212114.jpg
20240303_212105.jpg
 
alright! The boots are built.

pretty happy with how they have turned out, and they are only a little bit larger than the old boots.
They are about 1 inch longer and a little over 1 inch wider than the old boots.

Have some pictures:

20240307_171921.jpg
20240307_171941.jpg
20240307_171949.jpg
20240307_171929.jpg
20240307_172142.jpg
20240307_172126.jpg
20240307_172136.jpg
 
Alright! Here it is, the big weekend update!

The boots are done!

They have been weathered and test fit and they are ready to action!

Enjoy some pictures of my process!

First step first (2 coats of plasti dip)
20240309_114022.jpg

Then 2 coats of base color:
(coat 1)20240309_122948.jpg
(coat 2)20240309_151236.jpg

Then a round of weathering on top of the base coat:
20240309_155234.jpg20240309_155229.jpg20240309_155240.jpg20240309_155243.jpg

Adding the black ground exposure weathering:
20240309_155459.jpg20240309_155449.jpg20240309_155456.jpg20240309_155447.jpg

Time to paint the buckle:
20240309_160651.jpg 20240309_161125 (1).jpg20240309_161125 (1).jpg

Then a second layer of weathering
20240309_172541.jpg20240309_172546.jpg20240309_172551.jpg20240309_172553.jpg

And there we have them all done and finished:
20240309_173102.jpg
20240309_173112.jpg
20240309_173121.jpg
20240309_173129.jpg


And one last comparison to the old boots:
20240309_173149.jpg


Then some test fitting:
20240309_175017.jpg
20240309_175027.jpg
20240309_175215.jpg


I also managed to finish up the other forearm with the tac pad:
20240309_155558.jpg20240309_155607.jpg20240309_155555.jpg

The next project is clear though. My shins are about 2 inches short and are a bit too small in places now. so that rebuild is what is up next!

Until next time!
20240310_203801.jpg
 

Attachments

  • 20240309_161125.jpg
    20240309_161125.jpg
    4.6 MB · Views: 10
Last edited:
so it begins...

I finally got a batch of filament for my 3d printer. and I ran a test print of the cortana chip.

I then spent the better part of an afternoon cutting down and correcting the MoeSizzlac MK IV helmet.

The process is most definitely arduous. and getting the stl cutdowns to be "watertight" or complete was a pain. but I did finally manage that and started the print process.

I am also going to get started on the shins this week hopefully. and if I scaled it right the 3d print time for the helmet should be done sometime next week!

enjoy the pictures:
20240403_170833.jpg
20240403_205947.jpg
20240403_205928.jpg
20240404_071341.jpg
20240404_073511.jpg
 
weekend update!

I finished the 3d print of the new MK IV build, I am extra happy because the scale of the helmet is within about a centimeter of my original Pepakura. Almost unbelievable to me is that it is actually easier to put on and take off than the original build.

You can see in the comparison pictures where the original is deformed by my hasty build speed when hardening.
20240407_212706.jpg
20240407_212743.jpg
20240407_212805.jpg
20240407_212716.jpg
20240407_212911.jpg


i also experienced my first near print failure on the last piece of the build. one of my support trees failed to print normally and so I was forced to take some drastic measures to ensure build success. using my 3d printing pen, I taped across a number of supports (being carful not to cross the build itself) and built up an area for the support tree to "float" in place. and it worked!
20240407_153401.jpg
20240407_153405.jpg
20240407_155145.jpg


Hopefully, I have another update for you next week on the shins!

Well here are the rest of the build progress pictures:
20240405_170644.jpg
20240405_170718.jpg
20240405_170245.jpg
20240407_110249.jpg
20240407_110259.jpg
20240407_110324.jpg
20240406_093625.jpg
 
Been looking through your thread. Pretty clever, I've never seen anyone use those buckles you used on your boot armor.
Seems almost easier than using them than having to rig in snap clips and elastic. Nice work
 
Been looking through your thread. Pretty clever, I've never seen anyone use those buckles you used on your boot armor.
Seems almost easier than using them than having to rig in snap clips and elastic. Nice work
The buckles on the boots are largely cosmetic. but they will allow me to remove the upper from the boot to access more of the shoe if I need to.

Alrighty folks time for a progress update!

The 2.0 MK IV shins are about 60-70% complete. And I am very happy with them. nearing the end of my build time yesterday it occurred to me that I should test to see how they fit with the boots. and they are so clean. I have made no extra cuts or done any shaping they just fit!

20240415_170849.jpg


Well, enjoy the pictures!

20240413_122108.jpg
20240413_161401.jpg
20240413_171513.jpg
20240413_171512.jpg
20240413_211107.jpg
20240414_123027.jpg
20240414_185229.jpg
20240414_171516.jpg
20240415_153736.jpg
 

Attachments

  • 20240414_171524.jpg
    20240414_171524.jpg
    1.5 MB · Views: 0
  • 20240414_185241.jpg
    20240414_185241.jpg
    1.6 MB · Views: 0
well, I have a really quick update for everybody.

I have started working on the back of the shins.

I hope to have these completed this weekend. well enjoy the picture:
20240423_181841.jpg
 

Your message may be considered spam for the following reasons:

If you wish to reply despite these issues, check the box below before replying.
Be aware that malicious compliance may result in more severe penalties.
Back
Top