Subnova
New Member
Dear Fellow Spartans and ODST,
I have a long way to go but I hope my experiences here help us all with our costume building.
This thread I will try to keep regularly updated, however I may go quiet for periods due to work and my carers duties.
I will start out with the specs of my equipment and why I chose these things, please note I do a lot of tinkering work on equipment and materials so some choices can come out of left field, if asked I will do my best to clarify in time, please note all of this works for me, some things you may need to take into consideration is your environment when 3D printing, this includes ambient temp, personal experience etc, what may work for me may not work as intended for you, I'm happy to do my best to assist.
A BIG NOTE HERE JUST BECAUSE I DO NOT MENTION DURING THE STEPS IF I USE RESPIRATORS, GLOVES AND GOGGLES, DOESN'T MEAN I AM NOT USING THEM I WILL ALWAYS RECOMMEND WHEN USING PRODUCTS TO MAKE YOUR ARMOUR YOU NEED TO READ MSDS SHEETS AND WEAR APPROPRIATE SAFETY GEAR WHEN WORKING ON GEAR EVEN IF IT IS NON-TOXIC.
SAFETY EQUIPMENT I USED:
I will update this list as I go along.
I'm working on a few photos so expect an update tonight or tomorrow morning, would like to review my pictures and info as I go along
My method:
Because my 3D printer is an FDM unit, I want to adopt a similar style to building my armour because of the small build plate area,
(220x220x250)
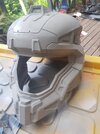
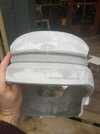
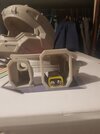
This while small is still no joke to work with, I had to spend some time optimize my printer so it could efficiently print out parts for being welded together with SUNLU 3D pen, however I believe ahead of time this could become an issue, maybe I could opt to use sticky tabs to line up all the print jobs then weld them together internally then putty the outside before finishing and strengthening the build, so what am choosing to make a set of reach operator armour with the grenadier front (big ol tube for snacks or power).
So first things first I setup my CURA with the best settings for me for printing, I did several overhang tests and found i could tolerate prints without supports up to 65 Degrees, this saves on so much fillimant usage for supports.
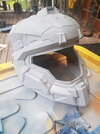
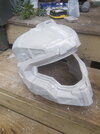
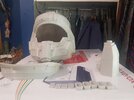
Furthermore I elected to slice up the helmet to allow for efficient printing, however slicing can create line up issues and may either require re-printing or body work to fit together.
So after scaling the Helmet first in CURA (I constructed a sample size of my head in a 3D application and then checked how well the mask will fit to me).
I sliced it in the Microsoft 3D builder and oh boy was that a lot faster and better than Meshmixer.

I then Saved each file as an OBJ and inserted them into CURA.
To cite and give credit where credit is due, the creator of the helmet is Nerd Forge Designs, an undeniably friendly person to work with and has a lot of high quality reach gear and suits to sell.
The shops twitter: https://twitter.com/NerdForgeDesign
Their ETSY: NerdForgeDesigns on Etsy
I have a long way to go but I hope my experiences here help us all with our costume building.
This thread I will try to keep regularly updated, however I may go quiet for periods due to work and my carers duties.
I will start out with the specs of my equipment and why I chose these things, please note I do a lot of tinkering work on equipment and materials so some choices can come out of left field, if asked I will do my best to clarify in time, please note all of this works for me, some things you may need to take into consideration is your environment when 3D printing, this includes ambient temp, personal experience etc, what may work for me may not work as intended for you, I'm happy to do my best to assist.
A BIG NOTE HERE JUST BECAUSE I DO NOT MENTION DURING THE STEPS IF I USE RESPIRATORS, GLOVES AND GOGGLES, DOESN'T MEAN I AM NOT USING THEM I WILL ALWAYS RECOMMEND WHEN USING PRODUCTS TO MAKE YOUR ARMOUR YOU NEED TO READ MSDS SHEETS AND WEAR APPROPRIATE SAFETY GEAR WHEN WORKING ON GEAR EVEN IF IT IS NON-TOXIC.
SAFETY EQUIPMENT I USED:
- Half respirator quick release mask
-
- Nitrile gloves (Heavy duty) black
- 3M 6000 Series Cartridge/P100 Particulate Filter Combinations Multi-gas/organic (because I dislike getting stuff in my lungs)
- 3M Organic Vapour Cartridge Filter 6051
- Chemical resistant goggles (only got one set of eyes)

- 3D printer: Creatly Ender 3 V2
- This fantastic printer is a build between cost effectiveness and quality.
- I have modified it to last of a longer time using ferrules.
- I have modified the firmware to Jayers firmware.
- I have spent a bit of time optimizing my CURA software for the most efficient print layout (matching cost vs quality)
- I'm using PLA+, (while ABS or ASA is a fantastic material to use and has merits above PLA/PLA+ I am concerned with the quality of air and how toxic the fumes of ABS/ASA is I have a small bird).
- I've made adjustments (quality of life mods) to my printer to help with filament feeding and z axis support.
- Software used:
- Microsoft 3D builder (Fantastic for slicing better than Meshmixer as Meshmixer is no longer supported by Autodesk).
- Ultimaker Cura (Great Slicer when used right).
- Armoursmith designer (Fantastic for pre-sizing OBJ/STL files)
- SUNLU 3D Printing Pen:
- Great Cheap 3D Printing Pen for Welding pieces together.
- Supports a number of fillimants and also has adjustable temperature and speed (speed adjustment is a bit meh but for $80AUD I ain't mad)
- Problems with this pen, its printing flow is continous so you will have to practice with this pen.
- Paints and Paint stuff
- Tamiya spraypaints (for Plastic)
- Primer
- Colours (several)
- Shell semi-clear gloss
- Painters tape
- 240 grit sand paper
- 380 grit sanding block
- Tamiya spraypaints (for Plastic)
- Additonal stuff
- Selleys Power grip step 1 step 2 pack for bonding pieces.
- Tamiya Epoxy Putty (Smooth Surface) for filling (should of used this earlier in the process)
- Magnets special order (zinc casing neodymium magnets rated at 1.5Kg->3Kg hold weight)
I will update this list as I go along.
I'm working on a few photos so expect an update tonight or tomorrow morning, would like to review my pictures and info as I go along
My method:
Because my 3D printer is an FDM unit, I want to adopt a similar style to building my armour because of the small build plate area,
(220x220x250)
This while small is still no joke to work with, I had to spend some time optimize my printer so it could efficiently print out parts for being welded together with SUNLU 3D pen, however I believe ahead of time this could become an issue, maybe I could opt to use sticky tabs to line up all the print jobs then weld them together internally then putty the outside before finishing and strengthening the build, so what am choosing to make a set of reach operator armour with the grenadier front (big ol tube for snacks or power).
So first things first I setup my CURA with the best settings for me for printing, I did several overhang tests and found i could tolerate prints without supports up to 65 Degrees, this saves on so much fillimant usage for supports.
Furthermore I elected to slice up the helmet to allow for efficient printing, however slicing can create line up issues and may either require re-printing or body work to fit together.
So after scaling the Helmet first in CURA (I constructed a sample size of my head in a 3D application and then checked how well the mask will fit to me).
I sliced it in the Microsoft 3D builder and oh boy was that a lot faster and better than Meshmixer.
I then Saved each file as an OBJ and inserted them into CURA.
To cite and give credit where credit is due, the creator of the helmet is Nerd Forge Designs, an undeniably friendly person to work with and has a lot of high quality reach gear and suits to sell.
The shops twitter: https://twitter.com/NerdForgeDesign
Their ETSY: NerdForgeDesigns on Etsy
Last edited: