My Armour Creation Journey (Helmet)

Status
Not open for further replies.
Cheeky update for final paint (I did some dry brushing), before I add the shell coat I'm going to do some pre drilling for mounting Holes inside the helm, I'm hoping with the dry brushing to provide kind of a road rash look mixed with a work look, like this spartan has taken off his helmet some times at the end of the day.

20211115_191601.jpg
20211115_191605.jpg
 
Last edited:
Annnnnd, I'm alive, do not recommend getting covid, recovery and the sickness was rough.

As an update I've received some fans, LEDs, magnets, epoxy putty, perspex, and some nicknacks for my helm.

I have fitted the magnets in so the back neck plate clicks in properly.
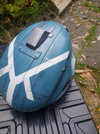
I have finally applied the clear shell coat and the helm looks, amazing, the wearing and the weathering I have put the helm through has paid off.
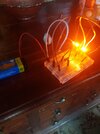
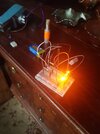
I have spent some time also building the circuit and boy oh boy does it look good.

Forgive the mass post of pictures, just excited to be back.
20211120_180018.jpg


Setting up the eva foam and the cushioning foam.

20211205_225129.jpg


Setup of some LED's using 9V

20220106_134149.jpg


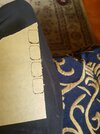
Setting up the template on the perspex for cutting.

20220106_150054.jpg


Finished cut, may need to sand edges (Can just hotglue gun the edges).

20220106_151607.jpg


I had a bit of a concern that the weathering i put on the helm would be effected by the clear coat, but it made the helm even better!
20220106_151613.jpg


If anyone has any advice regarding fitting the perspex I would appreciate it, I want to make the fit as tight as possible in this situation.
 

Attachments

  • 20220106_151617.jpg
    20220106_151617.jpg
    1.5 MB · Views: 133
  • 20220106_150642.jpg
    20220106_150642.jpg
    1.6 MB · Views: 132
  • 20211206_192122.jpg
    20211206_192122.jpg
    1.1 MB · Views: 129
  • 20211206_192117.jpg
    20211206_192117.jpg
    1.4 MB · Views: 141
Nailed the colours, I'm loving it. When I did the perspex visor on my warrior I heated the piece up and then pushed it into the hole from the inside so it molded around and sealed to the opening. That was only a small visor on that helmet might be a bit more trick with a larger one
 
Hello Esteemed Spartans,

I have done it, a big thankyou to you all for your advise and assistance, i will be spending extra time on detailing and fixing up the wiring, (the black dots are where the foam goes I made it so it Velcros to the inside).

I used the heat gun method mentioned by NEMES1S warp the visor as best as possible then I used the epoxy putty to act as the bonding agent and filler for visor placement, I'm using clamps and a small blowtorch to make sure it melds in properly.
20220116_163034.jpg
20220116_163043.jpg
20220116_164318.jpg
20220116_185759.jpg

After this dries, I will place in the foam, and the wiring, and then I will post up the final lighting and fan assembly, this may take me some time, (If anyone was interested in knowing, I do archery and my plunger slot just popped out and that spurred me on to finish the visor), Behold! The base operator helmet!
20220116_191751.jpg


A note for now, I will be making an EOD helm for a friend so I'll make another more efficient thread, and enjoy and share the armour making adventure!
 
Status
Not open for further replies.
Back
Top