My first build- Halo 4 MkVI foam

Status
Not open for further replies.
I
Thanks everyone for the complements. Yes I did use the band saw when I cut these pieces. On the shoulder and bicep pieces I cut with the blade knife. I liked the way the pieces came out when I used the saw better. It also was faster cutting time. It was tricky cutting the 45 degree angles on some of the pieces. Next up are the shin and hip pieces. Getting excited been looking at what cons are in this area just might go just to get an idea what happens at them.
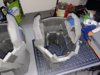
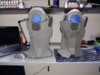
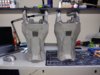
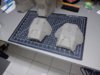
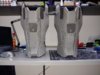
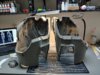
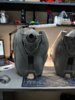
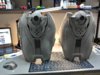
Agree the bandsaw is faster, but in my experiance it is easier to not have a straight line and mess up cuts. Especially when it is curves and angles. A knife will be much more clean. I love the bandsaw to cut sheets that have been glued ontop of each other so it is incredibly thick, yet easy to get a good pass. Downside with the bandsaw is your edges get fuzzy and have a billion little jutting teeth and lines. Try sanding the edges a little before gluing and hopefully that will clean it up
 
Yea I knew it was going to leave lines on the edges. I realized it was going to make more work for me on the finishing end. also you do have to have a very steady hand using the band saw. I will probably go back to the knife on the next pieces. I also thought the heat gun would get rid of the fussies. It does some not all. Yea I have some sanding and filling ahead of me. Thanks again for all the complements and advise. You all are awesome.
 
Using a band saw is possible. Bill Doran of Punished Props and SKS Props have mentioned using it before. A certain blade is needed to help minimize rough cuts and the fuzzing, plus using a High Density foam helps too. As for fuzzy stuff sanding (as mentioned by others) and using a heat gun can shrink those away.
 
Using a band saw is possible. Bill Doran of Punished Props and SKS Props have mentioned using it before. A certain blade is needed to help minimize rough cuts and the fuzzing, plus using a High Density foam helps too. As for fuzzy stuff sanding (as mentioned by others) and using a heat gun can shrink those away.
I believe Ashuraa uses a high TPI metal cutting band, I use a reversed wood cutting band (cutting with the non-blade edge) and both give you heat sealed perpendicular cuts.

A knife is usually more accurate for small detail work but sometimes you just have to use powertools and kick some butt.
 
Yes. We use a metal cutting saw blade. We can cut both directions with it.

Being able to set the bevel and have them come out the same way every time is beneficial
 
I am starting to build the Shins. I downloaded halo-4-mjolnir-gen2-mark-vi-master-chief-armor-1.2 patterns. The pattern for the back piece of the shin doesn't make any since. It looks like it has cuts over cuts. I also downloaded the patterns that pretzelslocker has. There are more pieces and they too have complicated cuts. I have down loaded some reference files, and they show a the 3d view of the shin and to the right totaly different pattern. I can't find these to down load. Can anyone help me out here.
 
I am starting to build the Shins. I downloaded halo-4-mjolnir-gen2-mark-vi-master-chief-armor-1.2 patterns. The pattern for the back piece of the shin doesn't make any since. It looks like it has cuts over cuts. I also downloaded the patterns that pretzelslocker has. There are more pieces and they too have complicated cuts. I have down loaded some reference files, and they show a the 3d view of the shin and to the right totaly different pattern. I can't find these to down load. Can anyone help me out here.
Can you post a picture to give a further example? I am pretty sure you are talking about overlapping lines. This will happen sometimes due to complicated shapes. I'm pepakura you can usually change the shape of the peice to fix this problem, but because you are working with foam, depending on the shape, you can usually ignore the line and just cut out the outside of the shape and fold the foam accordingly
 
Here is the part I'm talking about.
 

Attachments

  • Annotation 2019-07-29 223115.png
    Annotation 2019-07-29 223115.png
    42.2 KB · Views: 233
Hold up here, guys. This exact piece kicked my butt and I went through 4 or 5 shins altogether before I got it right.

First of you don't need to adjust the pattern all that much. Lieutenant Jaku has the right idea with where the red lines are, go ahead and cut there. But what made it all make sense to me (I'm sorry, Kenneth Morgan) is when I looked up angelegend's tutorials on YouTube. He is long winded and a little full of himself, so you'll have to endure that, but if there's one thing he knows it's this. His videos helped me a lot. Mostly. He lacks a lot of detail, though. Despite what he says.

Give those a look before you go too far. It'll save time and resources in the long run.
 
Last edited:
Thanks for the ideas Lieutenaunt Jaku and Sean. With what y'all have said and me sitting here looking at the file and have gotten a better idea on what to with the parts. This peticular foam file does not have all the patterns and I am thinking that is because both sides are close to being the same. With a few exceptions like added details. Yea Sean I understand what you are saying. Yea, he can be long winded :), and I do agree he does have some informative tutorials. I have used his tutorials so far in what I have built. It has helped me alot.
 
I finally figured out how I wanted to build the shins. I used 2 different patterns to get the look that I was wanting. I feel real good about them, and I didn't have to build one to practice with. I made both of the sides the same. That made them ambidextrous. I just liked the look. Have a lot to do to finish them, seal the joints and smooth out all the edges. Here are some pictures. Let me know what you think. Thanks.
 

Attachments

  • thumbnail (1).jpg
    thumbnail (1).jpg
    182.9 KB · Views: 206
  • thumbnail (2).jpg
    thumbnail (2).jpg
    122.5 KB · Views: 204
  • thumbnail (3).jpg
    thumbnail (3).jpg
    137.8 KB · Views: 177
  • thumbnail (4).jpg
    thumbnail (4).jpg
    146.1 KB · Views: 213
  • thumbnail (5).jpg
    thumbnail (5).jpg
    130.8 KB · Views: 227
Continuation of my build. I have competed the thighs. Here are some pictures. Am I missing anything? They seem a little flimsy. I was thinking of adding some parts to the inner part of the thighs. I know that is the under suit there but it seemed like it would help having something there. What do y'all think? I am thinking when I coat the inside with shoe goo or what ever they will harden up some. Any suggestions or comments are greatly appreciated. Also my armor pieces are stacking up. How do y'all store them?
 

Attachments

  • thigh 1.jpg
    thigh 1.jpg
    139.5 KB · Views: 204
  • thigh 2.jpg
    thigh 2.jpg
    182.1 KB · Views: 203
  • thigh 3.jpg
    thigh 3.jpg
    156.9 KB · Views: 156
  • thigh 4.jpg
    thigh 4.jpg
    139.5 KB · Views: 201
  • thigh 5.jpg
    thigh 5.jpg
    150.9 KB · Views: 208
This is really clean! I can't wait to see what comes next!
 
Hi All, It's been awhile since I posted on my build. Holidays and getting stuff worked out. So I have started on the chest piece. I cut out all the patterns. Oh Wow this is intense. I wanted the center back piece to look more like the pictures I've seen so I changed the pattern up. It took some time but this is what I came up with. What do y'all think?
 

Attachments

  • middle back chest.jpg
    middle back chest.jpg
    133.4 KB · Views: 205
  • middle back chest 2.jpg
    middle back chest 2.jpg
    116.4 KB · Views: 184
Status
Not open for further replies.
Back
Top