- Member DIN
- S149
Hey all! I'm new around here so please forgive me if I make some mistakes or don't format all too well, but welcome to my journey!
Quick rundown: This suit will be primarily 3D printed, as I love my printers and loving making stuff with them, and frankly I'm not brave enough (or well equipped enough) to venture into foamsmithing just yet. So as that is the case, my tools are my printers (A Creality CR10 and modded Ender 5 Plus), spray paint rattle cans, sandpaper, painter's tape, and my own two hands!
! I Will Be Adding Parts as I Complete Them !
Part 1: The Helmet!
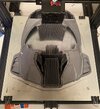
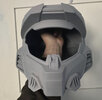
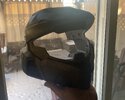
To start I got to work printing it, and for the model I checked over my options and found that our very own Moe Sizzlac had made quite a nice one and went with that. Now personally I fell in love with the Mark VII on sight, but I never really liked the chin piece, so for my helmet I have chosen to omit it, but leave the rest intact. Now this file came as one big piece, so I simply took my jolly butt into Meshmixer and sliced it into 4 easy-to-print, low support usage parts, and then got printing! For this particular part I used my CR10, and solely that machine; now this took me about a week straight of printing, but the result was very much worth it!
Upon completing the printing process I moved onto the next step, sanding! As anyone who has sanded a print can tell you, this part isn't exactly fun, but start low grit and then get that grit up high and you'll do just fine. (Don't forget a mask for all that dust however) Now if you don't hate yourself, what you can do is pick up some enamel spray paint and put down one, nice, even coat on your print after sanding it right off the print bed. Next get yourself some sand-able primer and hit it with a few coats, this way the enamel paint evens out the surface and eliminates most remaining layer lines. Be sure to not sand again till you get to the primer, trust me that enamel paint will gunk up sandpaper like it's no one's business! Once I finished sanding the primer I moved on, hit the helmet with some black enamel paint, taped off what I needed, and then did the same for the blue and gray, a nice, easy, rinse and repeat.
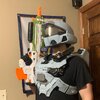
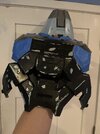
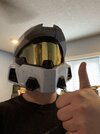
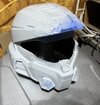
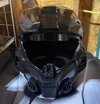
What was the result? The helmet you see now, though I did decided to take a razor blade and add some paint scraping and scratching. (Be careful if you chose to do this yourself.) Finally, I added the visor, I went silver initially, but I really think the gold is growing on me!
Thanks for reading ya'll, have a nice day, and happy cosplaying!
Quick rundown: This suit will be primarily 3D printed, as I love my printers and loving making stuff with them, and frankly I'm not brave enough (or well equipped enough) to venture into foamsmithing just yet. So as that is the case, my tools are my printers (A Creality CR10 and modded Ender 5 Plus), spray paint rattle cans, sandpaper, painter's tape, and my own two hands!
! I Will Be Adding Parts as I Complete Them !
Part 1: The Helmet!
To start I got to work printing it, and for the model I checked over my options and found that our very own Moe Sizzlac had made quite a nice one and went with that. Now personally I fell in love with the Mark VII on sight, but I never really liked the chin piece, so for my helmet I have chosen to omit it, but leave the rest intact. Now this file came as one big piece, so I simply took my jolly butt into Meshmixer and sliced it into 4 easy-to-print, low support usage parts, and then got printing! For this particular part I used my CR10, and solely that machine; now this took me about a week straight of printing, but the result was very much worth it!
Upon completing the printing process I moved onto the next step, sanding! As anyone who has sanded a print can tell you, this part isn't exactly fun, but start low grit and then get that grit up high and you'll do just fine. (Don't forget a mask for all that dust however) Now if you don't hate yourself, what you can do is pick up some enamel spray paint and put down one, nice, even coat on your print after sanding it right off the print bed. Next get yourself some sand-able primer and hit it with a few coats, this way the enamel paint evens out the surface and eliminates most remaining layer lines. Be sure to not sand again till you get to the primer, trust me that enamel paint will gunk up sandpaper like it's no one's business! Once I finished sanding the primer I moved on, hit the helmet with some black enamel paint, taped off what I needed, and then did the same for the blue and gray, a nice, easy, rinse and repeat.
What was the result? The helmet you see now, though I did decided to take a razor blade and add some paint scraping and scratching. (Be careful if you chose to do this yourself.) Finally, I added the visor, I went silver initially, but I really think the gold is growing on me!
Thanks for reading ya'll, have a nice day, and happy cosplaying!
Attachments
-
 ACBE3CB9-684D-4786-A6D0-55CD40636B26.jpg3.4 MB · Views: 254
 -
 FD5CDC35-6CE2-434F-AEDE-B46A19B623F0.jpg976.3 KB · Views: 241
 -
 458A178A-D9EC-4EBC-A18E-AE0278A5A560.jpg631.8 KB · Views: 266
 -
 E0C2CC2E-AAB4-4548-856F-FA3E6E09C0F0.jpg3.8 MB · Views: 261
 -
 65B53610-9766-4B2C-AB64-7AA83DC3CC1E.jpg3.9 MB · Views: 227
 -
 F05CE5F1-1631-4368-BC6E-EEBB244E281B.jpg774.6 KB · Views: 221
 -
 457EFEA6-4E11-468D-908A-EC78DD0E7CE2.jpg3.1 MB · Views: 227
Last edited: