Bunty Scrungus
New Member
Part 1(Helmet start of torso) Finally getting around to posting here sorry it took so long. ODST BUILD. Currently just adding all the photos of the process and I may update this later with a detailed description of the process. I'm very new to the forms so please let me know if I'm doing this wrong

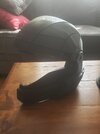
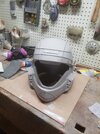
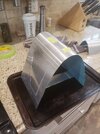
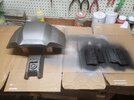
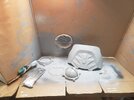
All parts of the helmet fresh off the print bed

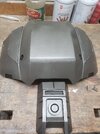
First attempt at gluing the helmet together, I do not recommend this glue it failed almost immediately. I would use some type of bonding agent like I ended up doing

First coat of sandable primer, makes it much easier to sand down then just the plastic

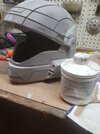
Some bondo to fill the seams

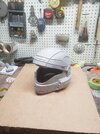
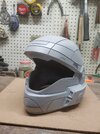
second coat primer, much better now but still in need of some work
 Quick note: this pic is right after I dropped the helmet and had to start all over again; re sand re prime and re bondo everything. Shaky cam makes everything funny but that sucked.

First coat of paint, I went with a cast iron metal spray can because I had a lot of it and it was easy to get if I needed more. Very happy with the color though.

Taped off and resprayed for all the "rubber" bits. went with a flat black tremclad paint

starting to tape of my yellow marks (go bumblebees)

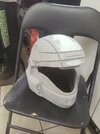
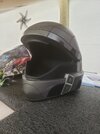
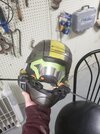
Helmet is all done without any real weathering. That wrinkled mess was my first attempt at making the visor, was not happy with it but I wanted a pic

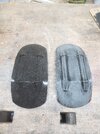
Made up a cardboard template for the visor and cut a new one out of grinding shield ( I very ambitiously bought one visor and expected to get it right first try)
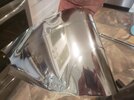
 Bent up a piece of aluminum stock to get the shape of the visor down (bake your grinding shields at 350, or don't this seemed stupid but it worked)

second attempt at the visor looked pretty good just sitting in the helmet (I ended up buying the wrong tint, I needed automotive tint that comes with an adhesive on the back. This turned out to be a static cling tint which failed after a few days)


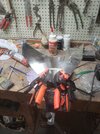
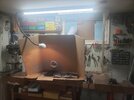
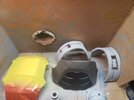
At this point I had other parts of the armor ready for prepping so I stated with that ( I used nails as pins for this piece)

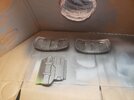
First coat of silver on the chest and some other parts being filled with putty to hid messy prints and seams.

Couple more torso parts freshly painted.

Semi final install of the visor just used some screws I had lying around.

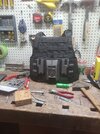
Was wondering what I was going to do for attaching all the armor to my plate carrier and I figured the best way was how everything else was attached to it. Molly straps are nice because I didn't end up needing to buy a new plate carrier I can still use this one. All the armor comes off after I'm done with it.

Rivets and buttons for all the straps

Just starting to fit the Strap armor, had to make some messy cuts to get the buckles through.

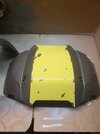
Adding more yellow

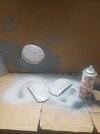
Wear gloves when you paint

Test fitting all the parts on my mock torso ( I ending up using Velcro straps to cover up all my cuts in the strap armor)

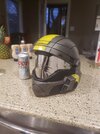
Happy with how the visor turned out in the end. That wraps up part one, thanks for reading!
All parts of the helmet fresh off the print bed
First attempt at gluing the helmet together, I do not recommend this glue it failed almost immediately. I would use some type of bonding agent like I ended up doing
First coat of sandable primer, makes it much easier to sand down then just the plastic
Some bondo to fill the seams
second coat primer, much better now but still in need of some work
Quick note: this pic is right after I dropped the helmet and had to start all over again; re sand re prime and re bondo everything. Shaky cam makes everything funny but that sucked.First coat of paint, I went with a cast iron metal spray can because I had a lot of it and it was easy to get if I needed more. Very happy with the color though.
Taped off and resprayed for all the "rubber" bits. went with a flat black tremclad paint
starting to tape of my yellow marks (go bumblebees)
Helmet is all done without any real weathering. That wrinkled mess was my first attempt at making the visor, was not happy with it but I wanted a pic
Made up a cardboard template for the visor and cut a new one out of grinding shield ( I very ambitiously bought one visor and expected to get it right first try)
second attempt at the visor looked pretty good just sitting in the helmet (I ended up buying the wrong tint, I needed automotive tint that comes with an adhesive on the back. This turned out to be a static cling tint which failed after a few days)
At this point I had other parts of the armor ready for prepping so I stated with that ( I used nails as pins for this piece)
First coat of silver on the chest and some other parts being filled with putty to hid messy prints and seams.
Couple more torso parts freshly painted.
Semi final install of the visor just used some screws I had lying around.
Was wondering what I was going to do for attaching all the armor to my plate carrier and I figured the best way was how everything else was attached to it. Molly straps are nice because I didn't end up needing to buy a new plate carrier I can still use this one. All the armor comes off after I'm done with it.
Rivets and buttons for all the straps
Just starting to fit the Strap armor, had to make some messy cuts to get the buckles through.
Adding more yellow
Wear gloves when you paint
Test fitting all the parts on my mock torso ( I ending up using Velcro straps to cover up all my cuts in the strap armor)
Happy with how the visor turned out in the end. That wraps up part one, thanks for reading!
Attachments
-
 20211017_141938.jpg466.7 KB · Views: 171
 -
 20211024_095437.jpg730.3 KB · Views: 169
 -
 20211024_121120.jpg700.3 KB · Views: 164
 -
 20211024_151350.jpg559.7 KB · Views: 158
 -
 20211024_154135.jpg701.6 KB · Views: 157
 -
 20211029_124236.jpg678.1 KB · Views: 141
 -
 20211105_120939.jpg606.7 KB · Views: 162
 -
 20211106_182245.jpg755.7 KB · Views: 170
 -
 20211109_114239.jpg705.9 KB · Views: 164
 -
 20211109_123957.jpg1.5 MB · Views: 172
 -
 20211121_122112.jpg903.6 KB · Views: 163
 -
 20211126_103526.jpg656.4 KB · Views: 167
 -
 20211211_135641.jpg790.5 KB · Views: 157
 -
 20211217_165209.jpg1.7 MB · Views: 183
 -
 20211217_231047.jpg941.2 KB · Views: 173
 -
 20211217_231829.jpg1.3 MB · Views: 169
 -
 20211218_164501.jpg466.8 KB · Views: 151
 -
 20211218_175352.jpg1.5 MB · Views: 175
 -
 20211218_181342.jpg1.5 MB · Views: 156
 -
 20211218_181431.jpg1.5 MB · Views: 167
 -
 20211219_172720.jpg1.7 MB · Views: 159
 -
 20211222_164612.jpg930.7 KB · Views: 165
 -
 20211223_121616.jpg529.2 KB · Views: 157
 -
 20211226_133324.jpg1.5 MB · Views: 144
 -
 20211226_135242.jpg463 KB · Views: 164
Last edited: