Needing help and advice on building my first set of armor.

Status
Not open for further replies.

Dorfman

New Member
I've been building weapon props for many people for quite a while now and I'm setting my sights on building armor now. I've heard of people using peprika and EVA foam to build their helmets and armor but I'm not sure on what to use. I'd like my helmet to be as sturdy as possible and have all the gaps filled in making it look like a real helmet. I've looked up youtube tutorials but haven't had much luck. I have a shop with plenty of tools and I've got plenty of material so if anyone can help me on my first build I'd appreciate it more then anything.
 
It really depends on whether or not your patient enough to build a pepakura suit. It took me nearly a year to fully assemble a suit. I would recommend building a eva foam suit first so you can get a better build in future pep builds.
As always community leaders are often willing to give advice and insight into building suits/helmets.
Hope you have fun building :)
 
For pepakura Id recommend indy mogul's halo build, it doesn't go deep into detail but it explains step by step. If you need help with fiberglassing or making a mold for sloshing check out Adam Savage's Tested channel.
 
probably so, but I'm a person who learns by failure, and that being said, I started on something hard (which was stupid of me, but as I said, I learn by failure) which ended up being the Halo 4 MC helmet. I didn't do great, but it was a HUGE learning experience. I suggest you do whatever is most appealing to yourself.

but, yeah! good luck! considering you've been making props for a while, you'll probably do great!
 
Welp I've learned a couple of things from this build and some questions. I learned then if you use a peprika document, you need to make it a but bigger then what it says. I learned that hot glue is very annoying to use but holds tight to foam. But how do you make the lines between the connection points seemless? How do you get perfect cut lines on EVA foam? How to get rid of excess hot glue on the helmet? Also can I see some of your guys builds? It'll give me more questions to ask haha
 

Attachments

  • Snapshot_20170503_2.JPG
    Snapshot_20170503_2.JPG
    24.7 KB · Views: 244
  • Snapshot_20170503_3.JPG
    Snapshot_20170503_3.JPG
    23 KB · Views: 234
  • Snapshot_20170503_4.JPG
    Snapshot_20170503_4.JPG
    25 KB · Views: 241
  • Snapshot_20170503_5.JPG
    Snapshot_20170503_5.JPG
    23.6 KB · Views: 222
  • Snapshot_20170503_6.JPG
    Snapshot_20170503_6.JPG
    24.7 KB · Views: 230
  • Snapshot_20170503.JPG
    Snapshot_20170503.JPG
    26.5 KB · Views: 245
  • Snapshot_20170503_1.JPG
    Snapshot_20170503_1.JPG
    26 KB · Views: 255
1493852254845-663104949.jpg
1493852320441-1250793657.jpg
1493852342988-1750662250.jpg
14938523757941670732835.jpg
Scaling armor is everything, my first helmet was a bobble head effect. To make connections seamless I recommend using a exacto knife to trim off excess material. Owning a heat gun or a high power blow dryer helps making lines match up. I use a box cutting knife & exacto knife to cut eva foam. I hope these pics help, I had more on my old phone but that's swimming in Hawaii lol.
 
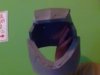
BucketHead1444...that's the Disguise MC helmet. Dorfman, if you're looking to buy a helmet, check out the commercially available Disguise helmet. The quality is pretty good. Anyhow, Here's some stuff that I have made and some tips will follow:
master chief trevor.jpg
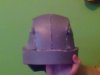
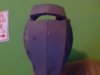
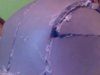
So that^ is my Halo 4 MC build...I too used the disguise helmet, but scratch-built the rest of the suit from EVA foam. The trick with this suit is to bevel the edges where parts connect and use a dremel sometimes to smooth the beveled edges, assuring a perfect fit.
Pulse Blade helmet 1.png pulse blade helmet 2.png pulse blade helmet 3.png
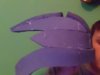
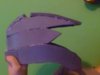
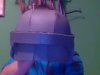
This is my Titanfall 2 Pulse blade helmet; made from EVA foam. one of the handiest techniques for this build was scoring the surface of the foam and heating it with a heat gun to open up the score cut, producing awesome detail. I used Andrew DFT's templates and modified them for accuracy upon making my own. Another trick for this one would be to (again) use a dremel and smooth out the outer edge of the foam to create a unique and "sculpted" effect, which looks really nice for additional layered details. just look at the chin are of the Titanfall helmet, there's where I "sculpted" the helmet a little.

Also, something I also do is very lightly trim off the sharp corners of the foam with a dremel. It makes the result look a little more "manufactured"
Rogue one ST helmet.png
And remember, take your time, don't use a lot of hot glue, and have fun!

Check out AndrewDFT on youtube, he has some amazing videos to help beginners get started on armor.

PS- It's called Pepakura, not...*giggles*...Paprika. :lol:
I'm just teasing, I know your auto-correct is probably doing that. :)

hope this helps!
ask away! :)
 
Alright thanks BucketHead1444 and mblackwell1002! I'll take a bit more time with the next one I do and I'll post what it looks like tomorrow!
 
mblackwell1002 ....You are correct, my bad guys wrong file's heh. If you don't mind me asking how did you add lights to you titanfall helmet?, I've seen people who added them to their builds but no-one ever goes into how they installed them, is it difficult to do?
 
Nah, it's not too hard. If you have experience with LEDs at all, you shouldn't have a hard time. I just wired everything and then hot glued them (at an angle) above my visor (which I used my silhouette cameo to cut a stencil). another thing you should probably do that I didn't do is sand down the tips of the LEDs to diffuse them a little bit. Helps avoid the light beam look.

and sorry for that tiny MC pic, I didn't realize it was so small.
 
Alright. Here is the outcome of today's helmet. Advice and criticism are welcome.
 

Attachments

  • Snapshot_20170504.JPG
    Snapshot_20170504.JPG
    31.2 KB · Views: 235
  • Snapshot_20170504_1.JPG
    Snapshot_20170504_1.JPG
    29.7 KB · Views: 246
  • Snapshot_20170504_4.JPG
    Snapshot_20170504_4.JPG
    29.3 KB · Views: 254
  • Snapshot_20170504_2.JPG
    Snapshot_20170504_2.JPG
    34.2 KB · Views: 237
  • Snapshot_20170504_3.JPG
    Snapshot_20170504_3.JPG
    29.2 KB · Views: 211
  • Snapshot_20170504_5.JPG
    Snapshot_20170504_5.JPG
    29.6 KB · Views: 222
  • Snapshot_20170504_7.JPG
    Snapshot_20170504_7.JPG
    30.7 KB · Views: 238
  • Snapshot_20170504_8.JPG
    Snapshot_20170504_8.JPG
    27.5 KB · Views: 237
  • Snapshot_20170504_9.JPG
    Snapshot_20170504_9.JPG
    29.3 KB · Views: 222
Better! However, when chamfering your edges, do not do what Andrew DFT does, if you can help it. What I do is pivot the razorblade while I cut to get a really nice chamfered edge. It makes the seam much cleaner.

Also, I hear that you don't really like hot glue...try contact cement. It glues much stronger, has no overflow, and is virtually seamless. try that out if you would like.

Anyhow, great job! you're getting there!!
 
Alright. But what do you mean by pivot? I'll go to lowes tomorrow and post how it goes thanks for the help!
 
Status
Not open for further replies.
Back
Top