Props Needler Multimedia Arduino-Driven Animated Airsoft Prop (Everything the Neca Needler Could Have Been)

Redshirt

RXO
405th Regiment Officer
Community Staff
Member DIN
S980
71014321_379063463029930_8343994864731422720_n.jpg


It's been a while since I finished the Airsoft Spartan Laser. I've been busy and I did do an acurization and airsoft conversion of the Jasmin laser tag Plasma pistol but I NEEDED a full-scale Covie weapon with lights and animation for the CON and airsoft circuit. The once-pricey Neca Needler caught my eye. Huge but plasticy. It had lights and some animation (the needles retract a little bit, but nothing like in the game) and sound (from a tiny scratchy speaker). When a cheap one caught my eye, I came up with a plan.

Before anyone gets all angsty about airsoft and cosplay, I've been down this road with my airsoft Spartan Laser. I fully support the 405th's policy that we are a communityc of cosplayers and that there is no express or implied ability for the armor built using the techniques on this site to in any way be suitable protection for any extreme sport (including airsoft). You need ANSI-certified (or whatever your home country recognizes) safety gear for any sport. The 405th has no part of that. Any projectile-firing replica must adhere to the standards of the country and the field you are operating at. Any projectile-firing prop that cannot be rendered intrinsically safe has no business at a CON or other public appearance. The 405th cannot accept any less than that from its members. I agree.

So, let's start with a cool, yet craptastic, Neca needler and see how far we can go in making the best replica we can.


Here are the project goals:

1. Convert the Neca Needler to an airsoft gun that can be configured to be CON legal

2. Must be able to shoot pink (red) tracer BBs

3. Must match the magazine size and fire rate of the in-game model (still deciding which game model to use)

4. All external screw holes and seams must be eliminated

5. Needles must fully retract like in the game and animation must match the depletion rate of the game model

6. BBs must track targets like in the game!

7. Exterior parts that are metal in the game must be metal on my prop

8. Exterior will be coated in Cerakote firearms finish with Gun Candy prismatic powder to match chameleon effect of in-game model

9. Must not creak and squeak like a toy (Neca original problem) and be tough enough to survive regular airsoft play and anything a CON can throw at it

10. Convert the Neca Needler into an exact replica of the game gun.


Wait!? Did he say tracking BBs like the needles track in the game?
Yes, I'm going to use a pair of 24GHz radar modules to track targets and adjust the flight of BBs.

20191219_142925.jpg

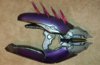
Here's what Neca gave us


20190705_135008_HDR~2.jpg


Here's the goal, the Needler from Halo Outpost Discovery

Keep watching this thread and my YouTube channel for updates.

Redshirt

Guess who's not coming back from the Slayer match--the guy in the Red Shirt
Signature Project: Halo 3 Working Airsoft Spartan Laser in Metal & Fiberglass
 

Attachments

  • 20191219_142925.jpg
    20191219_142925.jpg
    1.1 MB · Views: 837
Marc is very aware of how we on Division feel about anything made for real world uses as we just are not qualified for that and someone will get hurt. Marc did an excellent job of addressing this in his post - so thank you for that Redshirt.

I feel the need here to make a distinction to make it clear why this is allowed, and talk about impact resistant armor is not. While you can injure yourself making or using any prop, and this certainly being no exception (I caution all of you that Marc has skills most of us simply do not have), you're not actually making this to protect yourself from harm in an environment you are required to wear real safety gear for.

Also, Marc's Splaser weighs more than I do.....hahaha

Thank you Fangs! I appreciate Division stopping by early in this thread. Thanks for the props and the guidance. We have the boundaries set for the thread right up front, so let's get busy.

And, yes, the Splaser does weigh more than you do Fangs. That's what happens when you try to build a prop that tries to be a two things at once. The sad thing is that the airsoft-ready configuration of the Splaser actually weighs six more pounds than the stripped down CON configuration you got to hold. Needless to say, I tend to play defense and not run around very far (or fast) with it. I'm afraid this Needler build will be no different.

20191129_162526_HDR~2.jpg

Recent Halo airsoft projects

Whether you are an airsofter or not, please stay with me on this. While at times the posts will focus on the mechanics of the airsoft gear stuck inside, there will be no shortage of pure prop work that includes Arduino, electronics, animation, stepper motors, fiberglass work, hand and CNC metal machining, prismatic coatings, real radar, magnetic latching and sound effects. I have a little bit of experience in many of these but expertise in very few so we'll learn together and not have one of these threads that pops to the next update leaving you wondering, "How did he do that?"

Redshirt

Guess who's not coming back from the Slayer match--the guy in the Red Shirt
Signature Project: Halo 3 Working Airsoft Spartan Laser in Metal & Fiberglass
 
Last edited:
Today's update focuses on project planning. I maintain a Project Management Professional (PMP) certification in my day job so project management is in my blood. So a little planning goes a long way toward keeping on track, managing cost and avoiding having to rework parts. So, having taken this apart once for the intro video, I wanted to plan out the addition of some internal components against the goals for what I want to achieve on the exterior of the prop. In a nutshell, that means being able to access and service all of the existing and added components while eliminating all of the ugly screws and seams on the exterior.

To shoot BBs, you need a barrel. Despite the giant size of this prop, there isn't a lot of room inside to fit a piston, chamber and barrel. Front to back the center section is only 7-8 inches deep. Even if I used an electric pistol gearbox, I would only get a two inch barrel. The only solution that works is a custom HPA system. Off-the-shelf systems are expensive and large. I found a design on the Kuba-T1000 site that I asked my friends at Alpha to Zeta Industries to help me remodel to fit into the space. With a rough print in hand, I was able to validate that I could fit a piston, chamber and barrel in the space. Now we're in business!

20191219_142937~2.jpg

Airsoft components overlayed on the Needler to show planned layout.

Other smaller components will need to fit into this space, but we have enough fidelity to move ahead. The challenge here will be to rebuild the prop so that the parts are able to be serviced.

So, starting with the decision to use high pressure air (HPA) as the means of driving the airsoft components, that drove the need to place an air cylinder inside the prop. I obtained the smallest air bottle could source and determined that I could fit it inside the lower body. This placement will keep the center of gravity low and not interfere with the needles. Thanks to project sponsor, Leviathan Tactical of Pensacola, FL for the airsoft components.

20191219_143425~2.jpg

In addition to the bottle placement, the awful screw holes littering the right side of the prop are visible.


The seams on the prop don't follow the in-game model and are very visible. Add that to the fact that the prop squeaks and rattles horribly when handled shows a need to fundamentally reconstruct it.

20200217_221604.jpg

Giant seams in the wrong places.

My plan is to construct a one-piece solid space frame with access panels that bolt onto that. I'll construct the space frame by fiberglassing together the bottom of the top body, the core section of the nose, the top section of the lower body and at least one half of the grip to create as nearly as possible an indestructible base that everything else bolts to.

20191219_142925B.jpg

Yellow represents the solid space frame. Red represents the removable components to access the airsoft and animation components. All red lines except around the top needle section represent cuts that have to be made.

The removable sections will join to the space frame though magnetic and other hidden latchings to meet my other goal of removing all exterior screws.

With the basic layout determined, the next step is full disassembly and rough fitting of the new components.

Redshirt
 
Man I've been away for a long time! I didn't even know you made a plasma pistol! Always love your work bud and looking forward to seeing the progress on this as well!
 
Man I've been away for a long time! I didn't even know you made a plasma pistol! Always love your work bud and looking forward to seeing the progress on this as well!

VShore! Long time no chat. Thanks for the words. I didn't do a thread on the Plasma Pistol. It was so much more airsoft heavy than this will be. I will get a video up on my YouTube channel shortly, but you can find the Plasma Pistol build process on the Spartan Jess channel. Here's a look at the two we did up against an original Jasmin laser tag toy. You can see how we got rid of the screw holes. The coatings are Cerakote with Gun Candy prismatic powder added.

20190703_221448~2.jpg


20190703_221928_HDR~2.jpg


The Plasma Pistol is still undergoing final tuning to achieve perfect feed reliably, but it was a huge stepping stone toward this Needler project as there was a lot of Arduino and electronic work involved. The Needler will have a lot more emphasis on eliminating seams and being an exact match to the game model.

Redshirt
 
I was just joking... I read post 2... sorry if I offended u or somethin...

I got disconnected and was gonna come back and change my reply because it was kinda dickish. The thread had been reported on day 1 which is why Fangs dropped by. Anyway, A) Sorry. B) Welcome to the Needler build thread!
 
Real disassembly is underway. Following the cut lines of my earlier update. I began with the lower body as that's where I needed to make the biggest modifications.

Using a Dremel tool and and air saw, I was able to split the two lower halves. The picture below shows the separated former left and right parts screwed together to make top and bottom parts that now follow panel lines on the game model. You can also see the massive ribs in the lower section (at the top of the photo) are cut away to cradle the high pressure air bottle.

20200217_221322_HDR.jpg

Lower body sectioned to hold air bottle.

Later I will clean up the seams and fiberglass together the former left and right pieces of both the top and the bottom to make them solid and eliminate old seams. In fact the entire interior will get fiberglass coverage to make it damage (and BB) resistant. Top and bottom will be joined by magnetic and other hidden couplings.

20200217_153917_HDR.jpg

The final fit of top and bottom halves. This setup will let me get rid of these hideous screw holes. Notice the regulator sticks out into what will be the next section.

The regulator itself was the smallest I could find. I modified it to present the smallest lateral profile I could by attaching the overflow valve and hose attachment via 90 degree elbows. This was the only way to get it into the available space.

20200213_221434_HDR~2.jpg

Modified air regulator.

Up next. Lower body mods continue.

Redshirt
Guess who's not coming back from the Slayer match--the guy in the Red Shirt
Signature Project: Halo 3 Working Airsoft Spartan Laser in Metal & Fiberglass
 
More pics of the violent disassembly.

Lots of cutting and test fitting until all the parts lined up without wiggle. I'll probably use a couple of rubber straps to hold the air bottle snug in place so the closure magnets don't have to take any load.

The hole on the upper servise is the main power button on the Neca version. It works well and doesn't interfere with my mods, so I'm going to keep it mostly unchanged.

20200217_153909_HDR.jpg

Tight fit, but structurally unsound.


I fitted the forward section of the lower body up to the rear section temporarily to make sure that the regulator wouldn't interfere with anything. It did. The regulator and hose would have stuck out the front of the weapon. I had to remove more of the ribs in the lower-rear section to change the angle of the bottle as it intruded into the forward section. In the picture below everything is properly aligned.

20200216_171600_HDR.jpg

Perfect alignment.

Remember, everything is upside down here to how it goes on the gun in these photos. Here we have the first completed pieces of the space frame with the bottle installed. Below are the removable sections. The piece at the bottom shows the access panel for the front lower body.


20200216_171554_HDR.jpg

A better view of the lower body plan.

20200216_171624_HDR.jpg

Upside down but a great view of how it all goes together. In addition to the regulator, the forward lower body section will likely host the LiPo battery, the main electronics section, and probably one small stepper motor.


Here is a good point to talk about the regulator. Although I have changed fittings, the regulator itself is a 100% stock commercial-off-the-shelf item. The black fitting is where the air hose will attach. The hole in the center is for the air adjust that controls the speed of the BBs. In a legitimate airsoft event, all weapons are tested for safety compliance, i.e. the energy output by a projected BB (mass x velocity) is determined using known-mass BBs and a chronograph. The pressure is adjusted if non-compliant during testing and, once confirmed to be under the power limits, a lock is installed to ensure no-one adjusts their weapon post inspection (like peace bonding at a CON). It was critical for me to use stock equipment here so that my replica can be tested and the regulator legally secured just like a commercially-built airsoft gun. So, while the Needler will be 95% unlike anything else at the airsoft field, this 5% needs to be exactly standard for me to be welcome at any event.

20200216_171606_HDR.jpg

Good view of the regulator.

Next up. More vision for where this project is headed.

Redshirt
Guess who's not coming back from the Slayer match--the guy in the Red Shirt
Signature Project: Halo 3 Working Airsoft Spartan Laser in Metal & Fiberglass
 
I wanted to break from the teardown and cut-up sequence postings to talk about where the project is headed. Being that this is based on a Neca Needler, but will be entirely different in quality and function when the job is complete, I want to make this as visually distinguishable from the Neca prop as possible. I also want to have a decent ammo count since it is going to be an airsoft gun with a few disadvantages already such as no sights whatsoever. After looking at all the versions of the Needler that share this basic shape (Halo 4, Halo Reach, Halo CE Anniversary, Halo Fireteam Raven and Halo 2 Aniversary), it came down to Halo 2 Anniversary or Halo Fireteam Raven.

Bungie redefined the Needler shape for Halo Reach into a great shape, with kind of a dull finish. 343i picked up the same shape for Halo 4 with a much brighter color scheme. The pre-production art was pinker than the game gun which contrasted the pink needles with blue details. This was the version produced by Neca.

ce07880579e572232e14dd15ac61d24f.jpg

Pre-production art guidelines for the Halo 4 Needler (Reach Needler in inset).

The CE Anniversary Needler had an orange body tone but the Halo 2 Anniversary weighed in with a purple to gold fading Needler and pink sidelights.

H2A Needler.jpg

Pre-production Halo 2 Anniversary render showing pink side lights but not much of the purple fade to gold effect that would be in the game.

The final game version sported the purple to gold prismatic paint as well as the pink sidelights. Fireteam Raven went deep purple for its Needler.

corleon-richardson-needler-1.jpg

Deep Purple, the Fireteam Raven Needler

corleon-richardson-needler-2.jpg

The purple fades to brown more than gold and the needles are more purple than pink.

In the end, I decided against the Fireteam Raven version. It was just too purple and brown. The ammo count was an issue too. As an arcade-game weapon, it had nearly unlimited ammo between reloads. I wanted something with an ammo count similar to a real gun so it wouldn't be overpowered on the airsoft field. I'm not really a speedball player. I also wanted it to go through ammo fast enough that the retracting needles on top would be very noticeable. I picked the Halo 2 Anniversary Needler after a lot of hand wringing. Its 30 rounds to reload is a great match to other guns on the field. I have the ability to make the exact lighter purple to gold prismatic effect and I could get the sets of needles to retract in 30-0 increments with stepper motors.

So here's the glorious winner:

H2A-JohnNeedlers.jpg

The Pink Mist with purple to gold chameleon finish. There is so much awesomeness in this shot.

My plan for the finish uses GunCandy.com Viper finish. I have used this before on SCAR-H I did. You'll know it's a crime, but you won't be able to stop looking at it. This material comes as a powder that mixes with any type of clear coat you want to use it in. The clear gets shot over black. Because I want this to be tough, I'll use Cerakote firearms coating, a thermally-cured ceramic finish.


IMG_20190430_212838076_LL~2.jpg

Sexy or heresy? Either way, it's a test bed for the needler.

I will recast the side moldings in pink and replace all the Neca blue LEDs with pink. $7.19 gets you 100 pink LEDs on Amazon so I will also double down on the LEDs used on the actual needles. To simulate muzzle flash and keep the pink and purple vibe going, I have a purple eye-safe laser that will flash with each shot.

20200118_121009_HDR.jpg

Lighting effects.

So that's the updated design brief: Exact replica of the Halo 2 Anniversary Needler with 30 shots to empty, laser effect, fully-retracting needles (30 increments), and Gun Candy Viper chameleon paint.

Next time, more teardown.

Redshirt
Guess who's not coming back from the Slayer match--the guy in the Red Shirt
Signature Project: Halo 3 Working Airsoft Spartan Laser in Metal & Fiberglass
 
Last edited:
Hope everyone stocked enough supplies to keep their hobbies going for the stay at home period. I painted on my classic car until I ran out of paint, then moved on to the motorcycle until I ran out of parts. Fortunately, the prop-making side has plenty of work to be done in-house.

Today's installment covers the preliminary work on the needle mechanism and its housing, the upper shell. I had it apart for my intro video so I knew what I was getting into--a rat's nest of wires with no rhyme or reason to organize them. There are no connectors either in the upper section to allow you to disconnect anything.

20191125_203520_HDR.jpg

Wires and hot glue everywhere. It cost a lot of money, but it's all 'cheap toy' on the inside.

After removing all the screws and splitting the upper shell away from the base, I determined that the best way forward was to cut wires a pair at a time and tie them into automotive connectors. There were 24 wires alone running to the upper shell. I got smart about it and used two sets of eight-wire connectors and two sets of six-wire connectors. For each size I alternated the orientation. That is, to the two eight-wire connectors I put the male for one set on the shell side and the female for the other set on the shell side. Same for the six-wire connector sets. That way they can never be confused and connected wrong. In quality management circles, this practice is called mistake proofing (thank Toyota for this innovation). All modern automotive manufacturers do this so line workers can't assemble the car wrong. I wish I'd figured this out for the Spartan Laser that has what seems like 1100 connectors, all alike.

With that, I was finally able to separate the needle and upper shell assembly.


20200215_151052_HDR~22.jpg

Check the full-sized image to see how the connectors can't be reconnected incorrectly.

Looking at the underside of the needle and upper shell assembly, one can see how hastily it was assembled. The mechanism is as retarded as it is elegantly simple. When the trigger is pulled, the DC motor fires up driving a rack gear forward. This hits the back set of needles, turning a gear drive that lowers that set of needles about an inch and a half before it compresses a limit switch. If, when the limit switch closes, the trigger has been released, the micro controller cuts power to the DC motor. If the trigger is still depressed, the motor stays on and retracts the second row until it checks its limit switch. If the trigger is held, in a matter of a couple of seconds the front row limit switch is closed and the gun falls silent until the reload button reverses the DC motor and drives the rack gear backs, raising the needle rows in reverse order.

So the shortfalls here are:

1) Any brief press of the trigger gets one shot sound from the speaker and a whole row retracts
2) You only get four single shots to get an empty 'magazine'
3) Holding the trigger down empties the 'mag' in a couple of seconds, but only makes about nine shot sounds.
4) There are no partial retractions of the needle rows because there are only limit switches at the end of travel
5) The needles are over four inches long but only retract about an inch and a half

"There . . . . has got . . . to be . . . . a better way," Capt Kirk


20200217_221708.jpg

Simple, yet highly defective needle retraction mechanism.

The gears are turning and the Amazon "Order Now" button has been pressed. Stand by for new directions in the needle mechanism.

Back, briefly, to the airsoft side. I've already determined that I want the BBs to feed in from the top. How do I do that? Is that a hopper and a box mag or some kind of removable magazine? I don't yet know what the revised needle mechanism will look like and I have to fit some more electronic gadgets up in the upper shell area, so I'm shying away from the box mag idea. In addition to the space, it would add weight and complexity to the prop. However, there is this bit of bodywork that hangs under the upper body behind the pistol grip. The NECA design makes this not hard to make detachable. It is just big enough and thick enough to hide the innards of a mid or high cap M4 magazine into. I could get friends to 3D print multiples so I'd have reloads. We'll see. In any case, placing the BBs here makes sense. A flexible feed tube will move the BBs to the chamber and barrel.

20200215_152156_HDR.jpg

Leading candidate for the magazine, the stinger. Emitter holes for the sad 0.5 watt speaker are visible here. Gotta fix that too.

Anyone have any ideas for improving the needle retraction? Same question for magazine type or placement? I don't have a monopoly on good ideas. I'd love to hear solutions other than the ones I am considering.

Coming soon, breaking down the center section.

Redshirt

Guess who's not coming back from the Slayer match--the guy in the Red Shirt
Signature Project: Halo 3 Working Airsoft Spartan Laser in Metal & Fiberglass
 
How much space do you have between your airsoft components and the retraction mechanism? Is there a bit of room for play in the cavity if lighting wires were moved and some extra travel distance was added through a different gearing on the existing servos?
 
How much space do you have between your airsoft components and the retraction mechanism? Is there a bit of room for play in the cavity if lighting wires were moved and some extra travel distance was added through a different gearing on the existing servos?

TurboCharizard,
You are exactly in sync with my thinking. Unfortunately, the whole retraction mechanism is in the way of the needles retracting any further. To get the needles to retract fully would require scrapping the entire mechanism, but there is room in the upper shell for full retraction. So, I'm working on a design for full retraction and also incremental retraction of each row of needles to match the size of the H2A magazine (30 shots).

I have short NEMA 17 stepper motors on order and some ideas on how I want to run them. Fortunately, there is already a lot of stepper plans and code out there for 3D printers, CNC machines and so forth, so I don't have to pave much new ground on the electronic or software side. Only the actual mechanics of getting full retraction is keeping me up at night. I've mapped out my spaces and have a general plan though.

The addition of the steppers will add considerably to the weight which is why creating an immovable space frame is so important. Considering that my Splaser weighs 22 pounds loaded, I'd have to say that weight savings is not my strong suit and definitely comes a distant second to achieving correct animation. So that's four steppers for the four rows of needles and a fifth for a little something special I'm cooking up that will definitely put this project into the breaking new ground territory.

Redshirt
Guess who's not coming back from the Slayer match--the guy in the Red Shirt
Signature Project: Halo 3 Working Airsoft Spartan Laser in Metal & Fiberglass
Any reason behind the choice of NEMA-17 motors aside from being reliable? Why not something a little smaller and cheaper to save real estate in the Needler and cash in your pocket?
 
Any reason behind the choice of NEMA-17 motors aside from being reliable? Why not something a little smaller and cheaper to save real estate in the Needler and cash in your pocket?

TurboCharizard,
Good questions. I actually chose the short version of NEMA17s to save weight, voulume and power requirements. The bipolar NEMAs are super fast and powerful compared to the cheap/small monopole steppers all over Amazon. After watching a few videos I concluded that the molopole motors were just too slow to make 30 incremental needle retractions in the time it took to run through 30 shots. The monopoles were probably strong enough to do the job, but I just couldn't be sure.

Redshirt
Guess who's not coming back from the Slayer match--the guy in the Red Shirt
Signature Project: Halo 3 Working Airsoft Spartan Laser in Metal & Fiberglass
 

Your message may be considered spam for the following reasons:

If you wish to reply despite these issues, check the box below before replying.
Be aware that malicious compliance may result in more severe penalties.
Back
Top