OK, update time. Today I need to talk about the airsoft features while being mindful that this is not a subject I will dwell on here on our 405th forums. The ultimate goal is to produce a dual-use prop that (decommissioned of airsoft gear) can accurately capture the look, sound and animation of the game Needler at a CON, and (when configured for airsoft) accurately and safely capture the in game weapon behavior of the Needler using airsoft BBs in lieu of Subanese crystal shards.
So what do I want it to safely do on the airsoft field?
I want it to fire 30 BBs at a rate of 7 BBs/second, just like in Halo 2 Anniversary.
I want my pink BBs to glow, just like the shards in the game.
I want a brilliant pink muzzle flash with each shot, just like in H2A.
I want my BBs to track moving targets, just like in every Halo game ever.
Wait!? What was that last one? We will get to that. Here is how I'm going to solve those airsoft animation conundrums, AND, much of it is relevant to this project's creds as a CON prop. First safety: This airsoft gun will use an unaltered, universally-approved, off-the-shelf air regulation system to to deliver regulated air to the firing system. What does that get me? Consistent speed of BB's leaving the replica such that when the speed is tested to meet national or field limits, it will stay within those limits at all times.
A 12V solenoid valve will be controlled by the Arduino to pulse air to the custom HPA (high pressure air) system that fires the BBs. This same valve will draw off a tiny portion of air for the muzzle flash system. The muzzle flash system will be available in CON configuration, even when other airsoft gear is removed. The Arduino will set the air pulse frequency and duration, and cut out when the magazine is empty. This will get me my 30 rounds at 7 BB/second.
My magazine will feed the BBs to the firing chamber by way of a feed tube. Just as the BBs enter the chamber, a set of powerful near-UV LEDs will charge the pink glow BBs to maximum intensity to leave the barrel.
Remember the dream of a shimmering charged muzzle flash just like in the game? the tiny air line drawn off of the main air feed will pass into a glitter-filled chamber where it will mix the glitter and air before exiting via a pair of siphon tubes that open up just on either side of the barrel end. This will produce a tiny cloud in front of the gun at each shot. Purple lasers set to an eye-safe dispersal pattern will strobe the glitter cloud for the flash effect. Like I said, this feature will still be available to use even when the prop is demilled to CON-safe configuration. Kinda cool, I think--until the wife becomes irate over the glitter contamination.
Finally, we come to the tracking shards (er, BBs). First, some physics for non-airsofters. Airsoft BBs are slow--relative to metal BBs and bullets. That means that they should quickly drop due to gravity upon leaving the barrel. Instead airsoft BBs are launched with a back spin that uses the Bernoulli principal to gain lift. So, airsoft BBs fly a flat trajectory for a good distance, even as they bleed speed. The system that produces back spin is called the hop-up system. The induced spin is perpendicular to vertical when the gun is held upright and so this lift is against gravity. If you fire an airsoft gun 'gangsta-style' the BB will whip sideways toward whatever direction the gun is tilted. Why? because the lift induced is no longer perpendicular to gravity.
My design will track targets via radar and internally tilt the hop-up system in the direction of target movement, thus causing the BB's flight to curve in the direction of target movement. In other words, my BBs will track just as in-game needles do. Today I will show you the mechanical system. Later, we will build and test the electronics.
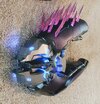
So here is the system, minus the commercial tank and regulator system, though they were mounted inside the lower housing at the time of this picture. This photo shows the approximate placement of these components relative to the body shell.
Here is the system by itself. the Arduino-controlled air valve is in the lower right. The blue fitting on the valve is where a tube will run up to the BB firing mechanism at the top right. The stepper motor to rotate the hop-up, based upon the radar signal, is in the lower left. The snake-like tube coming from the right and entering the top is the BB feed tube.
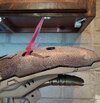
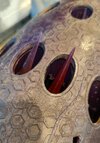
This photo is of the custom BB chamber. It is based on those common to all P90-style airsoft guns. First I modeled the original, then I added provisions for the feel tube and for the LEDs to charge to glow BBs just as they are fired. Initial test fit looks perfect.
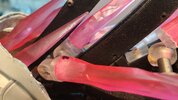
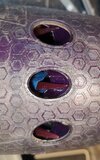
Muzzle flash? Here is the glitter chamber. Four bolts, not shown, will hold it together. The entry point for air is that raised hole on the bottom. Exit will be top left in the picture. The exit siphon tube will split into two and pass through those two holes on the frame at the extreme left of the photo. The siphon tubes will emit tiny glitter clouds to either side of the barrel. Again, this feature will remain even when my Needler is configured for prop-only duty.
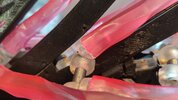
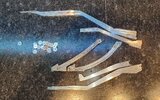
This view shows the stepper motor and pulleys for rotating the whole firing mechanism to get the BBs to curve either left or right so that they can track a moving target. If my radar system works as expected, I'm almost obligated to follow up this project with a Portal turret build.
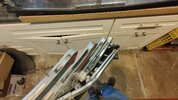
One final shot of the whole system. The structure at the top back is the air plenum where air for the firing system enters. It is fixed while everything ahead of it rotates for the tracking system.
The radar system will use a left and right pair of tranceivers (transmitter and receiver built into one unit, about an inch (2.5 cm) across). By comparing any change in the ratio of left and right signal strength, the computer can steer the BBs toward the moved target. This system can be applicable to much more than airsoft. It could be used in many animated props to get them to 'react' to movement. My ongoing build of Timmy the Infection Form comes to mind. Perhaps this system will better enable him to chase children at CONs.
That is it for this update. After this, we will shy away from the airsoft features, but I needed to cover some of the components that will be in the final build and support the overall animation features of the prop. The second-generation of the needle-retraction system is being assembled right now and is leaps and bounds ahead of the first system. I think 80% of this one will make it to the final build. I'm really excited to demo it in a coming update.
Redshirt
Guess who's not coming back from the Slayer match--the guy in the Red Shirt
Current Project: Needler Multimedia Arduino-Driven Animated Airsoft Prop (Everything the Neca Needler Could Have Been)
Signature Project: Halo 3 Working Airsoft Spartan Laser in Metal & Fiberglass


")