Noble Six helmet help pls

Status
Not open for further replies.

LeonardoLucas

New Member
hi guys, so the situation is this...
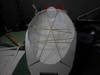
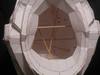
I am currently making a noble six helmet, and everything went well with the pep, but not with the resin.
After i covered it in resin and fiber glass i noticed a huge flaw.

10389681_796154230424361_5973128820883912534_n.jpg


1 side was different from the other, more drawn out, do any of you have any suggestions for some way to make it more symmetrical?

10526292_801984963174621_345952536_o.jpg
 
You should have pepped it and kept the visor in with it. It would have helped stop the warping slightly.... but how to fix it... I don't know.
 
Like Phoenix said, leaving the visor in longer helps keep rigidity until you have fully reinforced it. I didn't cut mine out until I was done painting.

Other than maybe bending the problem area with some sort of jig, I'm not sure how you would fix this. Also did you glass the outside of your helmet?
 
the fiber glass is a bit thicker than you guys normal use xD i didn't had the thinner one at the time. its only covered in the outside and i am thinking to warm it with a heat gun and the reshape it... but i dont know if the resin will melt :s
i am sorry if i write something in a incorrect way, i am not english xD
 
Adding in rigid support pieces during the pepping process helps to minimize any warping that may occur. Leaving the visor in until you've applied the fiberglass also aids in this.

Now, the major problem I see (and I'm dumbfounded why no one else has pointed this out) is that it looks as though you applied the fiberglass on the EXTERIOR of the helmet. This is a huge rookie mistake, as the fiberglass destroys any detail you worked on during the pep stage. The typical process is to apply a coat or two of resin on the exterior, then line the interior with fiberglass.

Now, your helmet is still salvageable, if you're willing to put a lot of work into it. Though, to be honest, it would be much easier to start over; add in support pieces (dowel rods, strips of foam core or bass wood, or anything else) on the interior to help the helmet maintain its shape during resin, apply two coats of resin on the exterior, then remove all the support pieces and fiberglass the interior.
 
Here is an example of how to add in a support structure.

DSCN1953_zps8a81d6a7.jpg


DSCN1976_zps02496ff3.jpg


Pepakura designer has a feature that lets you measure the distance between any two points in the 3D model. Using that information, you can cut dowels to length and glue them into place inside the helmet.
 

Attachments

  • DSCN1953_zps8a81d6a7.jpg
    DSCN1953_zps8a81d6a7.jpg
    31 KB · Views: 130
  • DSCN1976_zps02496ff3.jpg
    DSCN1976_zps02496ff3.jpg
    42.9 KB · Views: 146
I'm going to start the helmet from scratch again, but before that, im trying to finish this one, I've already putted 2 layers of bondo and tried to hide the asymmetry. I know that I will never have a high quality detail level because of the exterior fiber glass (but at least its hard as rock xD) , but at least im training xD this is mi first build.
What do you guys think?
10449802_802923979747386_576756876_n.jpg
 
It definitely looks better! A trial run is always helpful, and everyone has to start out somewhere :) I was here a few months ago. Just put your head down and you can make it work! And don't forget to research around and find good techniques and new materials, knowledge is your biggest friend here. Good luck!
 
Just a tip for the future, don't cover the entire helmet in bondo in one pass. Work in small sections and only apply bondo on what needs to be smoothed.

And I agree with mOWWck about research. It's a very VERY important step in this hobby. There are tons of great projects here in the forums. I urge you to take a look around, see what others have done, learn a few different techniques, and try them to see what works best for you.
 
thank you for your replies and motivation, it helped a lot, I haven't had any time to start a new helmet but I've been going some experiments on the old one just to practice the bondoing and sanding process. its not great but I think that for mi first attempt is acceptable xD
10512192_803516613021456_483596251_o.jpg

10529714_803516579688126_242322469_n.jpg
 
FYI - I never used 100% bondo when mudding up the outside of my helmet, simply because it so chalky and requires a lot more sanding. I always used Rondo which is 50-50 mix of bondo and resin. it ends up a lot harder and requires a lot less sanding. It also has the added benefit of allowing you to sculpt on it as it hardens, when it starts to harden you can take a sharp xacto blade and carve into it or remove excess. This save you a lot of time from sanding. Check out my build to see what I mean. I made the exact same helmet for my first one.

http://www.405th.com/showthread.php/39674-My-first-quot-Halo-Reach-helmet-and-armor-build-quot
 
Status
Not open for further replies.
Back
Top