This is a W.I.P. project that truly started 3 weeks ago but really wanted to persue 4 years ago. It's a slow progress due to not being to familiar with the build process and constantly second guessing myself.
4 Years ago I acquired a set of Sean Bradley's ODST armor kit. I've put it aside for a very long time due to my limited knowledge of armor building and lack of time. I really didn't want to go screwing something up that was very pricey for me at the time. But now I've kinda gone and completed 2 suits and a number of props so I'm feeling fairly ballsy to begin.
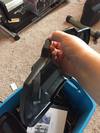
 Progress was pretty slow at first when I finally decided to undergo the process. I spent a couple hours drawing out the excess flash that needed to be removed. However after doing it in my garage with horrible lighting I decided to instead take it too work where they have the tools and facility space where I could just drop it off there and work on it during my early mornings and lunch breaks.

And as always safety first! the smell was nasty with a regular old dust face cover so I borrowed one of these more heavy duty mofos from a co worker. I call this my broke ass kylo ren cosplay Pretty much my get up the last 3 weeks.
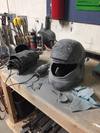
 Honestly it took maybe a week and a half to cut and sand my parts. Some need some additional trimming to fit better, like the forearms, back legs and thighs. Everything else seems to be pretty decent despite my large size!

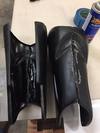
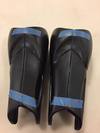
Pretty much this is where I get nervous and start to second guess myself a lot on how I want to proceed. I really don't want to screw these parts up and there's no solid way for me to make sure this was even goign to fit me until after the fact. However I said F it and I went for it. I like to use a product called 2P10 which is a super glue and an accelerate. I need to lay down just a thin layer of putty then sand and I'm pretty much done with these parts. I did test fit them and for the most part they fit. I'll need to trim the top a bit as I don't have a nice bend in the leg....maybe 45 degrees which is decent it just feels a little tight though.
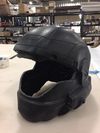
 Final pic of the day was finishing my ODST's basic cut. This was a helmet given to me by a friend of mine who's a bigger halo nerd than I am and I always love seeing what he's working on. He's same guy who helped me with a recon helmet I finished a month ago.
Sadly t hough it looks like I need to trim a lot more on the insert of the helmet. Far to tight to fit even for those with smaller heads when a co worker tried to put it on thinking he was going to be cool as f about it. NOPE!
4 Years ago I acquired a set of Sean Bradley's ODST armor kit. I've put it aside for a very long time due to my limited knowledge of armor building and lack of time. I really didn't want to go screwing something up that was very pricey for me at the time. But now I've kinda gone and completed 2 suits and a number of props so I'm feeling fairly ballsy to begin.
 Progress was pretty slow at first when I finally decided to undergo the process. I spent a couple hours drawing out the excess flash that needed to be removed. However after doing it in my garage with horrible lighting I decided to instead take it too work where they have the tools and facility space where I could just drop it off there and work on it during my early mornings and lunch breaks.
And as always safety first! the smell was nasty with a regular old dust face cover so I borrowed one of these more heavy duty mofos from a co worker. I call this my broke ass kylo ren cosplay
Pretty much my get up the last 3 weeks. Honestly it took maybe a week and a half to cut and sand my parts. Some need some additional trimming to fit better, like the forearms, back legs and thighs. Everything else seems to be pretty decent despite my large size!
Pretty much this is where I get nervous and start to second guess myself a lot on how I want to proceed. I really don't want to screw these parts up and there's no solid way for me to make sure this was even goign to fit me until after the fact.
 However I said F it and I went for it. I like to use a product called 2P10 which is a super glue and an accelerate. I need to lay down just a thin layer of putty then sand and I'm pretty much done with these parts. I did test fit them and for the most part they fit. I'll need to trim the top a bit as I don't have a nice bend in the leg....maybe 45 degrees which is decent it just feels a little tight though.
 Final pic of the day was finishing my ODST's basic cut. This was a helmet given to me by a friend of mine who's a bigger halo nerd than I am and I always love seeing what he's working on. He's same guy who helped me with a recon helmet I finished a month ago.
Sadly t hough it looks like I need to trim a lot more on the insert of the helmet. Far to tight to fit even for those with smaller heads when a co worker tried to put it on thinking he was going to be cool as f about it. NOPE!
Attachments
-
 14925784_10211000727431177_1041162399564524316_n_zpsfbdaxrju.jpg79.3 KB · Views: 179
 -
 14563547_10211160445704034_3620247749874108980_n_zpsx6n1zspo.jpg51.3 KB · Views: 205
 -
 15193496_10211151048629113_5071226107336351630_n_zpsp2hdqnam.jpg53.9 KB · Views: 176
 -
 15134652_10211143653764246_3745978118132927288_n_zpssvgwxeld.jpg46.3 KB · Views: 200
 -
 15085510_10211151048869119_4942504406930827927_n_zpsnxu3ot4t.jpg88.9 KB · Views: 199
 -
 14992071_10211103612363236_8620600169504093199_n_zpsotsowp51.jpg39 KB · Views: 183