OSDT Build - Back in action

AngelVirusX

Active Member
Starting up my WIP thread of my ODST build.

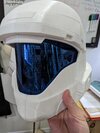
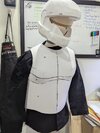
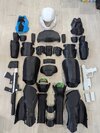
My Ender 3 is finally back up and running and first full armour build going down as an OSDT. Using GalacticArmory's files, I'm churning out some weapons and a full set of OSDT armour. Hoping to get it all printed in time for warmer weather for painting.

Also getting down on a Mark IV armour set after this. Start off as a base Halo Wars version, but hoping to build it up as a Spartan 027-Robert, but that's a build for another thread.


PXL_20230912_224138022 (1).jpg
PXL_20240225_220346925.jpg
PXL_20240227_153528052.jpg
 
Updatesssss!

Helmet:
Helmet is done printing. I managed to get the final pieces done for it off my Ender 3.
1713454010378.png
1713454026053.png


SMG #1:
Still a print-in-progress. I got several pieces done before my Ender stopped working properly, but I may end up redo-ing, as least the pieces I can fit, on my resin printer for a better finish (Photon Mono SE).

Armour - Shoulder Bells:
Ender 3 kinda crapped out on me finally and managed to save up enough for a Neptune 3 Max. This thing is a monster and I love it. Here's one of the shoulder bells printed off it. Admittedly, I should have flipped it "nice" side up, but I tried aiming for less material and time. Some clean up needed lol.
1713453814370.png
1713453829966.png


I don't think I'll be remaking the helmet, but I definitely put it through it's paces with a Helldivers B-01 helmet.
1713453902477.png
 
Gotten much more printed at this point at actually assembled the helmet parts together.

1718198924198.png
1718199121658.png
1718199381161.png


Thighs are last on the list as the shin guards have been completed. Black airsoft undersuit acquired too! Need to assemble the weapons and figure out my armour rigging situation. Then I'm like, "well, I should print the AR too, then shotgun, maybe a SPNKr."

Stop. Please finish this suit first lol.

Progress!
 
Everything's looking good, my man. I will say, if I may, that you might have a hell of a time sanding those shoulders down.

You might have some luck splitting the model up in your slicer and assembling them after the fact with two-part epoxy. I do this a lot for models that don't have a clean flat edge to serve as a bottom surface.

With that shoulder you could have split it in half lengthwise and printed it along the cut edge. You may still need some supports on the inside overhangs but you'll have a cleaner result overall.

Everything else is looking killer, though!
Yeah, the shoulders came out pretty rough, printed too close to bed. A lot of support junk on the edges that I should be able to take off most of it with clippers or a knife. I know there's lots of sanding in my future :lol:

One of the first parts of the armour I printed, so I also think I printed them with too much infill. Maybe a new set to be printed later on.
 
All laid out. Time to get to painting!

Printer is down right now, but hoping to get a few GA accessories done for the final.
 

Attachments

  • PXL_20240613_011827077 (1).jpg
    PXL_20240613_011827077 (1).jpg
    2.2 MB · Views: 63
  • PXL_20240626_171822775.jpg
    PXL_20240626_171822775.jpg
    2.5 MB · Views: 52
  • PXL_20240626_144927962.jpg
    PXL_20240626_144927962.jpg
    2.6 MB · Views: 54
Looking great! What colors are you planning on using?
making great progress. can't wait to see the colors you pick
I'm going to do a basic stripe pattern, down the center of the helmet and breast plate and a few a pieces offset from each other purple. The hex visor film I currently have is blue, but I was able to exchange it for a purple one. Just waiting for that to come in.

But yeah, purple stripes with a typical black, gunmetal grey. Purple based on my cosplay handle Voidshift.

Not sure about accessories or extra markings yet, but I'm sure it'll come to me.
Sounds cool! I'm excited to see how it all turns out!
 
While waiting for a good weekend to sand and paint everything, I just keep printing. M-90 shotgun, as well as a few add-ons. Maybe more to come if I have filament left.
1721309155752.png
1721309169677.png

1721309341082.png

Also, after trying to bondo my helmet's seams, I decided to pretty much scrap it in favour of a single print helmet I can finally do on my Neptune 3 max.

1721309267881.png
1721309274929.png
 
Sadly I wasn't able to make it out to FanExpo Toronto, but a few things have progressed since the beginning of August:

PXL_20240719_112639468.jpg

Printed out the visor buck! Picked up a small vacuform table and have some old PETG sheets that should do the trick for my own visor. Tried to order from Galactic Armory, but ended way to pricey for shipping to Canada. Almost $200 for a fit visor, is way out of my budget.


PXL_20240804_181355232.jpg

Whole helmet printed and printed visor part was removed with a heat knife. Patching up the gaps with Bondo spot putty. Probably could have printed the without-visor version, but I had issues with doing a visorless Helldiver helmet, so tried doing it all at once. It still needs another pass, but getting real smooth.

PXL_20240812_190948377.jpg

Rough 80 grit sand with a mouse sander. Ffs there are a ton of pieces :lol:

PXL_20240813_191134945.jpg

Shotgun assembled, but separable in the center for travel. I'll likely add a clasp or something to keep it held together, maybe magnets.


PXL_20240820_193934557.jpg
PXL_20240813_171235591.jpg

Four cans of filler primer down and finally got the base layer done. Planning on sanding it with the mouse sander at 220 and one more layer of primer before base colours. A silver layer down for base, then some latex brushing for battle damage. Picked a black car Colour Match can of automotive spray paint as my black. I'll probably find a non-automotive black for the guns' black.

Busy with lots of at home things, but definitely hoping to get everything painted up before it gets too cold outside (end of October-ish).
 
Legs assembled and filled in. The pieces weren't fully flush, I had to heat and bend the shins into place, but I filled in some of the gaps with some two-part epoxy I was using to glue them all together.
1726149637621.png
1726149660224.png


Shiney and chrome!
1726149793324.png
1726149814854.png
1726149841876.png


Trying to create a layering effect for battle damage. Silver, then matte black, then gloss black, adding some liquid latex brushing between each layer.
 
Behold, my stuff!

Still lots to do, but I think I'm close to wrapping up the painting process. Some visor stuff, rigging and weathering left. Oh and I need to figure out my accent paint scheme.
1726602180806.png
 
Wow, I look forward to the full reveal, your progress pictures are looking great! I'm printing out the GA SMG now and am excited to put it together. I think it's cool you've got the whole arsenal right off the rip. Keep it up!
 
Just a heads up incase you didn't know, and I haven't seen anyone mention it. The magazine on the SMG is backwards.

View attachment 352618
Oh shoot, no. Thanks for pointing that out, I didn't even think about it being backwards. I don't remember how I glued it either, epoxy or gorilla glue...So I might be able to pry it off and flip it.

EDIT: Pryed off without breaking the print. Need to paint underneath where it was, but otherwise painless. Again, thanks for the heads up!
 
Last edited:

Your message may be considered spam for the following reasons:

If you wish to reply despite these issues, check the box below before replying.
Be aware that malicious compliance may result in more severe penalties.
Back
Top