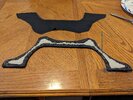
Pipninja's Reach Spartan Undersuit

pipninja

Well-Known Member
Member DIN
S770
So finally the time has come where I show my process of making my Reach undersuit!!

First and foremost, I want to give initial credit to WandererTJ , Because He is the one who made the pepakura model of the undersuit that I used to make my patterns, and KitKatGoose , Who I originally got the idea from! Thank you both for all the help!! Here are some completed pictures of the undersuit so you can see what I'll be showing you how to make!

PXL_20230215_055438129.jpg

PXL_20230215_055443456.jpg
PXL_20230215_055448247.MP.jpg
 
Last edited:
So first and foremost, I will be covering the foam building. I initially started with WandererTJ 's undersuit file, and altered them a little bit both digitally and by hand to be more accurate to my liking, as well as sized it in armorsmith. This process is something that is all about how you want it to look, so I won't be covering the initial pattern making. First things first though, after my patterns were cut, I traced and cut them out on 6MM Eva foam! I personally Like the foam from SKS Props.

PXL_20230204_051210109.jpg


After cutting was assembly. Because most of these parts will be individual parts, there were only a couple of pieces that had to be assembled ahead of time. I also, once cut out and assembled, took a Dremel to the edges at a low speed to soften the corners of the foam. I find this creates really smooth panel lines. I also tried to trace pieces as whole parts, instead of assembling two parts into a larger one, to avoid any seams. Once all the parts were cut out, and dremeled, I taped all the parts together for a test fit.

PXL_20230204_072833238.jpg

PXL_20230204_072839097.jpg
PXL_20230204_073345609.jpg


I decided to create a straight seam down the back, because on my particular armor, my spine is mostly covered. once I knew all the parts fit together, I tested how they fit on me.

PXL_20230204_072947930.MP.jpg
PXL_20230204_072950915.jpg
 
The next process is getting into the fabric skinning. I used this fabric from joann's.


and I backed the pieces with this 4-way stretch spandex


From there It was time to start tracing fabric. I sewed together two pieces of fabric, one side the pleather, the other side the spandex. I traced a 9mm seam allowance around all my foam parts. IMPORTANT, This is being traced on the back side of the rubberized (pleather) fabric. I used sewing weights to hold my foam parts in place. For the parts with two pieces, I just pressed them down on the fabric flat.

PXL_20230205_171331588.jpg
PXL_20230205_171652701.jpg


I designed this special tool that I could friction fit over the end of a sharpie to make precise lines! The file is attached to this post

PXL_20230205_172014692.jpg


From there, all the parts got traced out with the seam allowance, and cut out of the rubberized fabric.

PXL_20230205_191319936.jpg

PXL_20230205_201842575.jpg
 

Attachments

  • Sewing Seam Allowance Tool.obj
    1.5 MB · Views: 79
Next step was to get the fabric parts ready. I found it was easier to cut a piece bigger than the rubberized fabric part cut out in the previous step. and pin it together. because this is a stretch material, sometimes the backing material wasn't lining up properly as I pinned it when I was working with a identically shaped backing piece. pinning the rubberized fabric to a bigger piece alleviated this problem.

IMPORTANT: Make sure you have the rubberized face, face down, towards the larger spandex backing fabric.

PXL_20230205_204314903.jpg


This next part is why I made a precise 9mm seam allowance with the tool. It allowed me to line up the edge of my fabric with the outside edge of my presser foot on my sewing machine, placing the line of thread right where it needed to be in the same outline as the foam parts from step 1.

PXL_20230205_205052925.jpg


Next up was to trim the excess. A tip here, I made a dot when I traced the foam parts at all the corners, so I could make sure I sewn far enough.

PXL_20230205_205245357.jpg


After both parts were sewn together, I cut out the back of the spandex piece. MAKE SURE YOU DON'T CUT THE RUBBEROZED FABRIC BY ACCIDENT! After it is cut, you can turn it inside out. I Usually only include enough, like 10-20mm, to wrap around the back of the foam later.

PXL_20230205_205338232.jpg

PXL_20230205_205356567.jpg
 
Okay, now we get into the fabric wrapping. This part is tedious, but relatively simple in operation. You will start by inserting your foam pieces into your sewing jackets you just made.

PXL_20230205_205601393.jpg


From there, you will be wrapping your fabric around, and pinning it to the back. It will want to fight you here, but the goal is to stretch that rubberized part over the face of the foam part. Make sure you put your sanded edges, aka the front of your foam pieces, facing the correct direction, with the rubberized fabric on the outside face. Just go slow, and work your way around the edge.

PXL_20230205_210351075.jpg
PXL_20230205_210347482.jpg


From here we will be using E6000 to put glue down on the back side of the foam, in between the pins, under the fabric. Make sure you use gloves. E6000 is a toxic material. once again, go slow, and glue around the edges as you go. Feel free to move pins as necessary to get your fabric to hold how you want to. Once you have glued all the way around, you have to wait for your E6000 to cure before removing the pins. I usual found about 2 hours and it wont move when you take the pins out, but you should leave it overnight to be sure.

PXL_20230205_212427622.jpg
PXL_20230205_224822896.jpg
PXL_20230205_224829242.jpg


The reason we glue on the backside, and stretch the fabric, is it will remain naturally smooth, and be able to flex and return to the pristine look.
PXL_20230210_054646718.jpg
PXL_20230210_054658891.jpg
PXL_20230210_054700851.jpg


As a tip, I found that sometimes it was helpful to use masking tape to hold down the fabric in some places after it was glued, especially on the non flat parts. Also, if you poke all the way through the fabric on the other side, don't panic. It is a stretch material, and as soon as you remove those pins, you won't see any holes in the fabric.
 
Now time for the final Part, Attaching everything together!

We are going to be using a very similar technique here. We will be using strips of spandex, and gluing them as bridges between parts.

First things first, get the parts you want to start putting together. I started here in the middle.

PXL_20230211_165705357.jpg


Take your first piece, and loosely trace around it. This doesn't have to be super exact. Then cut out that part. On this first part, I just glued the foam wrapped part straight down to it first. Always only glue one edge at a time.

PXL_20230211_165939647.jpg

PXL_20230211_170153759.jpg

PXL_20230211_170636430.jpg


From there, I used masking tape to attach my two parts together on the front. I pinned the fabric away from the part to be glues, to allow me space to lay down that glue on to the oncoming piece. From there, I did the same process where I pinned the fabric down to the glue, and waited got it to cure. Essentially doing the same process as before to connect the two parts.

PXL_20230211_194755975.jpg
PXL_20230211_194917165.jpg
PXL_20230211_195345812.MP.jpg
PXL_20230211_205029332.jpg


From there I just expanded outwards.

PXL_20230212_034831584.jpg


Once all the parts were together, I decided to sew a zipper to some nylon, and glue that to the spine. I used the same E6000, but I found it needed way longer to cure than the fabric did for it to form a sturdy bond. This part is more personal preference. I later broke that zipper, so you can decide your personal attachment preference. I would probably use velcro next time.

PXL_20230214_211202286.jpg


PXL_20230214_211841815.jpg


From there my abdomen was complete!

PXL_20230215_055438129.jpg
PXL_20230215_055443456.jpg
PXL_20230215_055448247.MP.jpg


I later used the abdomen to attach armor parts to, and added some suspenders to them, but those are all personal modifications that are build dependent.

PXL_20230215_063712505.jpg
PXL_20230215_063718070.jpg
PXL_20230215_063723100.jpg
 

Attachments

  • PXL_20230211_170457152.jpg
    PXL_20230211_170457152.jpg
    3.4 MB · Views: 61
Interesting methods with a solid result. Thanks for sharing pipninja !

If you'd like we can add a link to the Tutorial Index, but first you'll have to add the word Tutorial somewhere into the thread's title.
 
WOW great job dude! I'm currently working on my mk 7 undersuit and wish I had found this thread sooner! I might have gotten that fabric you used. I don't think mine is turning out bad, but maybe you way would be easier lol. How long did it take you to make the undersuit?
 
Well done Spartan. I'll definitely be utilizing this. I wonder how hard or if it's worth incorporating it into a full body suit.
 
WOW great job dude! I'm currently working on my mk 7 undersuit and wish I had found this thread sooner! I might have gotten that fabric you used. I don't think mine is turning out bad, but maybe you way would be easier lol. How long did it take you to make the undersuit?
Umm not too long. I was making it between work days so I am not really sure the full time frame. Maybe like a couple days.
 
This thread is more than 9 months old.

Your message may be considered spam for the following reasons:

  1. This thread hasn't been active in some time. A new post in this thread might not contribute constructively to this discussion after so long.
If you wish to reply despite these issues, check the box below before replying.
Be aware that malicious compliance may result in more severe penalties.
Back
Top