Prof's Halo 3 Marine - Rookie Build

ProfugoBarbatus

New Member
Hello all, new blood here, y'all can call me Prof or Tyler. Got dragged into all this by a friend, and ended up doing the whole thing backwards. Went to a con, then went to a shoot, then joined the forums, and finally started a build. Halo 3 was a defining halo for me, even above and beyond Reach, and I had a hell of a time running around with my Marine buddies back when. Figured it'd be a fitting tribute for me to join them, so here we are! I'll be logging down what I do here, once I've got enough to show for a thing, anyway.

This will be my first ever cosplay build, and I'll be going at it with Fusion 360, a 3d printer, no artistic talent whatever, and a determination to make and print my own files. Most importantly, a fellow 405th member is going to provide some assistance with fabric work, in return for some prints and stuff. Its gonna be a fun ride! To get a feel for Fusion and autocad in general, I went ahead and started modelling a Biofoam canister. Figured it'd be a good starter prop for any halo build, and a nice learning platform.

Not your daddy's shaving cream

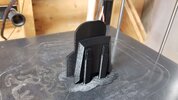
Its still work in progress and I'll probably add a few surface details, but in keeping with wanting to have a bit of spin on things, I decided to answer the question of "How does the nozzle not just flop around all the time" with a pull pin - with a pivot pin as well, so hopefully it can be a useful prop for shoots and such. Plus its just fun to make things move.

As for the marine proper, I'm apparently making the circumstances of my introduction a tradition, by starting from the outside and going in. I'm working on losing a bit of weight to better fit what I have envisioned, but my head, hands and feet ain't changing size anytime soon. So I went out, and got some combat boots and gloves, and started sketching ideas for the Helmet.

Feet First into - Wait a minute, wrong branch
50% recycled uniform, guaranteed!

The boots are more or less perfect. The gloves don't quite match the references I've seen, but they fit flawlessly and I'll take a perfect fit and no glove chafing over a slightly more accurate back rubber any day of the week. Tried to get a BDU as well, but they didn't have anything in the right shades for a Marine, even with some leniency. Gonna check back in a few weeks, otherwise might just order online. Not like there's a shortage of other things to make.

Over the next couple weeks I'll be drafting up the ankle and shin plating, and a first pass on the helmet size plus some padding buffer space. But before I can get into that, I've already been asked to help make a new print for a Reach Magnum - I have even been provided a broken print. Don't know who's design this is, but whoever it is, you did good, and I've seen it around a lot, promise I won't just lift your measurements. The best use of it so far is to help me understand how thick Xmm is actually in the hand, its really hard to judge scale in program. You lose sense of how big a millimeter is when its just on a screen at arbitrary zoom.

Not the pistol WIP I expect from the B button

I'll be making the Halo 3 Magnum alongside it, since they're pretty similar, and the general component and operating technique for the one should be useable for the other. I'm aiming for detachable magazines and moveable slides, but ambition and reality don't always agree, and I'm pretty green to this. An assault rifle is on the plan as well, but not on my active list of works.

My goal is to have all this put together before April of 2023, when my next local convention is. Work and life permitting, it should be doable, but I'd love to hear any of your guys input, thoughts, or advice!
 
The fun part is there's no "right" way to do it! I build my entire first 2 suits before realizing the 405th was more than a FB group :lol:
Your can of biofoam already looks great!
 
Been dying and sunburnt with the heat so my outputs been sporadic, but I've got some updates. The boot plates are ready for a first print, expecting I might need some revisions. I've been advised to print the studs separately, so don't mind the one floating in the void, and the ones on the lower plate were just for scale reference setting them up, tops gonna get the treatment too. The loops for the straps might be a bit thick, and a pain to clean up, but nobody will ever see them so I'm not worried about them being clean, just strong enough to not snap when they're under some strain.

FootPlates.PNG
FootPlatesAligned.PNG

I've rounded them so they're less likely to catch on each other or the boot, and it should help them maintain the overlap as well. If the test print and some walking indicates they're struggling with positioning, I'll add some hooks to the back side to catch the laces.

I haven't started on the shin ring yet, spent too long pulling my hair out looking at this reference thread trying to figure out how the hell to put them on and keep them in place, before giving up and going into MCC for refs on the magnum instead. Only to notice, in passing, there's detail on the game models that isn't on the ref - What a way to drive myself nuts. Always check your primary sources is the lesson I've learned.

20220822204659_1.jpg

Having an actual way to clasp them over will make life infinitely easier. But, I'd already started on the Magnum roughs, so that revelation is going to have to wait, Magnums gonna come first.

MagnumPrimitives.PNG

Still working out the basic shapes on this. Once the main bodies and cuts are in place, I'll do a pass over each part for functional details, then surface details. Only real complex parts are gonna be the safety/retention pin, and the mag release.

Things should hopefully pick up from here, as temperatures are trending back down. Being able to sleep at night and drink a hot tea in the morning will do wonders for my productivity.
 
Wew, been a while innit? Gotta remember to actually post on here. Been so busy with pushes at the dayjob, Ludum Dare for my Dev Hobby, and all the other little things life likes to throw at you.

But, I'll open strong with the fact that the Reach-Style Magnum has been more or less finished! Didn't realize until after I'd finished the thing that the specific grip details were from the Halo TV series, but the Wiki had it tucked up as M6G2. Too late now lol.
1666703943479.png


Just need to do some revisions to slice some of the round details off for separate printings, but the first prints came out pretty good! Orange bits just highlighting whats gonna get separated out in all likelyhood.
1666704092639.png


Despite making it to scale, it actually fits quite comfortably in the hands. Have to admit, its incredibly cool to hold something I made on a computer, IRL.
1666704197502.png


Now, for the rest of the costume? Unfortunately, basically minimal progress. And with my first con suddenly looking a lot closer than I'd otherwise think, I need to jump on that ASAP, so the H3 style magnum is getting temporarily shelved while I work on the hard parts of the Marine Armor, and start getting some help in on the soft ones. Luckily, I think all my major commitments for the rest of the year are done.

Hopefully, shouldn't need two months to bring together the next post :p
 
Wew, been a while innit? Gotta remember to actually post on here. Been so busy with pushes at the dayjob, Ludum Dare for my Dev Hobby, and all the other little things life likes to throw at you.

But, I'll open strong with the fact that the Reach-Style Magnum has been more or less finished! Didn't realize until after I'd finished the thing that the specific grip details were from the Halo TV series, but the Wiki had it tucked up as M6G2. Too late now lol.
View attachment 324625

Just need to do some revisions to slice some of the round details off for separate printings, but the first prints came out pretty good! Orange bits just highlighting whats gonna get separated out in all likelyhood.
View attachment 324627

Despite making it to scale, it actually fits quite comfortably in the hands. Have to admit, its incredibly cool to hold something I made on a computer, IRL.
View attachment 324628

Now, for the rest of the costume? Unfortunately, basically minimal progress. And with my first con suddenly looking a lot closer than I'd otherwise think, I need to jump on that ASAP, so the H3 style magnum is getting temporarily shelved while I work on the hard parts of the Marine Armor, and start getting some help in on the soft ones. Luckily, I think all my major commitments for the rest of the year are done.

Hopefully, shouldn't need two months to bring together the next post :p
Don't worry too much with making the con. There's always the next one! I learned pretty quick that the "con crunch" just stresses you out. I'd rather just go and be jelly of everyone with finished cosplays then get back home with renewed drive! I've been working on my Mjolnir for a few years and I an only just now seeing the finish line.
 
Hopefully, shouldn't need two months to bring together the next post
Well, I probably shouldn't have said that. Jinxed myself.

Good old TL;DR, focused on my gamedev hobby for a while, (Paid off, got 24th place in Humor in Ludum Dare!) and didn't seriously come back to this until the start of the month, but I came back with an actual goal and focus. Put aside my reluctance and hesitation to model with my lack of experience, and just dived in with a "Well I'll just make a V2 with what I learn later" attitude, and got started in on the helmet! And while I have a lot of things I already want to change, I still think it came out pretty well for only discovering how the loft tool works halfway through building it >.>
V2 is gonna fix and avoid that whole spherical base shape now that I'm very aware the real things boxier, but it'll work for a first go at any rate, V2 is probably a next year problem. Still need to figure out how to make sure my head can fit in it - Found the suggestion of printing sliced rings of the narrow parts and testing clearance that way, so might try that.

While figuring that out IRL, I'll be moving onto modelling the chest pieces.
I've been using CADD software for years (mostly Solidworks) and have used Fusion360 for a bit now. How did you model the helmet? Was it a lot of lofts, lots of fillets, or something else? I still struggle to wrap my head around round/organic shapes.
 
I've been using CADD software for years (mostly Solidworks) and have used Fusion360 for a bit now. How did you model the helmet? Was it a lot of lofts, lots of fillets, or something else? I still struggle to wrap my head around round/organic shapes.
The core body was lofts, mainly to get that transition from the brim working right - At first I tried using a warped sphere and removing material, but that just ended up looking awful, and trying to get any geometry to smoothly transition was impossible.
1684969921170.png

When I go back for V2, It'll be lofts with a better starting profile - When I threw out the above and remade it, I basically just stretched a circle to scale, and lofted it onto the brim, revolved for the rest and then just cut the excess lower material off. Maybe there's a better way, but I've got a good sense of 3d space in my head, so lofts, particularly with guide paths, grok with me.
 
The core body was lofts, mainly to get that transition from the brim working right - At first I tried using a warped sphere and removing material, but that just ended up looking awful, and trying to get any geometry to smoothly transition was impossible.
View attachment 331731
When I go back for V2, It'll be lofts with a better starting profile - When I threw out the above and remade it, I basically just stretched a circle to scale, and lofted it onto the brim, revolved for the rest and then just cut the excess lower material off. Maybe there's a better way, but I've got a good sense of 3d space in my head, so lofts, particularly with guide paths, grok with me.
That's a good explanation. Thank you! I've usually done a lot of lofts for organic shapes but should probably use guides for them more. Wasn't sure if there was a better method. Guess I just need to practice more!
 
Well it has been a Time - Life gets busy, I got busier, and what was hoped to be a quick upgrade to the 3d printer before putting the helm through it turned out to be "Your Thermal sensor is literally baked into the hot end, this might be why it was printing so badly". Nothing the parts cannon couldn't fix though, and off to the races we go!
PrintingHelmet.jpg

As for the rest of the armor, the chest piece was causing me no end of difficulty. Between being still very new to Fusion, and some general stubborness, I was getting nowhere fast with flat reference images and "best guess" slapdash work. So, I decided to try a different approach. Found ripped Halo 3 models for the marine (Thank you Halo Archive, saved me so much time), popped them open in blender, cut the chestpiece off the marine model and patched the holes, and exported that back over into fusion.

Used it as a base to start working over new Geometry, since the Halo 3 models are such low poly beasts. Got the chest plate close to what I want, based off staring at the normal maps for far too long in Blender, side by side.
BodyArmorWIP.png


Lots of work to still be done on it, but doing the chest this way took me maybe two lunch breaks and an afternoon, so that's already more progress than I made in a frustrated month beforehand.

Assuming the printer gods look kindly upon me, the helm should be done by the weekend. Then the !!fun!! part of learning to clean up a 3d print. Luckily I got Electraknite to help show me the path through this great journey.
 
Printers still doing its best impressions of a Pastamancer, but at least I can still work on the models.

Specifically, reworked the front plate, realized I'd completely bodged the dimensions after getting too in my own head on it.
1709775207149.png

The boltholes are only applied to half since I'm gonna be slice and mirroring it all at the end, no point doing so now. Probably going to change the shape of them to be easier to clean up, still need to make the bolts too.

As far as new progress goes, been working on the detail for the back, and making the shoulder and neck far less polygonal. Still a couple passes left on that front, but for having no idea whatsoever what I'm doing, I'm fairly happy with the outcomes so far.
1709775518887.png


Just gonna keep trucking away at it, I've been finding the entire process fairly cathartic - At least, as I get more comfortable with how to achieve the results I want. Makes a great lunch break project to work on.
 
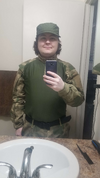
Base layer softs are in. Spent a while debating whether to go urban or forest for the marine, ultimately decided that the Sierra-117 color grading was what I was gonna go for. Worst case scenario, I can always buy some in different patterns in the future.

Hate taking photos of my self, so don't mind me looking generally uncomfortable.
baselayersofts.png

Pant legs seriously need to be hemmed in, but the rest actually fits better than I was expecting. Gonna be throwing a UNSC logo on the cap there as a fallback in case the helmet isn't ready in time, got access to a Resin printer that is still working so that should be fine. Talking with someone about buying some time on their Printer as well as a fallback option if repair efforts fall through. The main armor body is nearly done, I just need to finalize some surface details, and make some holes for me to sink metal threads into. Gotta scale it as well, but probably going to err on the slightly too big side, just since I won't have time or access to reprint it.

Speaking of finishing work, going to be taking that Halo Reach Magnum print from way earlier in the thread, and finishing and painting it. It might not be 'right' but at least I can have something for the upcoming con, and gives me something lower stakes to learn how to do so with.

Also busted out my old sewing machine (Really hope it still works, haven't actually tried yet), as the Marine has that black vest underneath the main body and shoulders., and the thigh panels that I need to make. Been nearly ten years since I took a crack at this, but I'm hoping I can at least bodge together something acceptable, got a plan all in my head. And hey, isn't half the fun of cosplay seeing how a plan goes wrong?
 
Wew, busy busy week! Lots of running around, lots of progress!

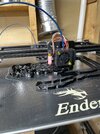
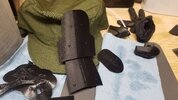
Good news is that Once again, I think the printer is working! With some dehydrator action, slicer recalibration, and bed adjustments, I managed to get about 20 hours of near straight printing out of it without a single failure, practical parts too! Not having much optimism, I threw on a thin wall slice of the boot plates I made way back, and they came out delightfully.
20240317_004654.jpg20240317_005247.jpg

I ended up printing both sets, although the thin walled nature of them meant that I broke one in half removing supports and the raft - Already walked back from raft to brim, was just trying to cover all possible failure points at the time. What does matter is....

20240317_140711.jpg

First part of the helm is printing! Messed around with settings and breaking it up, didn't feel confident in a 7 day, 3 rolls print, managed to break it down into 3 parts that print faster with half the support, and easily fit within the available filament.

While I was waiting on the printer to run its tests, I did take a crack at sanding that handgun - I honestly have no idea when "done" is so I didn't get past sanding. Man, does that put a kink in your neck though or what? Instant awareness of why some shapes are problematic for finishing too, taking that away for future design consideration.

When I wasn't sanding, I was priming and painting, because that Hat wasn't going to emblem itself. Resin print of the logo I downloaded came out great, and after a few primer applications I decided to try hand painting the emblem. Admittedly, I have no clue how to use an airbrush so it wasn't a particularly difficult choice.

20240317_161453.jpg


My brushwork leaves a lot to be desired, but a steady hand plus some shiny paint goes a long way. Still needs to be actually adhered to the hat, but that's an easy problem to solve.


Didn't forget about the fabric work either - Nothing to show for it other than a bag stuffed to the brim with materials, but looking to get started over the next day or two here. Life's gonna be nothing but cosplay for a while, but I'm nervously excited for it all.
 
Somewhat short update, but I think its done! Or at least, as done as I can afford it to be, it needs to hit the printers soon or it'll never make it.

1711157759736.png
1711157798610.png

Fully fitted with bores for threaded inserts, hardware arrived just a day ago. Plan to screw down the strapping on the shoulders and the anchor point to the chest. No experience or idea how effective gluing nylon strapping down is, and figured that this path is at least not any weaker, and could be used in conjunction. Same thing with the front velcro slots, if needed - I don't expect to have any pouches ready for the con, but having the potential is nice.

1711157981903.png
1711158009188.png

The lower arms link together in an overlap, with matching bar magnets. They slide to interface rather than direct contact to reduce the risk of them slamming into each other or pulling each other out. Since I'm not sure just how well that'll hold in practice, I've also added points to attach strapping or velcro to the inside, whatever ends up working. It'll be a bit awkward to secure when wearing it, but assuming its pulled tight, then even if a movement pulls the magnets out of alignment, the strapping will pick up the slack, and once the tension is removed the magnets should be able to pull everything back into alignment.

No idea if any of that will work out in practice, but hey, learning experience.

I've separated out the surface rivets that'll fit into the detail indents across it, now that I know how much it sucks to try and sand around protrusions. All thats left is cutting it up in such a way that the slicer can handle it, and not blow all the time and filament budget on support structure.

Reportedly, the helmet actually survived printing, so with any luck I'll have my head in plastic come Monday.
 

Your message may be considered spam for the following reasons:

If you wish to reply despite these issues, check the box below before replying.
Be aware that malicious compliance may result in more severe penalties.
Back
Top