Project: Valentine

RabbitActual

Jr Member
Hey y'all! Finally getting started on my Rakshasa cosplay. Based on my multiplayer spartan, so I'll be doing the ODST shoulders and the CQB helmet to go with it. So far I have the helmet mostly printed, though it may be a bit too big, so I'll hold off on printing the rest until I can see how it looks in proportion to the rest of the kit. I also have both biceps, and both forearms printed. Chest plate is on the printer, though it'll be a few days before the whole thing is done.
 

Attachments

  • Ref1.jpg
    Ref1.jpg
    202.8 KB · Views: 132
  • 01.jpg
    01.jpg
    3.6 MB · Views: 119
  • 02.jpg
    02.jpg
    93.8 KB · Views: 133
Rak City gang! let know how the odst pack works out for you and how you mount it, I've been thinking about doing it for mine but not really sure how it'll go.
 
Rak City gang! let know how the odst pack works out for you and how you mount it, I've been thinking about doing it for mine but not really sure how it'll go.
I'm still brainstorming ideas for that. I'm thinking since I'll have to make a vest to mount the chest plate anyway, I'll probably mount some buckles into the back to attach the pack, and then maybe add some straps to cinch it down so it doesn't move around a lot. Undersuits are really not my wheelhouse, which is why my Mandalorian kit still doesn't have one haha.
 
Well friends, the train to RakCity got derailed when my printer went down. In the time it took me to fix that, my mother was kind enough to order one of the Sean Bradley ODST kits for me as a birthday present. With my plans for the Rakshasa being so similar to the ODST kit anyway, I've opted to just scrap the Rakshasa and focus on making an ODST. Not to worry though, I do still plan on building a spartan in the future.

Now begins the arduous task of... Waiting for the kit to be delivered. Until then though I want to take a look at what will be my primary, as well as stripping down and redoing my rush job ODST helmet from Planet. First, the battle rifle. I picked up one of those stiff.. Foam? Rubber? guns from a vendor at Planet. I wanted to have something that was done and ready to go, no fuss.

Except... Now I want to fuss. I plan on modeling and printing the flash hider that SHOULD be on it. The scope is a little crooked and honestly, just underwhelming. Not sure what I want to do about that, but I'm open to suggestions. I also want to repaint it, though I'm not sure what it's actually made out of, and whether or not spray paint will react badly with it. I'd also like to hear your thoughts about that.
1752709225474.png
 
I also want to repaint it, though I'm not sure what it's actually made out of, and whether or not spray paint will react badly with it. I'd also like to hear your thoughts about that.
I repainted one of these for Fallen a few years ago, but neglected to take pictures before shipping it. I did use the same paints that I used on my Nerf Assault Rifle repaint. They were acrylic paints that I painted by hand. I hand painted it for two reasons. One, the best gun metal and metallic dark gray to achieve the sort of two tone paint job on the majority of UNSC weapons was an acrylic paint I stumbled on, and two, I didn't want to mask off all those small areas for rattle can painting and found hand painting it to be the easiest way to maintain control without masking off.

You can see which paints I used in my post on it here:

I believe Negativecacti was able to do a repaint with Rattle Can spray paints with no negative reactions from the foam base.
Thank you for the advice! I can't believe you painted that by hand! That looks amazing!!
 
I believe @Negativecacti was able to do a repaint with Rattle Can spray paints with no negative reactions from the foam base
Correct. I did do a repaint on that foam BR55.
I did a layer of plastidip first then used rattle can and acrylics to do the HCS Launch skin. I would recommend sanding it down with 320 before you use plastidip or rattle can so the paint can get better adhesion.
1000032132.jpg
 
Correct. I did do a repaint on that foam BR55.
I did a layer of plastidip first then used rattle can and acrylics to do the HCS Launch skin. I would recommend sanding it down with 320 before you use plastidip or rattle can so the paint can get better adhesion.
View attachment 364243
Thank you! Good to know I can start with a layer of plasti dip! It's usually my go to. Love that stuff haha.
 
Been awhile since I’ve updated… Still waiting on the ODST kit. It’s been delayed… twice now I think? However, I do have a new addition to the armory that Sweed was kind enough to donate. Forgot to take a before before picture, but I’m working on getting this MA5B ready for fresh paint.
IMG_4583.jpeg
 
Waiting is a easy and a hard game at the same time, atleast you have something to do :D
The kit has been delivered, but I have not yet done much with it. Wrapping up some other stuff for ren fest, since we will be doing that in the next couple weeks.
 
Well friends, the train to RakCity got derailed when my printer went down. In the time it took me to fix that, my mother was kind enough to order one of the Sean Bradley ODST kits for me as a birthday present. With my plans for the Rakshasa being so similar to the ODST kit anyway, I've opted to just scrap the Rakshasa and focus on making an ODST. Not to worry though, I do still plan on building a spartan in the future.

Now begins the arduous task of... Waiting for the kit to be delivered. Until then though I want to take a look at what will be my primary, as well as stripping down and redoing my rush job ODST helmet from Planet. First, the battle rifle. I picked up one of those stiff.. Foam? Rubber? guns from a vendor at Planet. I wanted to have something that was done and ready to go, no fuss.

Except... Now I want to fuss. I plan on modeling and printing the flash hider that SHOULD be on it. The scope is a little crooked and honestly, just underwhelming. Not sure what I want to do about that, but I'm open to suggestions. I also want to repaint it, though I'm not sure what it's actually made out of, and whether or not spray paint will react badly with it. I'd also like to hear your thoughts about that.
View attachment 364242
I printed two muzzles. One black/metal, and one orange for comic con. They are removable and attach with magnets
 
Figured I should probably do an update on the build. Fall months get busy at work so I didn't really have much energy to work on it throughout September. Really started to get to work when I went on vacation the first week of October however.

My main goal for vacation was just to get everything cut out, sanded, and start on assembly.
1762129374214.png

1762129404299.png


The kit came with divots specifically for one inch straps, but I hate the look of those nylock backstrap things. I ordered 1.75" strap from a military surplus store, and had to re-sculpt the back plate to take the larger straps.
1762130333235.png

1762130356714.png


Next up was getting parts primed, and settling on the color i wanted.
First up was Rustoleum Metallic Soft Iron, with Montana Gold Anthracite Grey
1762130484043.png


Rustoleum Metallic Gunmetal Grey, with Rustoleum Flat Black
1762130591341.png


Anthracite Grey and Flat Black
1762130633518.png


In the end, I went with the Metallic Gumetal Grey, Anthracite Grey, and Flat Black.
1762130710165.png

1762130729191.png


By this point, Halloween was fast approaching. I still had some detail painting left to do, but it was time to get started on the straps that hold everything together. The white strap I had ordered was dyed black, but ended up being too thick to really work with. I did use some later for decorative straps, but mostly used the green for the front and back plate, as well as some custom straps made from duck cloth.

1762130908995.png

Amazon sent the wrong D rings, but I didn't have time to exchange them. They will get replaced at a later date.

1762130965730.png


I also added this rubber weather stripping to parts that would be rubbing, or bumping together. It really gives the edges a finished look, and helps make the parts look thicker than they actually are. (This later fell off. I will have to find better glue.)
1762131089372.png


The kit came with EVA foam shoulderstraps that were meant to be glued to fabric, but that left the underside kind of messy, so instead we sewed actual covers for them.
1762131212518.png

1762131266739.png


The harness pattern from MCcall's M7176 was used to keep the shoulders on. It... Works, but leaves a lot to be desired. They tend to get twisted up, and it pulls them under the straps on the chest piece.

1762131438219.png


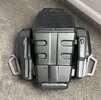
The torso is held together with rivets and and the custom straps I mentioned earlier. I altered it just a tad but for the most part its just as the directions say.
1762131645321.png

1762131679779.png


The boots are held on with covers that wrap around my legs, and velcro closed. The calves have straps riveted in, and the shins just stick on with a large strip of velcro. This method works, but could be better. I know they are supposed to have straps around the outside, but I didn't trust that to really hold it all together. I will add them at a later date.
1762131784762.png

1762131806636.png

1762131819513.png

1762131836203.png

1762131849001.png

1762131860043.png

1762131873043.png

1762131888015.png


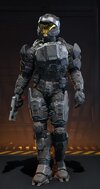
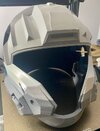
Finished the helmet repaint, visor swap, and weathering (Except for paint chipping, to come at a later date due to lack of time) for the entire kit the night before halloween.
1762132127064.png


In all the excitement of the costume contest at work, and then the wedding that night, I didn't really get many pictures, but this is the kit as of now. I still need to finish the gauntlets, as I sacrificed them to save time. I feel like the kit can stand on its own without them. I also need to come up with some way to keep the straps up on the collar pieces instead of slipping down on to the shoulders.
1762132274204.png

1762132694786.png
 

Your message may be considered spam for the following reasons:

If you wish to reply despite these issues, check the box below before replying.
Be aware that malicious compliance may result in more severe penalties.
Back
Top