Did you print the full undersuit from tpu? I have been wondering about this as i get to the mark VB files I have... If so how did you find TPU on the P1S as far as printing goes?
You are using an out of date browser. It may not display this or other websites correctly.
You should upgrade or use an alternative browser.
You should upgrade or use an alternative browser.
Rage's first build!!! The MK IV and Halo 3 Assault Rifle
- Thread starter RageGoblin
- Start date
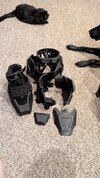
I have printed several pieces of the under suit using TPU so far. It isn't as flexible as I had hoped even with lowering the infill. I would say with printing, I had to make sure to keep the top glass portion opened, so I could maintain a proper temperature inside. You'll need to really watch the ambient temperature and edit the print temperature to a much more narrow range overall. I had it lock up the extruder the first couple of times, because I just let it print at the default TPU settings, and it got too hot inside the sprite.Did you print the full undersuit from tpu? I have been wondering about this as i get to the mark VB files I have... If so how did you find TPU on the P1S as far as printing goes?
I got to go home early from work early, so tonight I will be removing the supports from the pieces I have for the shin piece and then start working to fuse it together.
The way this file works is that the shin piece locks together from two pieces, but you don't fuse the whole thing together.
I am trying to figure out how to plastic weld the straps/buckles I will be using to the actual leg piece itself.
Do I like melt a huge area where the fabric from the strap is supposed to go and then mash it into the melted plastic? Or do I do that AND use some extra filament as like a type of solder and melt that around it too?
No idea.
It would have been really cool if I had been able to learn how to alter the file and create slots for the buckles to slide through on the backside of the piece that can't be seen in the front.
That is a project for a different day.
Attachments
So first things first, where your two parts meet, were those surfaces oriented towards the bed, and do they kinda mushroom out a little bit? If so, you'll want to sand those bumps down, or you'll have a tall seam, and its so annoying to sand out. Personally I like to give the two meeting surfaces just the slightest bevel. This will melt your seam down into the part instead of above it. Once they're prepped, I line up the two parts and "tack" the ends together. Just touch the tip of a hot soldering iron to them and melt a little bit together. Once that's done they should hold themselves together. This will probably be easier with a flat tip on the soldering iron.I got to go home early from work early, so tonight I will be removing the supports from the pieces I have for the shin piece and then start working to fuse it together.
The way this file works is that the shin piece locks together from two pieces, but you don't fuse the whole thing together.
I am trying to figure out how to plastic weld the straps/buckles I will be using to the actual leg piece itself.
Do I like melt a huge area where the fabric from the strap is supposed to go and then mash it into the melted plastic? Or do I do that AND use some extra filament as like a type of solder and melt that around it too?
No idea.
It would have been really cool if I had been able to learn how to alter the file and create slots for the buckles to slide through on the backside of the piece that can't be seen in the front.
That is a project for a different day.
Now you're ready to plastic weld! If you're right hand dominant, hold the soldering iron in your right hand, and hold a piece of filament in your left. You'll just go from right to left on your piece, Pushing the filament down into your bevel, then melting it all together. If you've ever seen TIG welding, that's pretty much exactly what I do. Going around the whole part, front and back should leave it essentially one solid piece.
PLEASE MAKE SURE YOU ARE WEARING A RESPIRATOR AND HAVE LOTS OF VENTILATION
As for the buckles... I have some ideas, but I'd like to see pictures, if you can take them.
When you say "bevel," do you mean to sand a groove into the top/middle of the piece?So first things first, where your two parts meet, were those surfaces oriented towards the bed, and do they kinda mushroom out a little bit? If so, you'll want to sand those bumps down, or you'll have a tall seam, and its so annoying to sand out. Personally I like to give the two meeting surfaces just the slightest bevel. This will melt your seam down into the part instead of above it. Once they're prepped, I line up the two parts and "tack" the ends together. Just touch the tip of a hot soldering iron to them and melt a little bit together. Once that's done they should hold themselves together. This will probably be easier with a flat tip on the soldering iron.
Now you're ready to plastic weld! If you're right hand dominant, hold the soldering iron in your right hand, and hold a piece of filament in your left. You'll just go from right to left on your piece, Pushing the filament down into your bevel, then melting it all together. If you've ever seen TIG welding, that's pretty much exactly what I do. Going around the whole part, front and back should leave it essentially one solid piece.
PLEASE MAKE SURE YOU ARE WEARING A RESPIRATOR AND HAVE LOTS OF VENTILATION
As for the buckles... I have some ideas, but I'd like to see pictures, if you can take them.
I mean I sand the edges, where the two parts meet, just enough to knock the corners down, and give me a place to put the filament. Just like this.In the middle is your seam, and the red circle will be the filament. If you want I can take actual pictures or video with my own parts after work tomorrow.When you say "bevel," do you mean to sand a groove into the top/middle of the piece?
How do you have a diagram of this?! This is perfect. I will try this when I start sanding tomorrow. I am supposed to plastic weld the entirety of the seam line in the front and the back?I mean I sand the edges, where the two parts meet, just enough to knock the corners down, and give me a place to put the filament. Just like this. In the middle is your seam, and the red circle will be the filament. If you want I can take actual pictures or video with my own parts after work tomorrow.View attachment 364245
Does that make getting it smooth under paint/primer a nightmare? Or does it make it easier?
I just made it in paint real quick haha. It’s the same diagram my teacher showed me in welding schoolHow do you have a diagram of this?! This is perfect. I will try this when I start sanding tomorrow. I am supposed to plastic weld the entirety of the seam line in the front and the back?
Does that make getting it smooth under paint/primer a nightmare? Or does it make it easier?
You’re probably still gonna have a high spot, because if you bevel too much you’ll go down into your infill. But it won’t be as bad as if you just melt the edges together without doing any sanding at all
This is a great diagram and idea, I would think the sanding also gives the melting plastic from the weld a better surface to attach to and bond with. I say this knowing nothing of joints other than woodworking which is mostly glue and not welding. =)I just made it in paint real quick haha. It’s the same diagram my teacher showed me in welding school
You’re probably still gonna have a high spot, because if you bevel too much you’ll go down into your infill. But it won’t be as bad as if you just melt the edges together without doing any sanding at all
Glad I could be of service haha. Maybe some day I'll get to make a metal kit, and I'll be able to do some real welding againThis is a great diagram and idea, I would think the sanding also gives the melting plastic from the weld a better surface to attach to and bond with. I say this knowing nothing of joints other than woodworking which is mostly glue and not welding. =)

On that note I need to buy another soldering Iron!
So when I'm plastic welding, does the plastic "weld/solder" I'm using to connect the pieces actually melt the underlaying layer to the "solder"? Or does it just melt the "solder" to the two pieces?Glad I could be of service haha. Maybe some day I'll get to make a metal kit, and I'll be able to do some real welding again
In a perfect world you want total fusion of underlying with your solder. but this can be tricky if you get the existing pice to hot you can get some warping.
It's kind of hard to explain.. Essentially it's all going to melt into one solid seam. The reason why I use the piece of filler filament is because if you just use the parts, you run the risk of melting into the infill of the part and getting a void.So when I'm plastic welding, does the plastic "weld/solder" I'm using to connect the pieces actually melt the underlaying layer to the "solder"? Or does it just melt the "solder" to the two pieces?
This weekend I have been working to scale and piece back together the parts for my right thigh outer suit. I had several failed attempts due to the fact that I completely forgot to actually have the TPU piece I had printed for my under suit ON MY BODY while I was trying on the test ring.
I have also been reading through the forums on how other people have attached rigging to their 3D printed pieces. I have some ideas and will use the failed prints as experiments for how much pulling and tugging the attached straps can take before either breaking the print or just coming detached from whatever I have used to anchor them with.
I have also been reading through the forums on how other people have attached rigging to their 3D printed pieces. I have some ideas and will use the failed prints as experiments for how much pulling and tugging the attached straps can take before either breaking the print or just coming detached from whatever I have used to anchor them with.
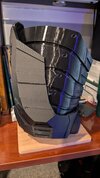
SUCCESS!! I have successfully scaled both of my inner and outer right thigh pieces so they fit together like a glove. I already have the left inner thigh pieces printed out of TPU. Tonight before I just logged off to go to bed, I sliced and started printing the left outer thigh part. IT'S COMING TOGETHER!
Next is to figure out the best way to slice up the abdominal piece that looks like a one piece swimsuit with the top bit cut off. Lol I know it'll be at least 6 parts.
Next is to figure out the best way to slice up the abdominal piece that looks like a one piece swimsuit with the top bit cut off. Lol I know it'll be at least 6 parts.
Attachments
- Member DIN
- S250
That looks awesome let me know how sanding TPU goes.
I will! I've been watching all kinds of YouTube videos and asking around trying to figure it out.That looks awesome let me know how sanding TPU goes.
This TPU looks pretty clean even without processing. the TPU is my biggest worry for my suit but this gives me hope. Looking forward to seeing more progress!
Slowing the print speed and keeping the temperature and moisture VERY controlled helped so much with the stringing. I also used rubber cement on the inside seams.This TPU looks pretty clean even without processing. the TPU is my biggest worry for my suit but this gives me hope. Looking forward to seeing more progress!