ALRIGHTY, Y'ALL! September has been a crazy month: my printer jammed up and wasn't working for a little while and then I got COVID that kicked my butt for a week and a half straight.
Now I'm back at it and have good news to share. I have hopefully figured out the settings for printing TPU now. (I know I keep saying that, but this time, I mean it for real. >_<)
For reference, I am using Overture 95A TPU.
So far, I have figured out to print TPU pieces the following:
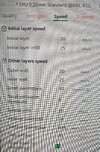
1. Slow all of the print speeds by 75%
2. Turn off retraction in the filament settings.
3. I set the nozzle temp to 10 degrees higher than the max of what the spool says for the initial 5 layers, then I set it to 5 degrees higher to the max for rest of the print.
4. vertical printing is your friend for anything with a curve to it.
5. slow part fan to 20%
6. I have a P1S that has a glass top and door to create a full enclosure. Normally, I have the lid cracked open to prevent heat creep into the extruder. However, I found the issue I KEPT running into was that the top of the prints had gaps in layer lines, were jagged, and would sometimes fail. I feel like this was because the print was getting further away from the heat of the build plate, and the ambient temperature around it was too low.
So when printing with TPU, I close the lid to have the full glass enclosure to help create as even a temp as I can.
7. Every three days, I put the TPU back into the dry box for a day. This has helped so much prevent stringing and uneven textures.
When I am running low on TPU and know I will be needing to switch to a new roll soon, I will take the new roll out of the packaging and put it into the dryer for at least 6 hrs before using it, even though it's brand new.
8. I use tree supports for any threshold angle > 30degrees, as well as "Support Critical Regions Only" and "Remove Small Overhangs" selected under the support tab.
9. Every couple of hours, I will check the nozzle temperature to make sure it isn't too hot since I have all the doors closed. Again, this goes back to trying to prevent heat creep and clogging my extruder.
10. I have my build plate set to the upper limit of what is on the spool with it only being 10 degrees hotter for the initial layer.
11. I am printing with 2 walls.
12. I have the the shells as such:
Top surface pattern: Concentric
Bottom surface pattern: Monotonic (probably could be the same as top)
Internal solid infill pattern: Monotonic.
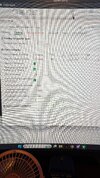
13. SPARSE INFILL SETTINGS:
Sparse infill density: 10%
SPARSE INFILL PATTERN: GYROID
-- I have spoken with several cosplayers who print with primarily TPU, and they have all said Gyroid is the best for support and strength for TPU. Thanks
SamuelHan for all the help so far with the TPU. I don't think I ever would have figured this out without you.
Now, I know that I could probably print with slightly faster speeds (most prints take 12+ hrs for one part), but I feel like I would rather the part take half a day to print and have a good looking part that I don't have to reprint or have wasted 100+ grams of a costly filament.
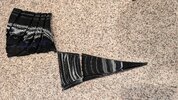
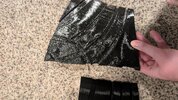
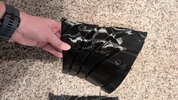
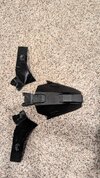
I have printed the front part of the waist/pelvis portion of the outer armor, and the part of the under suit that goes under the cod piece. I will continue to print the front part of the ab wrap undersuit.
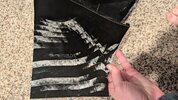
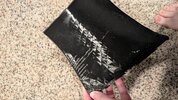
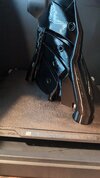
I will attached pictures of the failed TPU prints before closing all the glass doors and making the temperature adjustments with afterwards. I had more parts that failed spectacularly prior to these changes, but I threw those away.
My plan is to also put slots into the undersuit for the rigging to go through that will hold the outer suit and the undersuit together on my person as one piece essentially.
Thanks to
billeybob250 for telling me about the negative space component in the Bambu Lab slicer program. I was really struggling with this.
Photos to come! I hope this helps!