Reach UNSC Trooper WIP

Status
Not open for further replies.
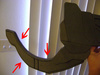
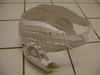
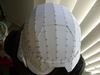
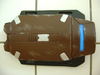
No way! Those shoulder pads look manufactured. You did a really good job on them. They look just like the DAPS for real body armor, they even have the velcro.

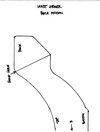
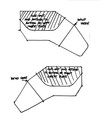
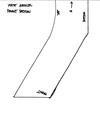
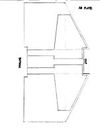
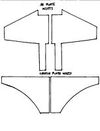
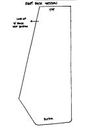
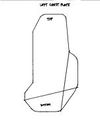
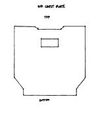
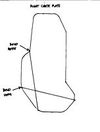
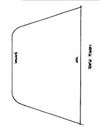
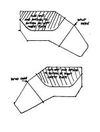
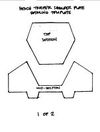
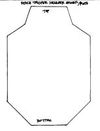
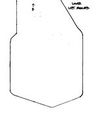
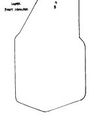
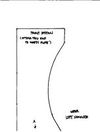
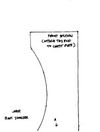
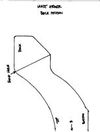
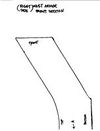
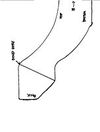
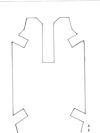
Thanks man! Yeah, I made a stencil from a poster board and cut the fabric accordingly. It was a pain to sew since I had to sew on the straps first, then sew the edges/seams while trying to keep the straps from getting in the way. The ripstop fabric is really slippery and I had a hard time keeping the pieces together while sewing them. I am by no means an expert tailor, but it all worked out somehow.

do you know the name to the airsoft chest gear? cuz when conducting reasearch for my ODst build i found out it is actaully like your unsc trooper armor, except with an added chest plate, shoulders, helmet, and shin gaurds LOL. so ill use your thread to help me reference xD

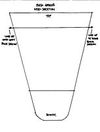
Not sure if it's cool to post a link for an Ebay listing that's not mine, but if you enter "M03 Airsoft Black Vest Paintball Tactical Hunting" in the Search box on Ebay, it will take you to the exact vest that I used. One thing though is that it says it will fit XS, S, M but I had to extend the sides so that I can velcro it close. But before the extension, I could not even strap the sides by myself. So, breakout the seam ripper and take off those cheesy straps.

LOL i was JUST about to ask your about painting xD

Sorry, don't know how I missed that question earlier! LOL!


Thanks Geoat2t! Glad you like it.
 
Well im going to refer to your thread alot for detaills on making my ODST suit. It just your trooper suit but with thte modifications xD. The only bitch to do would be the collar. Ill be sure to credit you when the time comes. even though it was an external help xD
 
doing good so far keep it up! by the way do you have any tips for painting on the foam? also can i get some sort of print for the thigh piece attachment or something? i plan to do a Reach ODST armor and it requires it was well.

I traced my templates down on letter size paper and was able to scan them in. So here are the drop-leg thigh attachment pieces in letter size format. It goes the same order you see them here.
DropLegThighAttachment1.jpg

DropLegThighAttachment2.jpg

DropLegThighAttachment3.jpg


Here is a little update on the modded Nerf Recon Reach AR.
DSC01528.jpg
 

Attachments

  • DropLegThighAttachment1.jpg
    DropLegThighAttachment1.jpg
    17.5 KB · Views: 172
  • DropLegThighAttachment2.jpg
    DropLegThighAttachment2.jpg
    18.4 KB · Views: 163
  • DropLegThighAttachment3.jpg
    DropLegThighAttachment3.jpg
    18.5 KB · Views: 161
  • DSC01528.jpg
    DSC01528.jpg
    40.3 KB · Views: 168
I traced my templates down on letter size paper and was able to scan them in. So here are the drop-leg thigh attachment pieces in letter size format. It goes the same order you them here.

DSC01528.jpg

Geewhiz thanks dude!!! :D Now i will have to find out how to do the bitchy collar. i think i've got an idea.
PS your doing great on your AR.
 

Attachments

  • DSC01528.jpg
    DSC01528.jpg
    40.3 KB · Views: 160
Geewhiz thanks dude!!! :D Now i will have to find out how to do the bitchy collar. i think i've got an idea.
PS your doing great on your AR.

You're welcome bro! Sorry it took me a while to scan those. I'm not sure how much you're willing to spend but here is a somewhat affordable tactical ACU vest with soft collar for last resort. CLICK HERE for the actual store front for this vest. BTW, thanks for the compliment on the Reach AR!

727-447590.jpg
 
TD2253;523328I'm not sure how much you're willing to spend but here is a somewhat affordable tactical ACU vest with soft collar for last resort. [URL="http://www.ghilliegear.com/tactical-vest-with-soft-collar-p-627.html" said:
CLICK HERE[/URL] for the actual store front for this vest.
727-447590.jpg

Hmm that seems to be promising, but i dont really like the pockets. theyll block the way :p the collar though i can transform w/ foam etc.
 
Or you can get an ACU pattern t-shirt, cut the pattern out and have someone sew it up for you. CLICK HERE for the $7.00 shirt link. I might do the same myself.

yhst-28915820625087_2151_14453084.gif
 

Attachments

  • yhst-28915820625087_2151_14453084.gif
    yhst-28915820625087_2151_14453084.gif
    43 bytes · Views: 168
hey there Im making armor from your templates and I was wondering if you have the template for the two side pieces and the two small pieces under the main chest piece:

DSC01258copy.jpg

DSC01243copy.jpg


Thanks I've been following your build and it looks amazing keep up the good work.
 

Attachments

  • DSC01243copy.jpg
    DSC01243copy.jpg
    28.7 KB · Views: 163
  • DSC01258copy.jpg
    DSC01258copy.jpg
    76.6 KB · Views: 170
Thanks man, got those files right here for you Chrisrunner. They are in letter format. Good luck with your build!

WaistArmorBackSection.jpg

WaistArmorFrontSection.jpg


LowerChestPiecesLeftandRight.jpg
 

Attachments

  • WaistArmorBackSection.jpg
    WaistArmorBackSection.jpg
    24.1 KB · Views: 178
  • LowerChestPiecesLeftandRight.jpg
    LowerChestPiecesLeftandRight.jpg
    48.5 KB · Views: 170
  • WaistArmorFrontSection.jpg
    WaistArmorFrontSection.jpg
    20.5 KB · Views: 165
No problem! Here is the complete list of templates I drew by hand. Most of the bigger templates were traced on several pieces of letter sized pages so I could scan them. Let me know if you guys have questions on how to assemble the parts together.

Ab_and_Crotch_Plate_Insets.bmp.jpg
Abdomen_Plate.bmp.jpg
Back_Armor_Left_Section.bmp.jpg
Back_Armor_Mid_Section.bmp.jpg
Back_Armor_Right_Section.bmp.jpg
Chest_Plate_Left_Section.bmp.jpg
Chest_Plate_Mid_Section.bmp.jpg
Chest_Plate_Right_Section.bmp.jpg
Crotch_Plate.bmp.jpg
Lower_Chest_Pieces_Left_and_Ri.bmp.jpg
Reach_Trooper_Shoulder_Plate_D.bmp.jpg
Reach_Trooper_Shoulder_Plate.bmp.jpg
Shoulder_Armor_Lower_Left_Sect.bmp.jpg
 

Attachments

  • Abdomen_Plate.bmp.jpg
    Abdomen_Plate.bmp.jpg
    3.5 KB · Views: 178
  • Ab_and_Crotch_Plate_Insets.bmp.jpg
    Ab_and_Crotch_Plate_Insets.bmp.jpg
    4.6 KB · Views: 165
  • Back_Armor_Mid_Section.bmp.jpg
    Back_Armor_Mid_Section.bmp.jpg
    3.9 KB · Views: 171
  • Back_Armor_Left_Section.bmp.jpg
    Back_Armor_Left_Section.bmp.jpg
    3.1 KB · Views: 180
  • Back_Armor_Right_Section.bmp.jpg
    Back_Armor_Right_Section.bmp.jpg
    3.1 KB · Views: 181
  • Chest_Plate_Left_Section.bmp.jpg
    Chest_Plate_Left_Section.bmp.jpg
    3.4 KB · Views: 172
  • Chest_Plate_Mid_Section.bmp.jpg
    Chest_Plate_Mid_Section.bmp.jpg
    2.8 KB · Views: 187
  • Chest_Plate_Right_Section.bmp.jpg
    Chest_Plate_Right_Section.bmp.jpg
    3.8 KB · Views: 169
  • Crotch_Plate.bmp.jpg
    Crotch_Plate.bmp.jpg
    2.9 KB · Views: 166
  • Lower_Chest_Pieces_Left_and_Ri.bmp.jpg
    Lower_Chest_Pieces_Left_and_Ri.bmp.jpg
    5.6 KB · Views: 178
  • Reach_Trooper_Shoulder_Plate_D.bmp.jpg
    Reach_Trooper_Shoulder_Plate_D.bmp.jpg
    4.6 KB · Views: 164
  • Reach_Trooper_Shoulder_Plate_D.bmp.jpg
    Reach_Trooper_Shoulder_Plate_D.bmp.jpg
    4.9 KB · Views: 165
  • Reach_Trooper_Shoulder_Plate.bmp.jpg
    Reach_Trooper_Shoulder_Plate.bmp.jpg
    3.3 KB · Views: 172
  • Shoulder_Armor_Lower_Left_Sect.bmp.jpg
    Shoulder_Armor_Lower_Left_Sect.bmp.jpg
    2.7 KB · Views: 163
Here are the rest, I couldn't fit them all in one post (limited to 15 images).


Shoulder_Armor_Lower_Right_Sec.bmp.jpg
Shoulder_Armor_Upper_Left_Sect.bmp.jpg
Shoulder_Armor_Upper_Right_Sec.bmp.jpg
Waist_Armor_Back_Section.bmp.jpg
Waist_Armor_Front_Section.bmp.jpg
Right_Side_Waist_Armor_Front_S.bmp.jpg
Right_Side_Waist_Armor_Back_Se.bmp.jpg
 

Attachments

  • Shoulder_Armor_Lower_Right_Sec.bmp.jpg
    Shoulder_Armor_Lower_Right_Sec.bmp.jpg
    2.7 KB · Views: 165
  • Shoulder_Armor_Upper_Left_Sect.bmp.jpg
    Shoulder_Armor_Upper_Left_Sect.bmp.jpg
    3.3 KB · Views: 166
  • Shoulder_Armor_Upper_Right_Sec.bmp.jpg
    Shoulder_Armor_Upper_Right_Sec.bmp.jpg
    2.9 KB · Views: 193
  • Waist_Armor_Back_Section.bmp.jpg
    Waist_Armor_Back_Section.bmp.jpg
    3.7 KB · Views: 165
  • Waist_Armor_Front_Section.bmp.jpg
    Waist_Armor_Front_Section.bmp.jpg
    3.3 KB · Views: 171
  • Right_Side_Waist_Armor_Front_S.bmp.jpg
    Right_Side_Waist_Armor_Front_S.bmp.jpg
    3.8 KB · Views: 156
  • Right_Side_Waist_Armor_Back_Se.bmp.jpg
    Right_Side_Waist_Armor_Back_Se.bmp.jpg
    3.4 KB · Views: 150
Your Templates have proved invaluable! THANK YOU! perhaps i will grace you with a pic when i'm done with my armor! it may be a "Naval ODST", but your army plates will do it justice!

EDIT: Here's the finished pic of the torso.
251569_234100066605494_100000165083252_1188193_5281953_n.jpg
 
Thanks guys! Bigolaf, that turned out pretty good dude! Are you going to pep the jetpack?

BTW, I decided to pep the helmet instead because I wanted it to be more accurate and plus, I am leaving town for two weeks and won't have enough time to mess with scratch built helmet before Comic Con 2011. The hardest part of pepping the helmet are the ears due to the concentric rings and the way they have to be put together. Here are some pics of the helmet so far.

DSC01651.jpg

DSC01648.jpg

DSC01649.jpg

DSC01654.jpg

DSC01655.jpg

DSC01656.jpg
 

Attachments

  • DSC01651.jpg
    DSC01651.jpg
    39.8 KB · Views: 145
  • DSC01648.jpg
    DSC01648.jpg
    47.5 KB · Views: 148
  • DSC01649.jpg
    DSC01649.jpg
    32.8 KB · Views: 135
  • DSC01654.jpg
    DSC01654.jpg
    41.9 KB · Views: 142
  • DSC01656.jpg
    DSC01656.jpg
    41.3 KB · Views: 155
  • DSC01655.jpg
    DSC01655.jpg
    44.8 KB · Views: 137
love the build. how are you making really fine lines in your foam, like with a razor or something?

Thanks man! First, the lines will be drawn in by ink then, I use a hot soldering iron guided by a metal ruler to make the fine lines. You can also use a woodburning iron with a flat chiseled tip.
 
UPDATE: Thigh pieces - painted and illuminated with EL wire.

DSC01657.jpg

DSC01658.jpg


Below is the EL wire that I bought from Glowire.com for $7 bucks each.
DSC01661.jpg


Below is the EL wire all wound up to fill the space. Top pic it's turned off and bottom pic turned on.
DSC01664.jpg

DSC01665.jpg


This is what I used to cover the EL wire which was .90 cents at Walmart. It was the closest thing to achieving the bluish glow from the game. This was cut in strips.
DSC01662.jpg


Here is how the thigh piece looks with the cover piece. Top is turned off and bottom pic turned on.
DSC01660.jpg

DSC01659.jpg


Here is a video clip on how it looks turned on. The first click is flashing mode then always on mode.
th_MOV01663.jpg

Next on the agenda is to sew up some black webbing to attach the thigh pieces to the belt and thighs.
 

Attachments

  • DSC01658.jpg
    DSC01658.jpg
    52.3 KB · Views: 139
  • DSC01657.jpg
    DSC01657.jpg
    55.4 KB · Views: 125
  • DSC01662.jpg
    DSC01662.jpg
    44.8 KB · Views: 139
  • DSC01665.jpg
    DSC01665.jpg
    57.6 KB · Views: 137
  • DSC01664.jpg
    DSC01664.jpg
    66.4 KB · Views: 136
  • DSC01661.jpg
    DSC01661.jpg
    36.1 KB · Views: 130
  • DSC01660.jpg
    DSC01660.jpg
    50.6 KB · Views: 151
  • DSC01659.jpg
    DSC01659.jpg
    49.4 KB · Views: 126
  • th_MOV01663.jpg
    th_MOV01663.jpg
    4.5 KB · Views: 128
Status
Not open for further replies.
Back
Top