Rock Lobbster
Sr Member
- Member DIN
- S098
Those shoulders are CHUNKY, I'm loving the build

I really like your build! What kind of fan did you use? and how did you wire it? I am looking to do something similar with my chief helmet!View attachment 322770
View attachment 322771View attachment 322772View attachment 322773View attachment 322774
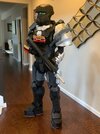
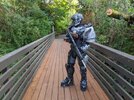
100% complete! Call for heavy lift gear, cuz its time to head to my first con!
Thx! I'm using Dual Modular Ball Bearing 4500rpm Fan Kit by HenrysHelmetFans on Etsy. They are pretty pricy but very worth and very easy to put together (no soldering of any kind since they clip together). I only needed one to keep my visor from fogging up.I really like your build! What kind of fan did you use? and how did you wire it? I am looking to do something similar with my chief helmet!
Thx dude!You absolutely KILLED IT my man holy crap!
helmet looks good scale wise. great job on the armor too and love the shotty....It's finally here! The one and only EOD Helm!
View attachment 321887View attachment 321888
It's heavier than I thought. It's a tight fit around the ears, but it's still spacious in the front and back. There's enough room to put cooling fans as well. If your wondering where I got the file, I bought the file from CoeIndustries on etsy.
View attachment 321889
where did you get that undersuit? I looks accurate and flexibleHere's an update on the build! Chest piece is pretty much done. All I need to do is complete the back thrusters.View attachment 321865View attachment 321866So far I found the chest piece to be the most difficult piece. There was alot of eyeballing in some spots to get the right curvature and making sure it fit me, but it turned out pretty decent. Thinking of using the classic buckle and strap instead of strong magnets..
View attachment 321867
Using the breacher collar from Infinte, this is where 7 shotgun shells will go, the next 6 will be on the right forearm (assault breacher)
Speaking of, here is a sanded shotgun and kukri. Will use sprayable filler/primer and wet sand these, to get that super smooth look
View attachment 321868
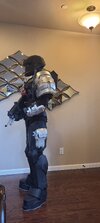
Last thing is the undersuit. There are no gen 3 mark 7 undersuits anywhere so I found and used the Reach undersuit instead, which works fine with the cod piece and chest piece.View attachment 321869View attachment 321870However the undersuit backside only covers so much back, so there was a gap between the chestpiece and the undersuit. To fix this I create my own back extension, similar to the one on the mark 5 .
View attachment 321871
I opted for a simple design, it's not in-game accurate, but it works. The extension now covers the gap and pairs well with the undersuit.
That's all for now. Also just recently decided to plan on going to my first con. Planning on going to PAX West in September. So that gives me 3 weeks to complete the suit and weapons. With the progress I've been making I should finish before then. I saw there are others that are joining as well and I am excited to meet some members of the community there!