Hey guys. So I've been a member of the 405th for awhile but this is the first time that I'm posting. To give a little background, I'm a full time college student with a part time job and a girlfriend who I give the rest of my time to. In my spare time though, I've managed to have three suits total.
-The first suit was only a pepakura build and fell apart after I wrongly applied the fiberglass resin (4 years ago)
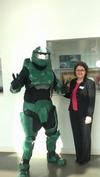
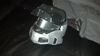
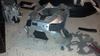
-The second build was a mix of pepakura and EVA foam. I made it for my college to wear at open houses since I'm a Mechanical Engineering and Technology (MET) major. My professor even made it a grade. It was a mix of foam and pepakura because a few of the pepakura pieces either warped or broke, the foam made a great quick replacement. Below is the final product I had for the school, and to say the least, I wasn't too proud of it... That's me on the left and my professor who graded it on the right.

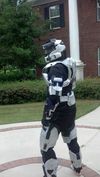
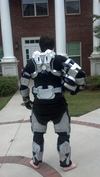
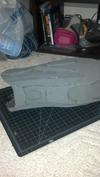
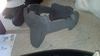
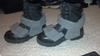
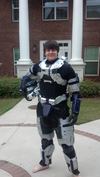
- The third suit, made completely out of EVA foam is the one I just finished, and am certainly most proud of. I love the way it cam out, how light and comfortable it is, and just the overall look. I didn't put my shoes on cause I didn't want to, but I do have the boots done as well.


A lot of credit for this build goes to L3X BLU3R1V3R for his amazing foam templates. Sadly though, going through this, I forgot to take a lot of the pictures, so please bare with me on that. (http://www.405th.com/showthread.php/33480-L3X-s-File-Database)
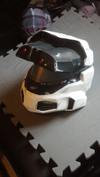
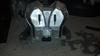
I started out with making the helmet, the only piece that was pepakura and bondo throughout the build. I managed to make it decently, and a perfect fit on the first try too. I went ahead and added some bondo to the back and began sanding down since I have already fiberglassed the outside, and bondo'd the inside.

Once finished with the bondo, I primed it grey and then added a base coat of silver. After doing this I cut the vents, and painted each part it's black and white. Even added beads for the lenses on top as well.

Not long after though, I changed the color scheme to a simple silver and blue, with black being in the normal parts. And then I took the beads back off because I thought it looked better without them.

The visor was made using the process by Hugh Holder for his ODST visors (http://www.405th.com/showthread.php/24388-Hughs-Odst-Build). I simply placed window tint on the back of a flexible plastic sheet, cut out my shape afterwards, and then VERY lightly dusted the opposite side of the tint with the color I wanted for the visor. Worked perfectly and I can see great through it.
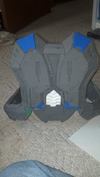
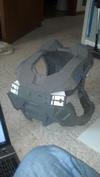
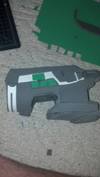
After the helmet, I went straight into the chest piece. Made completely out of EVA foam and has pieces of 2mm crafting foam in places as well to give that slight lift in detail.


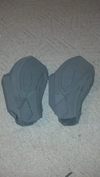
I decided when painting the full body pieces, I wanted to paint them all at once, so I'd have an even paint job around the whole suit. I think after finishing the chest, I started on the forearms because they seemed the easiest. you can see a couple of small dings in the top of one of he forearms as well, that would be because my dog decided he might make it his chew toy.


-The first suit was only a pepakura build and fell apart after I wrongly applied the fiberglass resin (4 years ago)
-The second build was a mix of pepakura and EVA foam. I made it for my college to wear at open houses since I'm a Mechanical Engineering and Technology (MET) major. My professor even made it a grade. It was a mix of foam and pepakura because a few of the pepakura pieces either warped or broke, the foam made a great quick replacement. Below is the final product I had for the school, and to say the least, I wasn't too proud of it... That's me on the left and my professor who graded it on the right.
- The third suit, made completely out of EVA foam is the one I just finished, and am certainly most proud of. I love the way it cam out, how light and comfortable it is, and just the overall look. I didn't put my shoes on cause I didn't want to, but I do have the boots done as well.
A lot of credit for this build goes to L3X BLU3R1V3R for his amazing foam templates. Sadly though, going through this, I forgot to take a lot of the pictures, so please bare with me on that. (http://www.405th.com/showthread.php/33480-L3X-s-File-Database)
I started out with making the helmet, the only piece that was pepakura and bondo throughout the build. I managed to make it decently, and a perfect fit on the first try too. I went ahead and added some bondo to the back and began sanding down since I have already fiberglassed the outside, and bondo'd the inside.
Once finished with the bondo, I primed it grey and then added a base coat of silver. After doing this I cut the vents, and painted each part it's black and white. Even added beads for the lenses on top as well.
Not long after though, I changed the color scheme to a simple silver and blue, with black being in the normal parts. And then I took the beads back off because I thought it looked better without them.
The visor was made using the process by Hugh Holder for his ODST visors (http://www.405th.com/showthread.php/24388-Hughs-Odst-Build). I simply placed window tint on the back of a flexible plastic sheet, cut out my shape afterwards, and then VERY lightly dusted the opposite side of the tint with the color I wanted for the visor. Worked perfectly and I can see great through it.
After the helmet, I went straight into the chest piece. Made completely out of EVA foam and has pieces of 2mm crafting foam in places as well to give that slight lift in detail.
I decided when painting the full body pieces, I wanted to paint them all at once, so I'd have an even paint job around the whole suit. I think after finishing the chest, I started on the forearms because they seemed the easiest. you can see a couple of small dings in the top of one of he forearms as well, that would be because my dog decided he might make it his chew toy.
Attachments
-
 QkxSL3V.jpg44.9 KB · Views: 142
 -
 4poLyNK.jpg84.6 KB · Views: 458
 -
 7uJ1dKV.jpg97.9 KB · Views: 125
 -
 N7yNzC4.jpg54.1 KB · Views: 133
 -
 uJyZ5RL.jpg50.1 KB · Views: 138
 -
 qo2vZJm.jpg38.8 KB · Views: 123
 -
 oSLPu3Z.jpg40.1 KB · Views: 148
 -
 4Xuiues.jpg46.8 KB · Views: 132
 -
 SH7fzDk.jpg76.5 KB · Views: 139
 -
 qI6hPB2.jpg56 KB · Views: 144
 -
 bqASSnH.jpg42.7 KB · Views: 132


")