star wars mandalorain suit

Status
Not open for further replies.

Chiefwannabe

Member
sorry if this is in the wrong spot but anyway

Im currently building a mandalorian suit for a fan film and i figured id post my progress on here
although i am a bit late as i have finished most of the suit but i will make the most of everything else
 

Attachments

  • IMG_4557.jpg
    IMG_4557.jpg
    1.9 MB · Views: 454
A good paint job can turn an okay-build into an epic one, and this certainly falls into the latter. Really nice weathering on all of the pieces, well done!

Side not: I need to get my hands on one of those blasters :p
 
A good paint job can turn an okay-build into an epic one, and this certainly falls into the latter. Really nice weathering on all of the pieces, well done!

Side not: I need to get my hands on one of those blasters :p
Thanks! Your right about the painting and it really improves a build.
Hopefully i will be able to do some more this weekend.


I have been searching through the 405th data-base for a suitable pep helmet and so far no luck:(
If any one knows of any files can u plz post them here it would be a HUGE help!
If I cant find any files then i will purchase a pre-made helmet online but I don't want to spend to much
 
Sorry about the double post:(
Not much of an update but i painted another toy gun to be a somewhat tactical blaster pistol!IMG_4629.JPGIMG_4630.JPG
 
Ok time for a real update!!!!!

I bought some more EVA foam today and begun work straight away.
IMG_4636.jpg
I started making the cod piece and made a template out of the packaging of the EVA foam
IMG_4639.jpg
I then traced it onto the foam
IMG_4640.jpg
Then cut it out
IMG_4641.jpg
IMG_4642.jpg
Then I beveled the edges to make it look more like a armour plate
IMG_4643.jpg
Then a test fit(felt like Michael Jackson)
IMG_4644.jpg
Then heat formed it with the trusty heat gun and I was done (for now:devil)
IMG_4645.jpg
I will add detail later when i get some more craft foam and obviously paint it and add straps when the painting is done.:D

But thats all folks !! (#porky pig)
 
Looks good man!
cheers bro!!


I did a little more work on the rest of the build and i have to say I'm making good progress!:D
I built the knees (need a little more work) and the boot covers(again ,not fully complete)
IMG_4647.jpg

3D battle damage
IMG_4648.jpg


knees
IMG_4649.jpg


and a little teaser for my next project:D
IMG_4650.jpg

thanks for looking!!!!!!!:)
 
Hey guys I know I haven't posted in a while and thats simply because Ive become really busy with school and helping around the house.
Ill probably continue the build tomorrow (depends on how much home work I get) and post all progress on the thread.

Thank you for all feed-back and complements and I hope to see you guys soon!!!
 
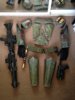
Ok a lot of you were commenting on the painting so i thought i would shoe you how i do it !!:)

1.So first of all I coat the piece in one to two layers of PVA glue to seal the piece(after this step you coat it in as many layers of plasti-dip but Im cheap and the finished result is just as good without it)
IMG_4679.jpg

2". then paint the piece in the colour of your choice (you could use spray paint but I can never seem to find the right colour) for this build I chose "hidden grove" AKA Master chief's armour
IMG_4681.jpg
IMG_4680.jpg

3. With a really rough brush go around the piece and any high points and paint them black only a little bit though. If you use to much you'll just ruin the elusion that this thing has been through war.
IMG_4691.jpg

4. With the same brush go over the same areas to make it look like the paint has been chipped away at and is exposing the metal underneath.
IMG_4692.jpg
( step 5 and 6 are optional)
5. mix some brown, yellow, black and orange until you get a muddy looking colour and water it down to the point where it behaves like milk. Ten dab, wipe or splash onto the piece depending on how dirty you want the piece.

6. give it a clear coat to protect the paint job!!

Thanks for looking and I hoe to have finished more soon!!:D
 
Very well done. I made my very own from metal and it looked lousy compared to yours. Props!

cheers man!! Its so good to have so many people on here helping me and giving me tips.
now don't say that your one was lousy! I bet it was great!!
 
Ok not really an update but I thought I would share this with you guys!

Me and my cousin are making a sci fi film and i was making props and costumes left, right and centre! one thing I did was turn my blaster that you all love and turn it into a completely different gun(well sort of)
All I did was build a bigger scope and it looks awesome !!:D
IMG_4698.JPG
IMG_4700.JPG
IMG_4702.JPG

Oh yeah that tube thing poking out? thats just the scope that came with the gun!!

Don't worry i can still change it back, that was the main part of the design!
 
Status
Not open for further replies.
Back
Top