It's been a while since i did a production diary and since this is by far the most complex build I'll be doing I thought I should. This will the very next cosplay once I am ever able to finish my Halo armor. While it's definitely a more niche cosplay I will be releasing the printable models for this one too. Warframe has a lot of amazing designs but very few are suitable for practical cosplay. I feel Mesa is the most practical as her design mostly resembles layers of clothing with an almost completely human physique. She's also easier to crossplay.
.png")
.png")
Like my halo armors, I'm using the in game model as a base mesh that way I already have accurate primary shapes and forms, and it saves time. I begin by sorting all the parts that will be printed. There is also a lot of pieces baked into the texture of the model that will need to be made from scratch such as details on the chest, back and, and arms. My focus is on what would be static in areas that wouldn't bend. A lot of this is the just the same pieces duplicated multiple times so it's less than it looks.


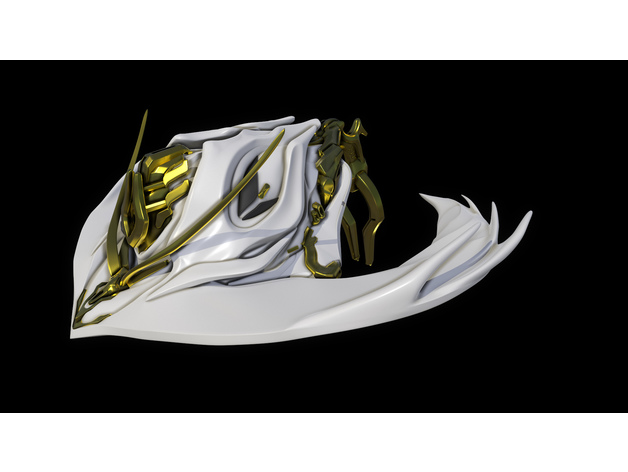
I'm Starting with the hat and Regulators pistols first which are main highlights. since Mesa Prime's hat is a literal part of her head and organically flows in into the back of her skull I had to improvise the back of hat in a way that was minimal but still provided support since it curve's upward. I separate all the copper ornamentation and detailing while rescaling and remodeling it into a base hat that could fit a human head. Since I don't have Zbrush at the moment I'll be omitting some if finer lines and details to create a simpler/clean design. I still need to smooth out the geometry and define my shapes which I can just use Maya's sculpting tool kit for. Once that's done I'll remodel the copper ornaments and just kit bash them back onto the hat.


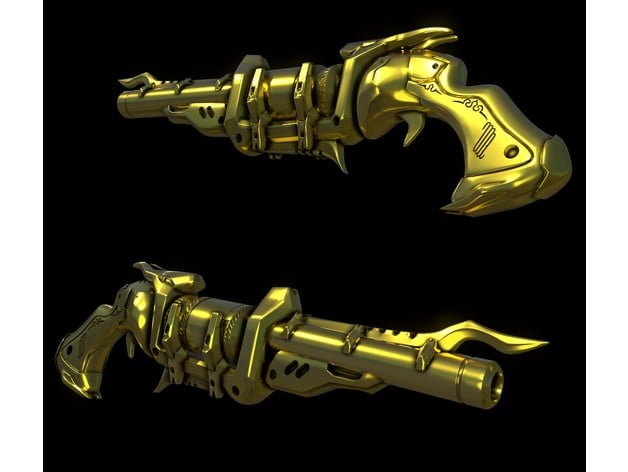
When I'm done with the hat I'll move onto the Regulator Pistols. These are pretty simple and straight forward, Though I'm posed with the question of how they actually get to her hands. Since there isn't an actually animation for it and they just appear in her hands when you use them, the easy assumption is they just swivel up and detach into her hands using game logic. I could do the same by mounting them on the inside of the wrist closer to the palm, and while it would be a cool effect it to just whip 'em out, it wouldn't be very comfortable as they would not go completely into my palms and might break too easy at the swivel if I used it too many times or bent my wrist while holding them. I noticed however they are mounted on the outside of her wrists, which got me thinking, maybe she just grabs and pulls them off with the opposite hands that way. This way I can just put magnets in the bracer and pistol and not have to worry about breaking anything.
.png")
.png")
After that I'll just need to model all the detail pieces that would attach to the main body which will then be glued to the main suit.
For the main body I being going with the same color scheme as the images and us a blue bodysuit as the base then layer thin black and yellow fabrics on to of that. I'll use yellow, blue, and black pleather's to make the chaps, vest, belts, and boots. I'll use some sort of shiny copper material for the trimming and stuff. I wont be going one for one with the the same level of detail as in the game. Some of it is just too much and a lot of it gets lost with just a little bit of distance. Almost all of this can be fixed directly on to the body suit so I can just slip in and out of it with little effort. I'm not electronic savvy enough to try and do any of the little lights and stuff so those I'll probably paint with a neon or glow in the dark paint.
.png")
.png")
I'm supper excited to work on this I just really wish my printer weren't broke right now and i wasn't the poor. My biggest challenge with this will be all the sewing I'll have to do which I've never really done. In addition to this I may also make the vectis or sybaris.
Like my halo armors, I'm using the in game model as a base mesh that way I already have accurate primary shapes and forms, and it saves time. I begin by sorting all the parts that will be printed. There is also a lot of pieces baked into the texture of the model that will need to be made from scratch such as details on the chest, back and, and arms. My focus is on what would be static in areas that wouldn't bend. A lot of this is the just the same pieces duplicated multiple times so it's less than it looks.
I'm Starting with the hat and Regulators pistols first which are main highlights. since Mesa Prime's hat is a literal part of her head and organically flows in into the back of her skull I had to improvise the back of hat in a way that was minimal but still provided support since it curve's upward. I separate all the copper ornamentation and detailing while rescaling and remodeling it into a base hat that could fit a human head. Since I don't have Zbrush at the moment I'll be omitting some if finer lines and details to create a simpler/clean design. I still need to smooth out the geometry and define my shapes which I can just use Maya's sculpting tool kit for. Once that's done I'll remodel the copper ornaments and just kit bash them back onto the hat.
When I'm done with the hat I'll move onto the Regulator Pistols. These are pretty simple and straight forward, Though I'm posed with the question of how they actually get to her hands. Since there isn't an actually animation for it and they just appear in her hands when you use them, the easy assumption is they just swivel up and detach into her hands using game logic. I could do the same by mounting them on the inside of the wrist closer to the palm, and while it would be a cool effect it to just whip 'em out, it wouldn't be very comfortable as they would not go completely into my palms and might break too easy at the swivel if I used it too many times or bent my wrist while holding them. I noticed however they are mounted on the outside of her wrists, which got me thinking, maybe she just grabs and pulls them off with the opposite hands that way. This way I can just put magnets in the bracer and pistol and not have to worry about breaking anything.
After that I'll just need to model all the detail pieces that would attach to the main body which will then be glued to the main suit.
For the main body I being going with the same color scheme as the images and us a blue bodysuit as the base then layer thin black and yellow fabrics on to of that. I'll use yellow, blue, and black pleather's to make the chaps, vest, belts, and boots. I'll use some sort of shiny copper material for the trimming and stuff. I wont be going one for one with the the same level of detail as in the game. Some of it is just too much and a lot of it gets lost with just a little bit of distance. Almost all of this can be fixed directly on to the body suit so I can just slip in and out of it with little effort. I'm not electronic savvy enough to try and do any of the little lights and stuff so those I'll probably paint with a neon or glow in the dark paint.
I'm supper excited to work on this I just really wish my printer weren't broke right now and i wasn't the poor. My biggest challenge with this will be all the sewing I'll have to do which I've never really done. In addition to this I may also make the vectis or sybaris.
Last edited: