WH40K Tech Priest

Status
Not open for further replies.

nerdman234

Member
Look guys. I made a post.

I started this in late August 2020, and have been making slow progress over the winter. This is broken into 4 sections: Mask/Helmet, Mechadendrite, Armor Bits, Fabric Elements. I'll regularly update this as I go and flesh out the sections. This is going to have blinky lights, microcontrollers, foam, plenty of iterations, tossed features, and mistakes that become features. Buckle up.

Concept:
I got inspired by SKS Props' Tech Priest and rabidly doodled a concept out on a steno pad in latter half of a night shift. I've pulled bits from other Tech Priest cosplays, Deathwing, and 'rule-of-cooled' my way through my design. My apologies if it's not lore-friendly.
- I really liked the balance of armor and robes that the tech priest had, and the mini below that SKS used as his basis was also mine. When looking for reference, I came across a couple of Tech Marine and Skitari images that I've pulled parts from.
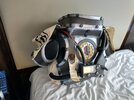
- The mask is based on a screenshot from Deathwing. Large eye on one side, with two or three on the other. The aperture isn't necessarily from an reference I found, but I thought it would look cool.
- The mechadendrites I've seen look cool, but I figured movement would add a lot to it. I've come across a couple of open source robot arms and prints from Thingiverse, but I settled on a repurposing of an Ikea lamp as the base for mine.
- Axes are cool, but what if it was also a chain saw? And a wrench. Not sure much needs to be said here.
Screenshot from 2020-09-04 05-08-28.png
IMG_20200829_103347037_HDR.jpg
skitari.jpg

IMG_20200809_003355802.jpg
IMG_20200809_021817474.jpg
e6104ee0e17c986305337c7ab3851964.jpg


Overall goals:
- Motorized Mechadendrite
- Motorized Iris/Aperture Eyes
- Foam armor
- Fabric priest robes. Learning to sew will be fun.
- Pack down roughly within chest piece (Minus axe)
- Tech Axe

Ideas thrown out: (This is only going to get longer)
- Additional mechadendrite(s)
- Spinning chain or moving crescent wrench on the tech axe

Sections:
- Mask/Helmet
- Mechadendrite/ Tech Pack
- Armor Bits
- Fabric Elements

I've got a fair bit of progress so far and I'm updating the section posts with my progress so far over the next day or so.
 
Mask/Helmet:
The main idea is to had a single large eye on one side, with two or three on the other. Plan right now is to make the larger eyes apertures with the smaller one(s) being some 10mm NeoPixels.

The helmet is from the Kamui Cosplay generic male helmet, and the mask is sort of defined by the eyes with a respirator. From the concept image, I'll have two hoses coming from behind the respirator and trailing back into the chest piece.

Eyes: I've gone through a bunch of iterations ranging from a "brake cable" style of mechanism to a steel wire arm like most RC vehicles use. I've settle on a 2:1 gear to actuate the aperture.
I used an aperture I found on Thingiverse as the base (the kind that drops into cheap welding goggles) as the base, the started modifying that over time. The gif included is the older "RC steel wire" style of control, but the current iteration uses a gear
IMG_20210426_141440300_HDR.jpg
VID_20201021_113343831.gif
IMG_20201011_032433685.jpg
IMG_20210426_161933121_HDR.jpg


The eye stack goes as follows:
- Aperture: Iris Diaphragm for Steampunk Goggles by IrisCalculator This was originally manually controlled, but the gear connecting to the 'actuating ring' spins it via a micro servo (9 gram).
- Tube: Not much to say here. It's a tube glued to a not-tube.
- Light Diffusion Cone: This will be the diffuser for the light of the aperture.
- Lights: Not much to say here. Using a NeoPixel Strip to provide lighting.
- Back cap:" This is the part that keeps the entire assembly together and carries the filter for green light. Shout out to D3lta with a 3 for the recommendation of using a red lens to filter green light and allow me to see through it.

Visibility is going to be interesting. With the red filter D3lta brought up, I'll be able to see a little bit though the eyes, but I plan on having mesh on the 'respirator' that I can see normally through.

After many MANY iterations. The eye has a final design:
IMG_20210827_151207196_HDR.jpg
IMG_20210827_151317835.jpg


I took an older iteration using the gear, and flipped it 180 degrees to shorten the stack and expose some more mechanical bits for some visual interest. The overall stack is just under 1.5", and any spinning bits are on the front (and away from my eyes).

Also changed the layout of the mask:
IMG_20210827_151127606.jpg
IMG_20210903_182245396_HDR.jpg


My eyes ended up right on either side of the "respirator". The 'helmet' portion was based on a generic scifi helmet, though I'll probably opt for a mask without the back in the future to keep things cool.
 
Last edited:
Tech Pack / Mechadendrite:
The tech pack will serve as both the battery storage as well as the mount to support the mechadendrite. I bounced around on YouTube to find a tutorial on how to make a DIY pack frame, and built one from PVC as a base, then added what was needed to mount the arm.. I have the rough shape done, but definitely need to add some beveling and curves to make it look less blocky.
IMG_20200903_104511420_HDR.jpg
IMG_20200903_104528037_HDR.jpg


I'm using the following Instructables post as the basis for my arm: Robot Arm From a Desk Lamp (IKEA Tertial Hack)
This uses 2 MG995 servos to move an Ikea lamp. I'm not sure if I'm going to stick with this, but I had one on hand and figured I'd give it a shot.
IMG_20200908_133645686_HDR.jpg


--------------------------------
The arm did not make it in the end. I started tearing the thin aluminum and will need to make something built to task in the future, rather than repurposing a lamp.

The pack and it's frame were painted, and i added a small caged light on the back. When the arm isn't in use, I can remove the frame and just hold the backpack with some simple straps.
IMG_20210826_073706155_HDR.jpg
IMG_20210921_030202807.jpg
 

Attachments

  • IMG_20210826_073713499_HDR.jpg
    IMG_20210826_073713499_HDR.jpg
    415.1 KB · Views: 162
Last edited:
Armor Bits:
My plan is to have the armor asymmetrical between left and right. On the left I'll have a heavier gauntlet, "tac pad", and glove, and on the right I'll have a much lighter, "skeletal" arm. The "tac pad" will be lighted, with a printer transparency for the screen details.
Since I can't obviously cut off my arm to make a very accurate skeletal arm, I'll scale the left arm to be large than the right to make it seem a bit more small.

Here's the progress so far:
IMG_20200925_122720164_HDR.jpg
IMG_20200925_122753961.jpg

IMG_20210426_162659706_HDR.jpg
skeletal arm.jpg


The chest piece is based on the Kamui cosplay generic chest, and features a Mechanicus logo with a "computer unit" in the middle. I'm not a fan of the rivets and I'm likely going to redo them. A tall collar will go up to just below the "nose" level.
IMG_20200830_162629791_HDR.jpg
IMG_20201009_115423787.jpg


Some assembly and me forgetting to take pictures later:
IMG_20210903_181118357_HDR.jpg


Armor was based in plastidip, then bronze enamel, and then hand painted the details in. The gauntlets were just Harbor freight work gloves with foam panels hot glued to them (Storm The Castle Gauntlet Tutorial). I added some canvas panels to the sides to cover strapping, and used an old belt with bits from some older costumes. Some additional canvas 'tassels' were added to the shoulders to bridge the gap between the arms, and had the mechanicus logo painted on it with some black paint.
 

Attachments

  • IMG_20210903_173402711_HDR.jpg
    IMG_20210903_173402711_HDR.jpg
    2.9 MB · Views: 167
Last edited:
Fabric Elements:
This will be the section reserved for fabric bits of this costume;

Purity seals are sort of fabric.... Right? Pretty much copied SKS 1:1 here. This is canvas made from Cisco Meraki bags salvaged from the dumpster with iron-on print outs applied to them. Don't try using an iron-on transfer in a laser printer. It's a bad idea. The "wax' is 3d printed PLA with 'Blood for the blood gods" paint on them. I used a mini-torch to scorch them. If you need purity seals for any reason, I'd highly recommend the SKS video: https://www.youtube.com/watch?v=tHdy6xDu-tk
IMG_20201002_111745521.jpg
IMG_20201003_135738439.jpg


The robes are still being thought out and I haven't even picked out a fabric or pattern for them yet.
 
Last edited:
Tech Axe reserved post
As above: It's got an axe, a chainsaw, and wrench. What else do you need?

I've got most of the shape laid out, though i wish I hadn't glued on the teeth yet. It will make painting really fun.
IMG_20200811_055417218_HDR.jpg
IMG_20201114_142746601_HDR.jpg


The entire axe will break into three parts: Handle 1, handle 2, and head. The handle will be made from a 1.5" PVC pipe covered in foam. This is frankly a direct copy of the SKS props Tech Axe with my own thoughts thrown on it.

Lots of trimming and dremeling later:
IMG_20210822_092419211_HDR.jpg


Key design stuff here. The axe breaks into 3 segments for packing, the threaded rod under the crescent wrench is a 1" acme thread I downloaded from mcmaster and printed.

Off to paint! Everything was based with plastidip, and then a few coats of bronze enamel.
IMG_20210830_195528366.jpg
IMG_20210830_195620850_HDR.jpg


The eagle eyed might notice the threaded section is very well sanded. This was part of a mechanism to use a motor and drive the wrench open and closed. I scraped that very early and didn't take it very far. The intention was to put a motor in the "engine" section of the axe to drive a belt attached to a nut that would drive the screw, sliding the bottom of the wrench up and down. Shown below with the prototypes on the left.
IMG_20201105_052134678_HDR.jpg


/end reserved posts
 
Last edited:
The final result:
IMG_20210903_191642391_HDR.jpg
IMG_20210903_191646525_HDR.jpg
IMG_20210921_035528547_HDR.jpg


DragonCon came and went, and I learned a few things:
1.) Holy Emperor, visibility was bad. I had a 1"x.5" space to see out of, just above my left eye.
2.) Getting in and out needs some work. I just strapped and tri-glided the upper arm parts, but a more permanent clip solution is needed.
3.) The chest piece needs to be split up. Preferably in three pieces (Front, back, Collar), to make packing easier.
4.) I completely misplanned and underestimated the entirety of the electronics. As a result, only the mask lights were working at the con.

The Future:
- Completely rebuild the mask as a solid front component that is printed in place. This will make assembly easier, and give me more flexibility to make changes in the future. Removing the helmet section will also lighten everything and make it cooler to wear
- Redo and finish the electronics. Maybe with some actual planning this time.
- Will finish the arm. It was a big feature I wanted, and would look great once done.
- Make a light weight inner hood to go without the helmet for walking in comfort

I'm still working on the pinned posts to update them.
 
Status
Not open for further replies.
Back
Top