Foam (WIP) Zero's GEN III MK V [B] + Weapons

Status
Not open for further replies.

Zero Prime

Well-Known Member
Well, took me long enough; Hello 405th, I am back once again, and working on a new set of armor. Currently blitz/crunching through my build for Game On Expo in Pheonix at the start of August.

This current build is inspired by my first kit, and current used MK V {B} core in Halo Infinite (minus an upcoming coating).
Screenshot 2023-07-07 002117.png
Complete | Constructed | In Progress | Scrapped

  • Helm: Grenadier
  • Left Shoulder: SAP/ODST
  • Right Shoulder: SAP/CQC (maybe SAP/CDO)
  • Chest: Default (maybe UA/TSA Prototype)
  • Gloves: Challenger
  • Wrist: TAC/MC5 TacPad
  • Utility: M45 Hardcase
  • Knee Pads: UA/Type FJ
  • Boots: Default
  • Coating: Power Suit Hero (Custom)

  • Primary Weapon: MA40 Model MS
  • Secondary: BR75 (HCS) AKRIVEIA

So where to begin, well I already have much of my main construction completed. Currently I am still working on the Waist, Torso, Boots, Knees, Wrist and Utility, and I am currently working on the Boots. the Weapons are also prepped for the printer (just need to finish one upgrade) then they can go on. Honestly there is not much for me to say, honestly there is nothing too crazy or special about this build, other than this is my first real push for a proper suit in a long time. The only other thing that I am working on is planning out the wiring and electronics for the body (helmet will have none aside from fans).

At this current state, I am working to finish all the core construction (and lock in the above maybes) then move on to detailing the parts I need to, as there have been some changed between the MK V 's seen in Reach and their GEN III cousins, and I am aiming for more of a hybrid look.

Well, I guess all there is to do is dump my photos of the current in-progress/constructed pieces. As a note, I only have the models for the weapons as I am still waiting to print them.
signal-2023-07-07-000954_002.jpeg
signal-2023-07-07-000954_003.jpeg
signal-2023-07-07-000954_005.jpeg
signal-2023-07-07-000954_006.jpeg
signal-2023-07-07-000954_007.jpeg
signal-2023-07-07-000954_008.jpeg
signal-2023-07-07-000954_010.jpeg
signal-2023-07-07-000954_009.jpeg
BR75 HCS.png
MA40 MS.png


Just to get out ahead of this. Yes, the weapons (and some of my armor templates) are ripped models that I have worked on finding and cleaning up/separating. As with my other thread involving the H5 weapons, I will not talk about the tools I used to so this. That being said; I am working on going through what I have, and I might start posting the files I put together AFTER I verify/test them to see if they are viable for templates or prints.
 
Last edited:
Bit of a minor update today, with some fun additions.

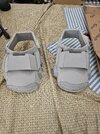
Recently finished construction of the boots, so far they are looking good. The plan for these is to just have them go over some walking boots, the method of which I am still working out.
20230710_082922.jpg

My belt progress has started, with the front piece fully built out. Thinking of leaving this part separated, but I am still working out the rigging in that department.
20230710_082713.jpg

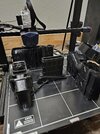
Fianly the BR print is coming along nicely, though some of the tubes/pipes on this particular model will need to be reprinted.
20230710_082643.jpg

And one last little bonus, from my delves into the files I have. I present Space Pickle (warning it's staby)
20230709_224311.jpg
 
The forbidden space cactus! Armor is looking fantastic so far, very crisp cuts. Love the weapon variety, when/if you post the files just make sure to note they're game files and can only be used non commercially!
 
Another day, another update.

First, my plastizote finally arrived, so I was able to fully wrap construction of my thighs and biceps. Also did a small lighting test.
20230711_232459.jpg
20230711_234108.jpg


Next, progress on the belt is slowed, but the butt plate is copmeted. I am hoping to finish the rest of it tonight and tomorrow.
20230713_002441.jpg


And finally my HCS AKRIVEIA BR is off the printer and is assembled, though it needs a good amount of work still.
20230712_234418.jpg


And that's all for now. Next update should be the finished belt and the start of the Torso.
 
Last edited:
Your cuts are so clean! Love the lights too, very nice (y)
Looking forward to the progress pics
 
Small update today.
Recently finished my belt (sorry no new pictures) and I am now working on figuring out the mounting/rigging for said piece. Torso I'd fully traced out, and I will begin assembly tonight. After that, only the Knees and SAP/CDO shoulder are needed, then main assembly will be finished (still planning on doing the Hard Case, but that is up in the air.)

The goal is by the end of the week, wrap construction and start on Detailing/sealing as tha Game On Expo is in 3 weeks.

Finaly got my BR75 AKRIVEIA reprint pieces finished and fully assembled. Had to replace the extruder moter on my printer hence the delay. I plan to use either a layer of ABS like UV resin, or some 2-part epoxy resin i have left over to smooth/seal it. With that take care of, I finally have my MA40 Model MS on deck and currently printing.
20230719_083858.jpg
20230719_083903.jpg
20230719_083911.jpg
 
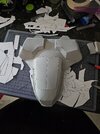
After 3 days of solid work, my Torso is finished! And with that, core construction is finished; I still have my Knees, Hardcase, Detailing, and ab plates/undersuit to do but thoes are not vital.
20230723_193754.jpg

20230723_193803.jpg
20230723_193813.jpg


Now to finish some 3d printed parts and attachments, then onto sealing and paint.

Honestly this is the best piece I have made in my cosplay career, and I can't wait to see it finished.
 
First test fit is here... and damn it looks so good (Still adjusting the positioning/fit)! I am so happy with how this has turned out thus far. Sadly, some parts (attachments) have had to be scrapped or are otherwise punted as my main concern is to finish this for Game On since I have decided to enter the Cosplay contest at the event. Now onto some detailing and adjustments for fit then onto sealing and paint.
signal-2023-07-24-231057_002.jpeg
 
T-8 days... PANIC!!!

Ho boy, 8 days to go until load in and I am in full on panic/crunch mode. Recently stared my sealing process, and I have about a third of my suit heat sealed/seam filled/plasti-dip'd with another 2/3 to go. I will say that once coated in plasti-dip the parts look amazing, while the seems are still somewhat visible they look more like panel lines... which I can work with. Once the rest of my suit is sealed I can work on painting, and hopefully 16 bottles of Plaid FX is enough to cover everything (4 Red & Green, 2 Gold & Blue, and a few other colors) after that is electronics time.
20230802_082603.jpg
20230802_082613.jpg
20230802_082620.jpg
20230802_082633.jpg
20230802_082640.jpg
20230802_082710.jpg
20230802_082720.jpg


Oh, and Magnets, how do they even work
20230801_082048.jpg
20230801_082040.jpg
 
looking owesome already.
where did you get the br model? :oops:
iv'e been using a modified nerf gun as my quasi br
:confused:
 
thats amazing.

i dont see that many people working on infinite assets, so your work is highly appreciated.
Season 8 Wow GIF by The Office
 
Looking good!! Funny enough I'm at a similar stage in making my armour except I have 23 days to finish it and I still feel pressured by time. Sounds like you're going to be busy the next 8 days... good luck!!

Is it necessary to seal the foam with plastidip? I know it is if you're using spray paint, but I thought PlaidFX could go right on the foam. Do you have problems with plastidip wrinkling or cracking when you bend the foam? Do you find that some PlaidFX colours don't like to stick to plasti dip? Just asking because I'm going to start painting soon and I'm still undetermined if I should use plasti dip or not.
Once you heat sealed and gap fill the foam, plasti-dip is not exactly necessary. However I find that the method I use to gap fill (silicon caulk) tends to leave a different surface texture/type. The reason I ended up doing a final seal of plasti-dip was to increase the strength of my suit (due to Arizona' hellish sun) and to offer a uniform surface type/texture for the paint.

Other forms of gap filling, like using EVA foam clay, might not need the process I use. So far aside from using the wrong kind of brush (foam brush was used as I just intended to test my color mixing) I have not had much issue with the paint sticking; I still plan to seal it with a clear coat acrylic spray, maybe modpoge.

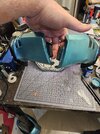
Here is a picture of my hand plate after a color test. I still need to apply it's second coat of plasti-dip and redo painting as my color was wrong. Thankfully the homeowner where I live manages a paint manufacturing plant, so he helped me get the right color in the end.
20230803_081639.jpg

Again, half a coat of the right color and wrong brush type, over a initial layer of a bad color mix with wrong brush type.
 
The Death I Deserveroli

That is how I feel right now, running at full steam trying to get this done in time. Thursday night is load-in and I am in fire need to get this done by then, or at least by Friday morning. Currently still have paint to finish, rigging and electronics, but thankfully progress is steady.

So I have not even used a single bottle of paint and the teal is almost done. Once that is finished I will move on to applying the orange, then the rest of the highlights.

Still I am so happy with how this color is coming out, and I am so excited to see it finished.

-PHOTO DUMP-
20230804_022203.jpg
20230804_044254.jpg
20230808_080342.jpg
20230808_080358.jpg
20230808_080402.jpg
20230808_080414.jpg
20230808_080505.jpg
20230808_080426.jpg
20230808_080447.jpg
20230808_080555.jpg
20230808_080610.jpg
 

Attachments

  • 20230808_080522.jpg
    20230808_080522.jpg
    1.8 MB · Views: 92
Status
Not open for further replies.
Back
Top