Your Captain's Mark VII build!! :D

York D029

Member
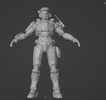
Hey guys! First time ever building a cosplay other than a scout trooper helmet i did a while ago, so im excited to learn and make some mistakes along the way! Im planning on using the infinite mark vii armor core.
1692499349116.png


Helmet - MK VII with starlight and special visor ;)
Chestplate - ODST
Right shoulder - Mk V B ODST
Left Shoulder - Rakshasa Teccniqe
Wrist attachement - Mk V B Tacpad
Thigh attachement - Rakshasa medkit
Knee pads - Rakshasa Sportstek
Gloves - Mk V B Challenger

Im planning on using this for the visor:
1692501916320.png


because of the mark viis simple visor shape i dont feel like im losing a lot of detail with using a mask and the led lights look cool :3
Ill be using the custom design option for funny eye designs like this:

1692501382747.png

1692501558933.png

1692501687133.png


because i wont be able to see throught he mask im planning on doing what PipNinja did with his gungir build and just build a nanny cam into the helmet (starlight attachement) and putting the lil tablet view on the inside to see thru.

For the armor itself I'll be using a white/yellow/black color scheme because I like the way it looks on the rakshasa coating and its just a good color scheme in general :)

Printing all of this on my ender 3 Max with PLA, so it wont be the smoothest straight out of the printer but at least the printers big enough to print the pieces whole/just a couple pieces.

Im going to start printing the Mark VII helmet tonight! if yall have any ideas or criticism dont hesitate to reply!
Ill come back here to update yall on more!
(keep in mind i am new to this so theres def gonna be alot of sloppy mistakes and stupid questions so pls be patient w me and thanks for all the help! <3)
 
Last edited:
as im setting up the 3d print, take this quick model of what i am (currently) planning on my armor to look like :)
 

Attachments

  • image_2023-08-21_192139201.png
    image_2023-08-21_192139201.png
    304.6 KB · Views: 89
Where are you getting your models from? They look intense and accurate. I'd love to know your printer settings you go with. I am always curious in wall strength, infill %, and filament people go with.
 
Where are you getting your models from? They look intense and accurate. I'd love to know your printer settings you go with. I am always curious in wall strength, infill %, and filament people go with.
The image above is actually just a blender file ripped from halo infinite, its supposed to be for animation n stuff but i like to use it for modeling :) the actual files ill be using for the print are from the 3D model index: Free 3D Model Index :D as for printer and settings, Im using an ender 3 max (cheapest with size and speed) w an infil density of 5%, pla filament, and 0.8 mm! happy to answer any other questions!
 
Can't wait to see the prints! This armor looks badass. I was just watching the galactic armory new odst video and noticed for their armor installing grommets to synch it altogether. Might be something you might want to do with this armor.
 
I’ll be starting my Mk. VII soon too. Looking forward to seeing your progress on this, it’s gonna be great.
 
Can't wait to see the prints! This armor looks badass. I was just watching the galactic armory new odst video and noticed for their armor installing grommets to synch it altogether. Might be something you might want to do with this armor.
Ill check that out, thanks! and thank you for the kind words : ), cant wait to see how it turns out myself
 
The image above is actually just a blender file ripped from halo infinite, its supposed to be for animation n stuff but i like to use it for modeling :) the actual files ill be using for the print are from the 3D model index: Free 3D Model Index :D as for printer and settings, Im using an ender 3 max (cheapest with size and speed) w an infil density of 5%, pla filament, and 0.8 mm! happy to answer any other questions!
Ooh. Just a word of advice. I'm not sure if you've built a set of amor before, but be very careful with that low of an infill density. I usually never drop below 20%, just so that my stuff I build doesn't crack so easily and break. Even at 20%, my odst armor came out of its first con with quite a few cracks and breaks, so just be wary. It also depends on what infill patter you have, but I still recommend 20% or above. Just a suggestion though, you're free to do whatever you'd like obviously :) good luck !
 
One guy's two cents worth - and you're paying even less than for it.
Just sharing some thoughts, not telling anyone they are right or wrong, not telling anyone what they should do.


> an infil density of 5%, pla filament, and 0.8 mm!
I agree with UrCaptainSpeakn. To me, that entire spec is completely suspect. I wouldn't do that for a prop pistol let alone armor.
  • PLA - No
  • .8mm walls - No
  • 5% - No not in combination with .8 thickness
Thicker walls do more for strength than infill. I tend to go about 1.6-2mm thick. I can sand the heck out of that and not punch through. Then I can have light infil without sacrificing strength.
PLA - Lower glass transition temp than PETG means you run the risk of warping your parts in the heat. Again, especially when they have so little structural integrity from such thin walls. Long drive to the convention in a hot trunk... sitting on a tarmac waiting to load in the plane... Arizona... Texas... I wouldn't do it. PLA is also harder than PETG which isn't always good thing. Its great for parts taking compression forces. As UrCaptainSpeakn pointed out, if you roughhouse in it too much, slam yourself against a wall during a photo shoot, its so hard it might prefer to crack rather than flex a little.

I'm going to guess this is your first 3d printer. I'd urge you to start smaller. Props, pistols, rifle etc. Work your way up to doing armor where a few settings changes means the difference between a $10 part and a $40 part, or a piece so light it won't hold up, or so heavy its a struggle after a 10 hour convention day. I recommend homing in on your preferred sweet spot of strength v. weight and not just settle for "it was fast and didn't turn into a puddle of goo on the print bed."
If this was for me (I wasnt quite sure, it was a bit confusing ), I grew up (i guess) in the iron man 3d printing community, and over there, those are the standards (I guess you would call it), and looking through more forum posts, im seeing more and more of the 10-15% infill and thicker walls, I guess different communities and different fanbases just do it differently haha. It is really interesting though, how much it can change between each fanbase lol. Anyways, thanks for the advice ill have to try it out !
 
My advice for the lights: look for the glasses instead! the mask might not have enough gaps between the lights to see out of, and i know some of the glasses have apps that can be connected so you can control what is displayed from your phone
 
One guy's two cents worth - and you're paying even less than for it.
Just sharing some thoughts, not telling anyone they are right or wrong, not telling anyone what they should do.


> an infil density of 5%, pla filament, and 0.8 mm!
I agree with UrCaptainSpeakn. To me, that entire spec is completely suspect. I wouldn't do that for a prop pistol let alone armor.
  • PLA - No
  • .8mm walls - No
  • 5% - No not in combination with .8 thickness
Thicker walls do more for strength than infill. I tend to go about 1.6-2mm thick. I can sand the heck out of that and not punch through. Then I can have light infil without sacrificing strength.
PLA - Lower glass transition temp than PETG means you run the risk of warping your parts in the heat. Again, especially when they have so little structural integrity from such thin walls. Long drive to the convention in a hot trunk... sitting on a tarmac waiting to load in the plane... Arizona... Texas... I wouldn't do it. PLA is also harder than PETG which isn't always good thing. Its great for parts taking compression forces. As UrCaptainSpeakn pointed out, if you roughhouse in it too much, slam yourself against a wall during a photo shoot, its so hard it might prefer to crack rather than flex a little.

I'm going to guess this is your first 3d printer. I'd urge you to start smaller. Props, pistols, rifle etc. Work your way up to doing armor where a few settings changes means the difference between a $10 part and a $40 part, or a piece so light it won't hold up, or so heavy its a struggle after a 10 hour convention day. I recommend homing in on your preferred sweet spot of strength v. weight and not just settle for "it was fast and didn't turn into a puddle of goo on the print bed."
Ill take all this into account! 2nd printer, and not my first time printing a helmet either. (i dont mean this in like a passive aggressive way or anything sorry if it comes off like that) Thanks for the advice tho! ill experiment with smaller pieces and find settings i like, i had no problem sanding a mk v helmet with the same settings but u definitely have more experience and knowledge so im def going to take ur advice! thanks for giving me ur 2 cents! :D
 
Last edited:
My advice for the lights: look for the glasses instead! the mask might not have enough gaps between the lights to see out of, and i know some of the glasses have apps that can be connected so you can control what is displayed from your phone
yk i considered glasses originally but i thought theyd be weird to fit in the visor, but now that i think about it i could probably just slip them on behind a clearish visor and not have to worry about monitor problems. i wasnt thinking about looking thru the mask, i considered putting a little baby monitor behind the mask and using the camera as the starlight helmet attachement. ill look into that tho, thanks!
 
If this was for me (I wasnt quite sure, it was a bit confusing ), I grew up (i guess) in the iron man 3d printing community, and over there, those are the standards (I guess you would call it), and looking through more forum posts, im seeing more and more of the 10-15% infill and thicker walls, I guess different communities and different fanbases just do it differently haha. It is really interesting though, how much it can change between each fanbase lol. Anyways, thanks for the advice ill have to try it out !
yea i got my print settings from an iron man print community too, maybe not the best for halo but it worked for my scout trooper helmet! ill prolly just experiment with settings with smaller pieces to find what works for me :)
 
yk i considered glasses originally but i thought theyd be weird to fit in the visor, but now that i think about it i could probably just slip them on behind a clearish visor and not have to worry about monitor problems. i wasnt thinking about looking thru the mask, i considered putting a little baby monitor behind the mask and using the camera as the starlight helmet attachement. ill look into that tho, thanks!
Your welcome! Depending on how comfortable you are with electronics you might be able to cut the glasses up and isolate the electronics and find a way to mount those inside the helmet itself to give visibility
 
Your welcome! Depending on how comfortable you are with electronics you might be able to cut the glasses up and isolate the electronics and find a way to mount those inside the helmet itself to give visibility
i dont feel too comfy w electronics, the original plan was to mess with one of these masks:
1693183200092.png

to fit the visor but i dont think id be good enough with electronics to change it
 
> an infil density of 5%, pla filament, and 0.8 mm!
I agree with UrCaptainSpeakn. To me, that entire spec is completely suspect. I wouldn't do that for a prop pistol let alone armor.
  • PLA - No
I may actually disagree with you on a couple things! Firstly, I think you're totally correct with increasing the infil and wall thickness, definitely good to have it above 5%. However, I'll actually disagree with your take on using PETG over PLA. I've used both for a while now, and the results I've gotten from PETG are truly mixed at best. I find it to be just too unstable of a filament to print large items with, as you need to have it as dry as possible for the entirety of your prints. First three suits I made were all PLA (with the exception of the recent addition of TPU for the legs), and as long as you don't leave them in absolutely hostile environments, they're generally fine to carry around for roadtrips in your car.

I suppose I have yet to take mine on a plane, but I'd be more afraid of losing the suit than it warping.
I'm going to guess this is your first 3d printer. I'd urge you to start smaller. Props, pistols, rifle etc. Work your way up to doing armor where a few settings changes means the difference between a $10 part and a $40 part, or a piece so light it won't hold up, or so heavy its a struggle after a 10 hour convention day. I recommend homing in on your preferred sweet spot of strength v. weight and not just settle for "it was fast and didn't turn into a puddle of goo on the print bed."
I will also say, as someone who like jumping headfirst into projects, if you want make a suit, make the suit! The first thing I printed on my first 3D printer was the forearm I wore on my Mk IV for two years. 3D printing is and will always be a learning experience, so if you want to try bigger projects, go for it! My advice: plan ahead, triple check your measurements, and don't be afraid to ask for advice. Can't wait to see the progress!

(P.S. SgtSaint, you gotta tell me what your settings are for PETG, I simply cannot STAND printing with the stuff! :lol:)
 
I wouldn't say the environment has to be too hostile for PLA to warp... I avoid leaving anything PLA in the sun for more than a few minutes because It gets soft really quick. That being said I've never used anything but PLA, but I have lost a gun or two to the heat, even in Canada.
 
This thread is more than 6 months old.

Your message may be considered spam for the following reasons:

  1. This thread hasn't been active in some time. A new post in this thread might not contribute constructively to this discussion after so long.
If you wish to reply despite these issues, check the box below before replying.
Be aware that malicious compliance may result in more severe penalties.
Back
Top