Noble team & mark VI build, completed

Status
Not open for further replies.
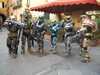
Here we are! after a long time of hard work we finally made it and we are proud to present the unique full italian noble team presented for the very first time at Lucca comics and games 2011

24vqgdz.jpg


this was the entire team of friends of mine who made with me the whole project!

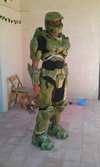
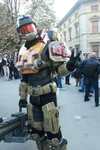
this is mine final result of jorge armor

35akb5x.jpg


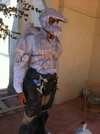
we put apart the side project of a halo 3 spartan 2 due to univesity exams and other trouble, so the eod should remain a dream for now

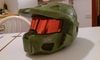
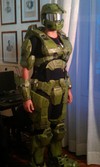
probably we will start a new project of a master chief high def armor instead of the eod...

We all thanks you all so much for the technical and moral support!!
 

Attachments

  • 24vqgdz.jpg
    24vqgdz.jpg
    90.9 KB · Views: 455
  • 35akb5x.jpg
    35akb5x.jpg
    78.9 KB · Views: 438
hello everyone!! finally summer comes and I had the time to go ahead with the master chief's project!! this is the point so far!!
2d290nd.jpg

everything is resined and painted with green, just missing details! i hope to finish this in time for Romics at the end of september!
 

Attachments

  • 2d290nd.jpg
    2d290nd.jpg
    130.2 KB · Views: 148
eod will reamin in my heart forever lol i love that suite!!
this is the detailed forearm
i've almost finished master chief yuppie!!

1198adz.jpg
 

Attachments

  • 1198adz.jpg
    1198adz.jpg
    238.7 KB · Views: 125
eod will reamin in my heart forever lol i love that suite!!
this is the detailed forearm
i've almost finished master chief yuppie!!

1198adz.jpg

ye i love rogue more than eod but eod is nice too ! :)

keep it up chief :p
 

Attachments

  • 1198adz.jpg
    1198adz.jpg
    238.7 KB · Views: 114
what's infantrymen stands for?
aniway is there any tutorial or guide on how to create undersuite?
 
latest news: armor stands up with some cord and velcro, and added led on helmet!!

2n8c3ts.jpg
 

Attachments

  • 2n8c3ts.jpg
    2n8c3ts.jpg
    863.6 KB · Views: 116
what's infantrymen stands for?
aniway is there any tutorial or guide on how to create undersuite?

'Infantryman' next to someones name means that they have been an active member of the community, contributed to others builds by offering help and encouragement, and have built a nice looking costume of there own. How to become an infantryman: reach 100 posts or have a suit (or multiple suits) that are good enough to impress a moderator enough to rank you up to infantryman. With the way you are going with this build, it looks like you are on the right track :)

As for an undersuit, most people use a black under armor shirt and pants, or if you are willing to spend the money you and buy a motorcycle pressure suit. If you really want it to look game accurate you can make an undersuit yourself based strait off the game, like on LilTyrant's kat armor or Thorssoli's mark vi suits.

btw, the mark vi is looking awesome, the only think i would suggest it to sand some of the areas where there are ridges, like on the top of the helmet, the jaw/ cheaks parts of the helmet, and the bicept parts. Otherwise it tooks amazing! I subbed:)
 
thank you for your answer and for support!! i know i should have used some bondo (or someting like that) but i'm not very handy with that and i was scared of ruining my pieces, so at last i decided to avoid using bondo. Even extra time was needed and usually i don't have many hours to dedicate at this fantastic job sigh... ;-)

anyway i am going on step by step, and finally i have ended my helmet

358z337.jpg


i am wondering if i can make the second layer of the visor, but don't know if i could see trough two layers of visor-film-color-visor-film-color...

i have also finished to create the velcro-foam-cord system to substain pieces in their position and thi is the result

vurzk.jpg


now i have two big problems: first of all FEETS...they are made of three pieces that don't mach one with each other...the result is really bad as you can see from the picture...
second problem is weapon...i don't even know where to start from...
 

Attachments

  • 358z337.jpg
    358z337.jpg
    878.7 KB · Views: 142
  • vurzk.jpg
    vurzk.jpg
    386.6 KB · Views: 151
The fact that you didn't use any bondo is really lifting my spirits in regards to my own build. I plan on using it and your suit looks better than most that DO use Bondo. Holy crap man. This is awesome stuff.

For the feet, it might just be a scaling issue.

Make sure that the boot is measured toe to heel in centimeters, than add a couple of more centimeters for the boot/shoe you're measuring to fit. Then convert the cms to millimeters and enter that number into the depth box of the pepkura designer. You can also use low definition files to get the correct sizing. As far as making the boot look game accurate, 3 piece boot is ideal. You want that top part of the heel to come off so you can actually put it on. Some people use plastic buckles, like Carpathia. You can also make a foam heed that is measured to the size of the pep, and strap your boot to it. I recommend just looking at Carpathia's build in the creation forum. His build is overall one of the best around.

I hope this made sense.
 
the idea of foam for the top part is pretty good...the size is right as it fit perfecly to my feet...the trouble is all in the upper part, maybe i can recreate it with foam...

anyway bondo make really good effects on rounded parts, but i find it a bit difficult to use to obtain best result..so i have used a dobule layer of rasin on the external side, than i sanded it a little, so the result is this...
 
Status
Not open for further replies.
Back
Top