1st Build - ShoeGum's Spartan Hieu Dihn from Halo Infinite

ShoeGum

New Member
First off, this will be my first build of a spartan but it's technically not my first build. My first armor was actually a foam ODST armor from Andrew DFT. So I have experience in EVA foam, but I found that it didn't hold up to use very well. So now I am looking into a more sustainable option. 3D printing is durable and mostly passive which means I can let it run while doing whatever else I want, including detailing on the armor. In addition to pepekura (which will be new to me), they pose a much higher level of durability and detail than I can (personally) achieve with foam.

I chose spartan Dihn because I appreciate rugged, used, and flavorful armors. Battle scars and chipped paint tell me a much more interesting story than a factory finish. There are some places on his armor that are literally held together by tape and rope. The bits and pieces where he customized his own armor also add to this well-loved appearance.

Spartan Hieu Dihn doesn't have much source material out, so this will be tricky to research. Screenshots will most likely be my primary source. Fortunately I have found that his armor is based off of the Rakshasa core for which there are free models.
Edit: The files are not 100% free, there is a demo with lowered resolution meant for sizing but the full model is $75 :(

This one by Aguilar Workshop caught my eye:
Rakshasa Collage Aguilar Workshop 3D Files.jpg


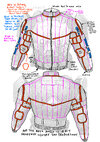
When compared to Dihn's armor, it's easy to see the underlying armor core. And that most of the armor is built off of this foundation.

Dinh Model Thighs Up - Front.png


The main points of interest in terms of what differs from the normal Rakshasa core are:
-The Helmet
Helmet.PNG


-The breastplate extension
Breastplate Extension.PNG


-The shoulders
shoulders.PNG


-And the knee caps
kneecaps.PNG


- Plus some extra bits like the rope and knives

I plan to build the Rakshasa core first and then go from there. Right now this is very much a wish and not a goal as I have no timeline or plan other than "ready by Halloween". I will update this thread when I make progress but don't expect consistency, I'm very sporadic so I could have progress by the end of the week of the end of may. Any tips are welcome, have a great day, and make good choices.

---------------------------------------------------------------------------------------------------------------------------------------------------------------
 

Attachments

  • Rakshasa Jacket 2.jpg
    Rakshasa Jacket 2.jpg
    616.1 KB · Views: 95
Last edited:
The rakshasa core is one of my favourites because of the mix of spartan/odst look, the reason I also have this armor on my list to make!
 
Day 2 of research, I've found a thread with some amazing designs for the under suit and all the details here: Rakshasa Discussion
It discusses quilting the under suit which I have no experience in, but I think it would produce the best results so that's what I'm going for.

rakshasa-jacket-2-jpg.jpg


This diagram by Beemo8bit goes into great depth on the unique pattern
Unfortunately, I just found out that the core stl files are not free. There is a free demo but the full armor is 75 USD. I'm also considering buying the helmet stl from Halo infinite: Artaius helmet. There are also knife patterns for sale by the same person selling the armor core which are cheep in comparison to the rest of the files.
This is all quite ambitious but I don't want to settle for less than the furthest extent of my capabilities. But for now I think I will start with the helmet, and save for the filament/files to the full armor. My belief is that the helmet will be the best for practice since helmets tend to have the most mix of details and skill requirements. Hopefully this will result in me having a head start on the skills needed for the armor.
Any tips are welcome, have a great day, and make good choices.
 
I got the helmet files. The author did a pretty decent job on it and parts of the helmet are printable separately. The shell will take a whole 40 hours to print, so I got a silent motherboard for my printer to run at night.
I can't figure out how to upload my .mov files so here is an example from Reddit.


I also got a CR touch but its taken 7 hours to set up and I don't wanna talk about it.

Back to the topic of the helmet, there is a file for a visor which I could probably print and vacuum form at my local makerspace. Or I could use this as an excuse to buy the fancy translucent red protopasta filament. I'll have more results on the helmet when its printed, but it probably won't fit first try. Anyway, its getting real late so have a great day, and make good choices.
 
3D printing is a pain in the butt.
35 hours into a 40 hour print my new motherboard did a little trolling and reverted to factory settings in Mandarin.
I am now on revision 3 of said 40 hour print.
 
I just got back from a week long trip to fine the second fourth of the helmet is complete! I assembled it using CA glue but I feel like the glue may be brittle. Any advice on how to bind PLA parts with a smooth seam? I'm thinking of fiberglass inside the helmet but that defeats the point of using PLA over fiberglass for cost effectiveness.

IMG_6617.jpg
IMG_6616.jpg


The back half will be white PLA because matterhackers was out of 3KG spools of grey at the time. It should arrive tomorrow and I can begin printing again. Overall, my biggest concern short term is the brittle CA glue seams.
I found some more purchasable files for things like the right shoulder, knees, and the heartplate. All from SlenderDummy on CGTrader: SlenderDummy | CGTrader
I'll probably buy them and if the current helmet doesn't work out, I'll get their version because it looks much easier to post-process.
I got some work to get done, so have a great day and make good choices.
 
Last edited:
If you need an ABSOLUTELY INVISIBLE seam, I use an Acetone bath on each face to be adhered (around 5 min) and some Testor's Liquid Cement.
If you have the means to cover (like a single layer of primer) a little then I suggest JB Weld ClearWeld and cutting excess with a blade. Much stronger bond.
It's essentially a question of how tough versus how visible.
Edit: Also have you seen this product from EVAKura? Its a Midsection Wrap to look like a tech suit. Smarter minds could also use it for biceps and thighs.
I probably won't get an invisible seam, but I do have some clearweld that I'll test out. Thanks!
 
I've been held up with school work recently and haven't had much time to work on the helmet. In that time though. I've installed a direct drive and PEI plate to my printer! But they resulted in some issues that took a little time to fix. With these issues solved, I'm now continuing the helmet.
Originally I used an STL which was very pretty, but I found that it had quite a few issues that proved to much to fix. Now I am using a much improved version which I sliced up to make it printable on my size of bed. These new parts are much better made and I feel very confident in them.

Here is the subframe of the helmet before modifications:
SubframeWhole.PNG


It doesn't fit my printer, and I have been told that the smaller my parts are, the smaller my fails will be. So I cut them into printable parts with Meshmixer and saved them into a single project:
SubframeAssembly.PNG


As you can see, I try to make the steepest overhangs as close to the bed as possible for shortened print times, and improved quality. Everything on the right needs to be printed, the piece in the bed is either currently printing or next in my series, and the ones on the right are printed parts. My goal right now is to make a complete ring around the narrowest part of the helmet to make sure it fits well. And my current assembly is promising:
Progress.jpg

(Yes I see the warp, it annoys me too)

Now its back to the worst part of printing: waiting. But I'll do my best to work the current piece as best as possible. It's a shame that the old helmet didn't work out, but I've learned and now I'm improving. With summer just weeks away, I'll have more time for this project soon.
Questions and comments are very welcome, but in the meantime, have a great day and make good choices!
 
This thread is more than 11 months old.

Your message may be considered spam for the following reasons:

  1. This thread hasn't been active in some time. A new post in this thread might not contribute constructively to this discussion after so long.
If you wish to reply despite these issues, check the box below before replying.
Be aware that malicious compliance may result in more severe penalties.
Back
Top