Which attachments?
You are using an out of date browser. It may not display this or other websites correctly.
You should upgrade or use an alternative browser.
You should upgrade or use an alternative browser.
- Status
- Not open for further replies.
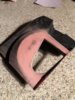
I have good news: I don't have too unlock any of the attachments to preveiw them! 
So here you go! all of the helmet attachments!
.png")
.png")
.png")
.png")
.png")
.png")
.png")
.png")
.png")
So here you go! all of the helmet attachments!
By the way if you (or anyone else) need any reference pics for any other armor pieces from reach, feel free to ask me it's no problem at all!

 www.405th.com
I made a thread for it!
www.405th.com
I made a thread for it!
it's no problem at all!MCC PC Armor Reference Images
Okay, So I noticed some of you guys don't have access to the Halo game your building a suit from so I thought, since I have the MCC maybe I could share some reference pics from Halo: Reach with you guys. I started with a few helmets, but there not all here yet. If there's a Halo: Reach armor...
www.405th.com
Last edited:
Your layer shift problem could be due to the stepper drivers overheating. You can try that by placing a fan over them to cool them better. It could also be something binding up, but that would happen earlier as well. If you use Cura as a slicer, I could send you a post processing script that homes the printer after every layer so that a layer shift doesn't ruin print completely. It does produce some stringing however, as the printer doesn't necessarly retract before homing.
kahnah
Member
That is exactly what i was looking for! Thank you TONS! I am very appreciative of your contribution. Hopefully this will help others as it is helping me.By the way if you (or anyone else) need any reference pics for any other armor pieces from reach, feel free to ask me
I made a thread for it!MCC PC Armor Reference Images
Okay, So I noticed some of you guys don't have access to the Halo game your building a suit from so I thought, since I have the MCC maybe I could share some reference pics from Halo: Reach with you guys. I started with a few helmets, but there not all here yet. If there's a Halo: Reach armor...
Your very welcome kahnah, I hope it helps other people too C:That is exactly what i was looking for! Thank you TONS! I am very appreciative of your contribution. Hopefully this will help others as it is helping me.
kahnah
Member
Your layer shift problem could be due to the stepper drivers overheating. You can try that by placing a fan over them to cool them better. It could also be something binding up, but that would happen earlier as well. If you use Cura as a slicer, I could send you a post processing script that homes the printer after every layer so that a layer shift doesn't ruin print completely. It does produce some stringing however, as the printer doesn't necessarly retract before homing.
I may have discovered the issue. I converted the extruder to a direct drive which eliminated clogging and any related failure of the bowden tube. BUT this created a new issue. I found that as the print increases in height there is a lack of slack from the filament roll to the extruder. This lack of slack creates tension and does not allow the x axis to move freely. Moving forward I think i'm going to revert to the original bowden tube setup with the extruder mounted to the x axis frame.
kahnah
Member
I did a thing:
Holy heck I destroyed my helmet. I completely chopped off the jaw line. I also added a bit of detail to the visor surround. I used a craft foam sheet with a sticky back. I cut it in a long strip and stuck it along the visor surround. the i slapped a THIC layer of bondo. Im very satisfied. i still need to clean up where it meets the plastic and i should be done.

I still need to chop up the CBRN a bit more. Ill detail it up once the helmet is complete.

As for what is to replace the jaw line, here s the rough, undetailed, unsmoothed portion of the original rip. in the cheek sections I really do appreciate how i gained the proper angles.I still have a whole LOT of smoothing and detailing.

Now the ear details (THIS WILL BE FUN). First I played around with a spare part to test if i could make the rounded area. It was cake with the dremel sander. I like how this piece came out so Im going to use it as a template for the actual helmet.

SO i made the detail inside of the ear. Ill apply the template, cut out the detail, angle it and glue it into place then slap some bondo to smooth it all out.

Here is the printed detail. it came out perfectly.

anyways that is it for now. I still have ALOT of trimming left untill im able to glue all the parts into the helmet. stay tuned.
Holy heck I destroyed my helmet. I completely chopped off the jaw line. I also added a bit of detail to the visor surround. I used a craft foam sheet with a sticky back. I cut it in a long strip and stuck it along the visor surround. the i slapped a THIC layer of bondo. Im very satisfied. i still need to clean up where it meets the plastic and i should be done.
I still need to chop up the CBRN a bit more. Ill detail it up once the helmet is complete.
As for what is to replace the jaw line, here s the rough, undetailed, unsmoothed portion of the original rip. in the cheek sections I really do appreciate how i gained the proper angles.I still have a whole LOT of smoothing and detailing.
Now the ear details (THIS WILL BE FUN). First I played around with a spare part to test if i could make the rounded area. It was cake with the dremel sander. I like how this piece came out so Im going to use it as a template for the actual helmet.
SO i made the detail inside of the ear. Ill apply the template, cut out the detail, angle it and glue it into place then slap some bondo to smooth it all out.
Here is the printed detail. it came out perfectly.
anyways that is it for now. I still have ALOT of trimming left untill im able to glue all the parts into the helmet. stay tuned.
Attachments
Callianis
Member
If it's anything like my Anet A8 and Creality CR-10S, then the following might benefit also;
* Adjustable belt tensioners - sometimes the belts get a bit loose and will affect print quality/accuracy
* Fibreglass reinforced belts - if you're using steel wire ones they'll eventually stretch (and affect print quality/accuracy)
* (optional) stepper motor braces for if you end up with tight belts. I have one for my X axis that incorporates a bearing (ie it supports the top of the stepper shaft)
* Frame braces to reduce wobble, especially for those taller prints
* Spool hubs, to center the center of the spool on the hub so the extruder motor doesn't have to work so hard to drag the filament off the spool. Might help with that issue you mentioned.
Some also say the spool on the top will also add to the wobble potential of a 3D printer (and affect print quality/accuracy).
Not sure if you have got any but automotive filler primer is great for helping fill in those 3D printer lines. I start with some low grit sandpaper first as the primer clogs sandpaper pretty darn quick. I'd use other filler for the big holes and gaps (eg Bondo, JB weld, or spot putty for the small stuff that filler primer wouldn't fill).
It's looking good, and you're more ambitious than I am with all that chopping. Or should I say brave
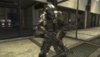
Here are a couple of my own Reach images I've gathered.
* Adjustable belt tensioners - sometimes the belts get a bit loose and will affect print quality/accuracy
* Fibreglass reinforced belts - if you're using steel wire ones they'll eventually stretch (and affect print quality/accuracy)
* (optional) stepper motor braces for if you end up with tight belts. I have one for my X axis that incorporates a bearing (ie it supports the top of the stepper shaft)
* Frame braces to reduce wobble, especially for those taller prints
* Spool hubs, to center the center of the spool on the hub so the extruder motor doesn't have to work so hard to drag the filament off the spool. Might help with that issue you mentioned.
Some also say the spool on the top will also add to the wobble potential of a 3D printer (and affect print quality/accuracy).
Not sure if you have got any but automotive filler primer is great for helping fill in those 3D printer lines. I start with some low grit sandpaper first as the primer clogs sandpaper pretty darn quick. I'd use other filler for the big holes and gaps (eg Bondo, JB weld, or spot putty for the small stuff that filler primer wouldn't fill).
It's looking good, and you're more ambitious than I am with all that chopping. Or should I say brave
Here are a couple of my own Reach images I've gathered.
Attachments
kahnah
Member
If it's anything like my Anet A8 and Creality CR-10S, then the following might benefit also;
* Adjustable belt tensioners - sometimes the belts get a bit loose and will affect print quality/accuracy
* Fibreglass reinforced belts - if you're using steel wire ones they'll eventually stretch (and affect print quality/accuracy)
* (optional) stepper motor braces for if you end up with tight belts. I have one for my X axis that incorporates a bearing (ie it supports the top of the stepper shaft)
* Frame braces to reduce wobble, especially for those taller prints
* Spool hubs, to center the center of the spool on the hub so the extruder motor doesn't have to work so hard to drag the filament off the spool. Might help with that issue you mentioned.
Some also say the spool on the top will also add to the wobble potential of a 3D printer (and affect print quality/accuracy).
Not sure if you have got any but automotive filler primer is great for helping fill in those 3D printer lines. I start with some low grit sandpaper first as the primer clogs sandpaper pretty darn quick. I'd use other filler for the big holes and gaps (eg Bondo, JB weld, or spot putty for the small stuff that filler primer wouldn't fill).
It's looking good, and you're more ambitious than I am with all that chopping. Or should I say brave
Here are a couple of my own Reach images I've gathered.
My ender 3 is the littlebrother of the CR10. I did add the belt tentioners shortly after the purchase of my printer. Im still sticking to the direct drive conversion as the route of the problem. Man the chopping of the helmet was definitely overly ambitious. I may have to reprint the original cheek sections and add the detail by using bondo as I cannot get the new cheeks to fit perfectly. However it has been super cold in the workshop so I havent really been working on the project.
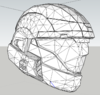
In the meantime I did work on the 3D model of the OG Reach ODST file. I still have no idea how to smooth out the model so its very boxy. However the detail is now there. Take a look.
- All the detail Lines where added to the top
- The visor surround has also been fully detailed with raised and lowered sections
- The ear has all its detail as well
- The cheek also has some detail lines as well
- The back of the helmet has detail lines and indentions as well.
- I have it converted to OBJ and STL formats
I dont think I will add the detail to the jaw as I think it would be easier to carve and add bondo.
Attachments
Last edited:
Smoothing models isn't very difficult. In blender, you have to import the model and add the subdivision surface modifier, but that will smooth everything. To keep sharp edges, I think the easiest way is to set the edge crease. To do that, select the edge and press shift+E, then type one and press enter or leftclick. That should turn the edge purple and should keep it sharp. To remove the crease, type -1.
kahnah
Member
Smoothing models isn't very difficult. In blender, you have to import the model and add the subdivision surface modifier, but that will smooth everything. To keep sharp edges, I think the easiest way is to set the edge crease. To do that, select the edge and press shift+E, then type one and press enter or leftclick. That should turn the edge purple and should keep it sharp. To remove the crease, type -1.
Okay let me give this a shot.
Man if i can get this it will change my whole build as I will basically start over.
Last edited:
kahnah
Member
Smoothing models isn't very difficult. In blender, you have to import the model and add the subdivision surface modifier, but that will smooth everything. To keep sharp edges, I think the easiest way is to set the edge crease. To do that, select the edge and press shift+E, then type one and press enter or leftclick. That should turn the edge purple and should keep it sharp. To remove the crease, type -1.
Alright! getting somewhere. However there are a few areas that seem to be problematic. Im not exactly sure how to correct these broken faces (if thats what they are)
take a look there are a few broken details like this across the helmet
Certainly looking smoother! Nice! I dont know how to solve your problem though sorry... I have no idea what could cause that...
I have no idea what could cause that...Nuts4Accuracy
Active Member
Alright! getting somewhere. However there are a few areas that seem to be problematic. Im not exactly sure how to correct these broken faces (if thats what they are)
View attachment 284582
take a look there are a few broken details like this across the helmet
View attachment 284583
Could you show us the mesh for that area? AS in, in edit mode.
Callianis
Member
Is the Reach ODST helmet any different from the Halo 3 version? Coz Jeffrey/nintendstroid has a pretty smooth helmet (I printed it) found at 3D Printable Halo 3 ODST helmet Wearable Cosplay by jeffrey
kahnah
Member
Could you show us the mesh for that area? AS in, in edit mode.
Here is what im looking at. Purple edges are the hard lines i intend to keep nice and sharp.
Here is that ugly ear in edit mode
Also i forgot to show the detail I added in the back brim of the helmet. check it out!
I tried detailing the Jaw however It is a mesh mess. I cannot get the proper shape for the indentions so im sticking to my original plan of just carving out the details and using bondo. Unfortunately this model will only be 90% accurate. Oh well.
Last edited:
kahnah
Member
There are a few different details that the Reach ODST has.Is the Reach ODST helmet any different from the Halo 3 version? Coz Jeffrey/nintendstroid has a pretty smooth helmet (I printed it) found at 3D Printable Halo 3 ODST helmet Wearable Cosplay by jeffrey
It seems that the faces are bent and overlap, which can cause issues. The best fix would be to delete the faces in that area and create new triangles, but you could also try the remesh modifier or something like that (not sure of the exact name), which might fix the issue as well. Just make sure it's above subsurf in the modifier stack.
kahnah
Member
I am WAY in over my head here. I cannot seem to get my head around the program. sketchup is easy enough however Blender is another animal. There are a few more Issues other than the ear when i apply the sub surface. If anyone is willing to take a crack at it be my guest. Ill figure out how share the model.
Meet Google Drive – One place for all your files
Let me know if this works^
Meet Google Drive – One place for all your files
Let me know if this works^
Last edited:
- Status
- Not open for further replies.
Similar threads
- Replies
- 2
- Views
- 1,431
- Replies
- 4
- Views
- 1,893