The epoxy is nearly completely dry but it’s dried with a few channels and layers in it so I might go back over it with another layer of sanding and dabs of epoxy around the helmet. It looks clean though! I’ll post photos of it after more sanding soonI am looking forward to seeing the final product after using the epoxy method. I can imagine with sanding it would super duper smooth.
You are using an out of date browser. It may not display this or other websites correctly.
You should upgrade or use an alternative browser.
You should upgrade or use an alternative browser.
3D printed Spartan build
- Thread starter Jev
- Start date
- Status
- Not open for further replies.
Update 14-10-23:
I LIVEEEEEEE!
Sorry for the lack of updates lads, the printer has been working overtime and so have I. I’ve gotten all of the arm pieces bar the shoulders completed, more updates soon (I promise), and scaled.
After looking back on how I did my helmet I can see I made a few procedural errors that made my life a bit harder (welded the parts together, wood filler’d the seams then coated with epoxy without sanding, THEN sanded and spray painted over it.) so now I’m just getting to properly smooth after picking up a new random orbital sander (much appreciated turbo for the tip, this thing rules). The helmet is getting pretty smooth at this point but I’m not 100% happy with it just yet, I’ll give it another go over with the sander tomorrow to see if I can’t get it ready for a (hopefully final) epoxy coat (we’re approaching 3 now due to mistakes made earlier in the build and yes, this thing is built like a brick and also has a pool of resin that will be rather convenient for mounting pads to). I’ll be getting one of the honeycomb visors from Etsy that I’ve seen before, I’ve got the voice amplifier and if anyone knows any good sets of pads I’d really appreciate if you commented with a link!
I’m currently printing the prop for this build as I’m getting a new printer soon (anycubic Kobra 2 max, I actually can’t wait). I decided on the Halo 3 carbine from moesizzlac over on thingiverse. Cutting it up to fit the old ender 3’s bed took a while but I’ve got it done now (will probably upload the cut up version to thingiverse as a remix of moes for anyone else interested in doing it themselves.
I plan on using the new printer to do the thighs, shins and chest in as little pieces as possible as opposed to the mess of parts I’m used to.
More updates to come, any tips or advice is greatly appreciated!
Attachments
Yay for new printers! Having a larger printer is definitely worth it, and saves SO much time trying to fill and smooth seams.Update 14-10-23:
I LIVEEEEEEE!
Sorry for the lack of updates lads, the printer has been working overtime and so have I. I’ve gotten all of the arm pieces bar the shoulders completed, more updates soon (I promise), and scaled.
After looking back on how I did my helmet I can see I made a few procedural errors that made my life a bit harder (welded the parts together, wood filler’d the seams then coated with epoxy without sanding, THEN sanded and spray painted over it.) so now I’m just getting to properly smooth after picking up a new random orbital sander (much appreciated turbo for the tip, this thing rules). The helmet is getting pretty smooth at this point but I’m not 100% happy with it just yet, I’ll give it another go over with the sander tomorrow to see if I can’t get it ready for a (hopefully final) epoxy coat (we’re approaching 3 now due to mistakes made earlier in the build and yes, this thing is built like a brick and also has a pool of resin that will be rather convenient for mounting pads to). I’ll be getting one of the honeycomb visors from Etsy that I’ve seen before, I’ve got the voice amplifier and if anyone knows any good sets of pads I’d really appreciate if you commented with a link!
I’m currently printing the prop for this build as I’m getting a new printer soon (anycubic Kobra 2 max, I actually can’t wait). I decided on the Halo 3 carbine from moesizzlac over on thingiverse. Cutting it up to fit the old ender 3’s bed took a while but I’ve got it done now (will probably upload the cut up version to thingiverse as a remix of moes for anyone else interested in doing it themselves.
I plan on using the new printer to do the thighs, shins and chest in as little pieces as possible as opposed to the mess of parts I’m used to.
More updates to come, any tips or advice is greatly appreciated!
I'll need to order some more soon, my tub is starting to get a bit light. I do however have a big tub of body filler which I've been avoiding having to use, at least I got a respirator recently ¯\_(ツ)_/¯Smart using wood filler. I used Bondo and that stuff, while maybe better, was soooo toxic. And when you sand, the Bondo dust is also super toxic and it gets EVERYWHERE.
I feel like I've spent the majority of this build with sandpaper in my hand xD, it'll be a great to have to worry a bit less about smoothing seams!Yay for new printers! Having a larger printer is definitely worth it, and saves SO much time trying to fill and smooth seams.
Update 20-10-23:
Just a small status update this time,
I ran out of filament yesterday but I got most of the Carbine printed anyways so it's just a few days until the new printer arrives with 2 rolls of filament so I'll be sanding and working on the armour I have until that arrives. I might start a new build thread for the props I want to make for the armour (tacpad, some magnum variant, grenades, maybe some AI chips to give out at cons)
So on the status of the armour:
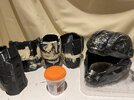
Helmet: Printed, 99% sanded, welded, wood filler'd, 3 coats of epoxy sanded down, layer of spray paint
Biceps: Printed, 80% sanded, welded, wood filler'd
Forearms: Printed, 0% sanded, welded, wood filler'd
Just a small status update this time,
I ran out of filament yesterday but I got most of the Carbine printed anyways so it's just a few days until the new printer arrives with 2 rolls of filament so I'll be sanding and working on the armour I have until that arrives. I might start a new build thread for the props I want to make for the armour (tacpad, some magnum variant, grenades, maybe some AI chips to give out at cons)
So on the status of the armour:
Helmet: Printed, 99% sanded, welded, wood filler'd, 3 coats of epoxy sanded down, layer of spray paint
Biceps: Printed, 80% sanded, welded, wood filler'd
Forearms: Printed, 0% sanded, welded, wood filler'd
I’ve had similar problems with my printer currently. Not sure if this helps, but I’ve had success with printing with a brim, and taping the brim down with scotch 2090 tape. I had Cr-10 V2 that I would do this on when I was printing my helmet/suitUpdate 26-9-23:
After cleaning up the helmet with sandpaper I’ve got a final layer of epoxy down on it, mostly applied with an old paintbrush to keep it nice and thin just to seal in the smoothness.
Currently having problems with my printer not having bed adhesion so I’ll update when that’s up again
Had some issues with build plate adhesion as well. I was able to fix it by making sure my z-offset was dialed in, and I upped my build plate temp a bit. Also, I wipe down my plates with 95% isopropyl alcohol before every print. Have a textured plate on my Ender, and smooth plates on my K1 and K1 Max.I’ve had similar problems with my printer currently. Not sure if this helps, but I’ve had success with printing with a brim, and taping the brim down with scotch 2090 tape. I had Cr-10 V2 that I would do this on when I was printing my helmet/suit
Also, brims are great! Unless I’m doing a print with a lot of surface contact on the build plate, I always use a brim as well.
But I’ve also only used PLA and a little TPU. When it comes to ABS or PETG, I have no suggestions. lol.
- Member DIN
- S360
the prints look like they will be pretty good once you give them some sanding,
I might try that for the next few prints if I have any issues, I tried gluing the prints a while ago but it got pretty noxious so I stopped. Thanks!I’ve had similar problems with my printer currently. Not sure if this helps, but I’ve had success with printing with a brim, and taping the brim down with scotch 2090 tape. I had Cr-10 V2 that I would do this on when I was printing my helmet/suit
I hope it helps! Here’s a photo for reference on a leg I printed. I had to tape one of the supports to the leg since it came loose, but the tape held it down throughout the entire print. 2+ days if I recall correctly.I might try that for the next few prints if I have any issues, I tried gluing the prints a while ago but it got pretty noxious so I stopped. Thanks!
Attachments
Update 9-12-23:
Once again apologies for the lack of updates, I’m in the middle of my end of term exams so most of the work is printer work.
So the new printer arrived and my god if it isn’t an absolute chonker! As soon as I got it I decided to print a thigh all in one, which around half way though I realised was not the sized stl but the unsized one. After a minute or two of absolute regret over not printing test rings first and wasting nigh a whole roll of filament, I made a mental note to never make that mistake again.
So the armour pieces current status is:
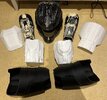
Helmet: welded, filled, epoxied, sanded
Forearms: welded, filled
Biceps: reprinted as old ones were too large, still not cleaned of supports
Shoulders: tempted to reprint due to scaling being off
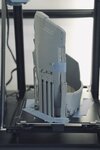
Thighs: printed
I see a lot of sanding in my future when I get some free time xD
Once I decide whether or not to reprint some of the pieces I have currently, it will just be that, the chest (which honestly worries me, it’s a lot of filament and has to be sized well, any tips of it would be very much appreciated), shins/greaves and finishing the carbine.
I’m also printing an M6G (model from thingiverse) that is to be magnetized to my thigh, also considering making a hard case or medic pouch/case to go on my other thigh at the moment. Another possible upgrade would be a working (old phone in 3d printed case) mounted to my forearm.
I still haven’t gotten the visor yet, it’s on the to do list. I’ll also have to work on helmet fans and LEDs in time. Currently the only helmet upgrade I have is a microphone and speaker system (planning to put the speaker in the chest cavity).
With the deadline being the Dublin Comic Con in March, I think I’m making good time so far.
Anyways,
Thanks for reading the update, more coming soon!
Once again apologies for the lack of updates, I’m in the middle of my end of term exams so most of the work is printer work.
So the new printer arrived and my god if it isn’t an absolute chonker! As soon as I got it I decided to print a thigh all in one, which around half way though I realised was not the sized stl but the unsized one. After a minute or two of absolute regret over not printing test rings first and wasting nigh a whole roll of filament, I made a mental note to never make that mistake again.
So the armour pieces current status is:
Helmet: welded, filled, epoxied, sanded
Forearms: welded, filled
Biceps: reprinted as old ones were too large, still not cleaned of supports
Shoulders: tempted to reprint due to scaling being off
Thighs: printed
I see a lot of sanding in my future when I get some free time xD
Once I decide whether or not to reprint some of the pieces I have currently, it will just be that, the chest (which honestly worries me, it’s a lot of filament and has to be sized well, any tips of it would be very much appreciated), shins/greaves and finishing the carbine.
I’m also printing an M6G (model from thingiverse) that is to be magnetized to my thigh, also considering making a hard case or medic pouch/case to go on my other thigh at the moment. Another possible upgrade would be a working (old phone in 3d printed case) mounted to my forearm.
I still haven’t gotten the visor yet, it’s on the to do list. I’ll also have to work on helmet fans and LEDs in time. Currently the only helmet upgrade I have is a microphone and speaker system (planning to put the speaker in the chest cavity).
With the deadline being the Dublin Comic Con in March, I think I’m making good time so far.
Anyways,
Thanks for reading the update, more coming soon!
Attachments
Exia
New Member
Those look really clean. Can't wait to see how your LEDs and fans and how they are put in your helmet.Update 9-12-23:
Once again apologies for the lack of updates, I’m in the middle of my end of term exams so most of the work is printer work.
So the new printer arrived and my god if it isn’t an absolute chonker! As soon as I got it I decided to print a thigh all in one, which around half way though I realised was not the sized stl but the unsized one. After a minute or two of absolute regret over not printing test rings first and wasting nigh a whole roll of filament, I made a mental note to never make that mistake again.
So the armour pieces current status is:
Helmet: welded, filled, epoxied, sanded
Forearms: welded, filled
Biceps: reprinted as old ones were too large, still not cleaned of supports
Shoulders: tempted to reprint due to scaling being off
Thighs: printed
I see a lot of sanding in my future when I get some free time xD
Once I decide whether or not to reprint some of the pieces I have currently, it will just be that, the chest (which honestly worries me, it’s a lot of filament and has to be sized well, any tips of it would be very much appreciated), shins/greaves and finishing the carbine.
I’m also printing an M6G (model from thingiverse) that is to be magnetized to my thigh, also considering making a hard case or medic pouch/case to go on my other thigh at the moment. Another possible upgrade would be a working (old phone in 3d printed case) mounted to my forearm.
I still haven’t gotten the visor yet, it’s on the to do list. I’ll also have to work on helmet fans and LEDs in time. Currently the only helmet upgrade I have is a microphone and speaker system (planning to put the speaker in the chest cavity).
With the deadline being the Dublin Comic Con in March, I think I’m making good time so far.
Anyways,
Thanks for reading the update, more coming soon!
Update 12-12-23:
Small armoursmith update here,
I'm pretty sure I've got a better understanding of the software after an hour or two of tinkering with settings and printing test rings.
My thigh pieces, biceps and forearms are borderline perfectly sized now.
Chest and hips are to be done, waiting on some more filament so currently printing small accesstory pieces. Finished printing an M6G to be magnetised to my thigh today.
Bigger updates coming soon hopefully!
(Pic 1: disassembled form)
(Pic 2: success!)
Update: 3-1-24 (happy new years!)
It’s good to be back on the project properly, but almost immediately I ran into a proper rough clog in my extruded, I tried cold pulls, pumping the heat up to 240 (printing on PLA).
However, none of this worked, finally I decided to disassemble the extruder and find the clog, it turned out to be a tiny piece of unextruded melted PLA that somehow got stuck between the gears and the heat block (probably incorrect terms but I can’t remember the right ones, sorry!)
With this issue resolved I can get back to printing my armour!
More updates soon!
Nice work on that troubleshooting. I had to do something similar a few months back. Looking forward to more updates, good luck to your build!
- Member DIN
- S901
Looking great! Don't sweat any of the setbacks with the printers. I've had just about every issue you've run into happen to be, including the excess PLA that got out and clogged up the fans/gears/heatblock. How are you liking the Kobra 2 Max? I've printed multiple sets of armor on an Ender-5 but have looked into something with a larger build plate.
Hi!Looking great! Don't sweat any of the setbacks with the printers. I've had just about every issue you've run into happen to be, including the excess PLA that got out and clogged up the fans/gears/heatblock. How are you liking the Kobra 2 Max? I've printed multiple sets of armor on an Ender-5 but have looked into something with a larger build plate.
On the Kobra 2 Max, I'm liking it overall. I wasn't having any issues really until the clogging happened. It's happened again around yesterday actually but I'd say that I just didn't clean it out thoroughly enough.
The speed and build volume easily make up the value of the printer though in all fairness. One thing to not discount though is the inertia, due to the speed it can get a bit of momentum going so you'd want a solid table under it to support it. I've heard of some people just putting it on the floor for this reason.
It also EATS filament, I've completely stopped using 1kg filament rolls just as I'm printing things all-in-one and due to the fact that it's at such a high speed. I use mostly 3kg rolls now that tend to last much longer but need an external holder (the included filament holder can't support the weight or width of the larger roll)
- Status
- Not open for further replies.
Similar threads
- Replies
- 4
- Views
- 1,727
- Replies
- 6
- Views
- 1,624