3D printed Spartan build

Jev

Active Member
Hi all, I'm happy to say that I'll be starting a new project for the next few months. I'll be 3D printing the vast majority of this suit for ease and am planning to use epoxy-resin and fibreglass to strengthen it.
I've scaled Moesizzlac's Air Assault helmet for my head and have just started printing it, with my single printer (ender 3) and time constraints, I'm estimating up to 2 weeks to finish printing the bucket. I'll also be using MoeSizzlac's mark V spartan armour (huge thanks to Moe for making the armour and putting it up for free on thingiverse by the way) as a base with some of his other parts (scout torso) for customizaton.

My goal is to have this suit ready for next year's Dublin Comic Con, I'm hoping to have the slow pace of printing keep me from burning out as I did with previous projects. I'll very much be treating this build as a marathon rather than a sprint.

02-09-23 update:

Just a small update today,

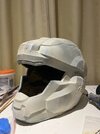
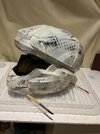
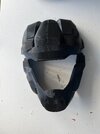
Currently I’m still trying to get the hang of armorsmith and how it works, I’ve moved away from the Halo 3 style of armour in favour of some Spartan III armour. I’m still using Moesizzlac’s air assault helmet (photos attached) which is now 1/2 printed. The scale is a bit high but I’m hoping to be able to make it look fine with a large chest and shoulders.

I’m using some of Moe’s models for Emile’s base suit and will be using bits of the other Spartans from noble team to make it more of my own.


Any tips or comments are appreciated (y)
 

Attachments

  • image.jpg
    image.jpg
    1.2 MB · Views: 119
Last edited:
Good luck with your project! Just remember, you shouldn't work yourself too hard, even if it is an easier method of creating armor.
 
Sounds like it's gonna be cool! Are you using Armorsmith to do the sizing, or measuring and mathing it out?
Also, what kind of parameters are you printing with! May have some suggestions, but mainly curious!
 
Sounds like it's gonna be cool! Are you using Armorsmith to do the sizing, or measuring and mathing it out?
Also, what kind of parameters are you printing with! May have some suggestions, but mainly curious!
I’ve sized my bucket the old fashioned way but I’m really considering getting Armorsmith for the actual armour. The only thing really holding me back from Armorsmith was that I heard some people saying it was unreliable or broken at the moment.

To do with my printing parameters,
I’m running on an Ender 3, printing in PLA with a 200 degree Celsius hot end and a 55 degree heated bed, starting the first few layers at 75% speed and later on in the print upping it to 120%. The printer is in an enclosure for noise reasons.

Any tips are appreciated!
 
Armoursmith was broken for a bit when it came to non-uniform scaling of foam parts. It would butcher the template. Should be ok for 3D printed parts. I would recommend for an entire 3D printed suit.
 
Armoursmith was broken for a bit when it came to non-uniform scaling of foam parts. It would butcher the template. Should be ok for 3D printed parts. I would recommend for an entire 3D printed suit.
I’ve gone ahead and purchased Armorsmith, I’m still trying to get the hang of it with the videos and trying to figure out scaling with it. But it is helping me get a better idea of what I need to do. Also after putting my scaled helmet into it seems a little big, I’m praying that I didn’t mis-measure and that it’ll come out fitting me!
 
Armoursmith does take a bit to get used to, I'm still pretty average with it but there is so many tutorials online there is an answer for just about any issue
 
Update 5-9-23:

I have all but one of the pieces of the helmet printed but I ran out of PLA so I’ll have to use an old roll of PETG (forgot that it‘s so picky with hot end and bed temps since I last used it) until the new rolls of PLA arrive. The scaling seems to be about right but the opening on the helmet seems like it will be too small for my head, I plan to use magnets to make the lower back quarter of the helmet detachable so the look isn’t effected by cutting.

I‘ve also ordered Epoxy Resin, a voice amplifier and wood filler to continue working on the helmet as the rest of the armour prints.

Other than having to temporarily change to PETG, I think I’m making rather good time!
 
Update 11-9-23:

Apologies for how long it took for me to update the build!

I was waiting on some supplies to ship after I ran out of PETG. I now have a voice amplifier for the helmet, wood filler, epoxy resin and magnets for the helmet! I’ll post some as I progress with the helmet with the supplies. I have more PLA on the way as well thankfully.
 
image.jpg


I’ve got the helmet coated in epoxy and the seams covered in wood filler, planning on sanding soon and possibly another layer of epoxy if needed. Magnets are attached to both the main helmet and the back (in the back of the picture), if they aren’t enough I might just have to cut a small bit of the rim to fit my head.
 
I'll be watching this as well. I'm curious to see how that work flow sequence comes out.
  1. Epoxy
  2. Then filler
  3. Then sanding
I have to say it sounds backwards to me. I would have expected:
  1. Glue and seam to make the helmet a single part.
  2. Sand and putty/filler, seaming until the seams disappear
  3. Primer at this point for me. Epoxy over all of it for you, I guess.
I just would have expected the rough stuff first, and the smooth glossy last - the epoxy sealing in everything else. So yeah, very interested to see how this sequence works for you.
 
Update 24-9-23:

I’ve been busy over the last few weeks with work and such so not much time to work on the helmet, I’ve gotten a first coat of paint over it to smoothen the layer lines and go over the seams, I don’t have any sandpaper at the moment so I’ll have to pick some up before I can start really cleaning it up.
 

Attachments

  • image.jpg
    image.jpg
    1.6 MB · Views: 87
I'll be watching this as well. I'm curious to see how that work flow sequence comes out.
  1. Epoxy
  2. Then filler
  3. Then sanding
I have to say it sounds backwards to me. I would have expected:
  1. Glue and seam to make the helmet a single part.
  2. Sand and putty/filler, seaming until the seams disappear
  3. Primer at this point for me. Epoxy over all of it for you, I guess.
I just would have expected the rough stuff first, and the smooth glossy last - the epoxy sealing in everything else. So yeah, very interested to see how this sequence works for you.
I tried this for a helmet previously and it seemed to work out pretty well. I don’t have a solid structure yet and so I’ll have to figure it out and find out what’s optimal over time. For the next components I’ll try your sequence (which will probably work better considering that it’s planned rather than a bit all over the place). Thanks for the tip there!
 
Update 26-9-23:

After cleaning up the helmet with sandpaper I’ve got a final layer of epoxy down on it, mostly applied with an old paintbrush to keep it nice and thin just to seal in the smoothness.

Currently having problems with my printer not having bed adhesion so I’ll update when that’s up again
 

Attachments

  • image.jpg
    image.jpg
    1.7 MB · Views: 92
Update 26-9-23:

After cleaning up the helmet with sandpaper I’ve got a final layer of epoxy down on it, mostly applied with an old paintbrush to keep it nice and thin just to seal in the smoothness.

Currently having problems with my printer not having bed adhesion so I’ll update when that’s up again
I am looking forward to seeing the final product after using the epoxy method. I can imagine with sanding it would super duper smooth.
 

Your message may be considered spam for the following reasons:

If you wish to reply despite these issues, check the box below before replying.
Be aware that malicious compliance may result in more severe penalties.
Back
Top