You are using an out of date browser. It may not display this or other websites correctly.
You should upgrade or use an alternative browser.
You should upgrade or use an alternative browser.
Another H2A ODST Cosplay – First Build
- Thread starter ReclaimerODST
- Start date
-
- Tags
- 3d printed first build halo2 odst sewing
- Member DIN
- S357
Alrighty everyone following this thread! I’d lost some motivation, but have made a ton of progress since the last post, so here it is.
The majority of my time was spent working on the bags for the costume. There are 18 in total, with some sort of bizarre designs. I’m pretty new to sewing, so this was a huge struggle for me. I ended up finishing 5 bags, which will make up the front of the belt, leaving the large side bags, the back, and the four in the chest.


The pictures don’t quite show all the details since I was in a huge crunch and not taking a lot of progress pictures.
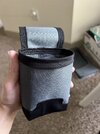
I also wanted to put together a holster for my SOCOM as a tiny side project, just traced the basic shape and added a strap to close it. The actual hip-mounting strap is a WIP.


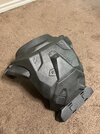
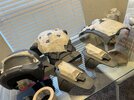
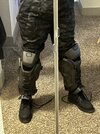
In the last post I hadn’t even started sanding, and now I’ve gotten paint totally finished. A huge part of the appeal to the ODST armor is the strapping all over, and for the most part I was able to get them all in the proper placement, held in with hot glue. Other than a clear coat and the “ODST” decal on the back, the armor is completely done. Unfortunately I took almost zero progress pictures, but here they are all finished.


Lastly, I wanted a resin visor because I didn’t trust myself to vacuum form, so I ordered one from a printing service online. Following a guide from @spartan_hs92 on Instagram, I wet sanded it until it was transparent, and tried to dye it blue, but the dye didn’t hold. I’m gonna try another method using alcohol ink, but for now I’ve got a nice clear visor that looks and fits perfect! After dying, it’ll be coated on the inside with chrome paint for the (hopefully) mirror finish.


Before sanding, left; after sanding, right.
I should have more progress soon, no more huge gaps! The biggest struggle will be the last 13 bags, but I’ve gotten much better at sewing and think I could knock them out within two weeks or so. The armor itself, visor included, should be finished within a week. Thank you for anyone keeping up with this suit! I’ve learned a lot and have talked with some cool people.
The majority of my time was spent working on the bags for the costume. There are 18 in total, with some sort of bizarre designs. I’m pretty new to sewing, so this was a huge struggle for me. I ended up finishing 5 bags, which will make up the front of the belt, leaving the large side bags, the back, and the four in the chest.
The pictures don’t quite show all the details since I was in a huge crunch and not taking a lot of progress pictures.
I also wanted to put together a holster for my SOCOM as a tiny side project, just traced the basic shape and added a strap to close it. The actual hip-mounting strap is a WIP.
In the last post I hadn’t even started sanding, and now I’ve gotten paint totally finished. A huge part of the appeal to the ODST armor is the strapping all over, and for the most part I was able to get them all in the proper placement, held in with hot glue. Other than a clear coat and the “ODST” decal on the back, the armor is completely done. Unfortunately I took almost zero progress pictures, but here they are all finished.
Lastly, I wanted a resin visor because I didn’t trust myself to vacuum form, so I ordered one from a printing service online. Following a guide from @spartan_hs92 on Instagram, I wet sanded it until it was transparent, and tried to dye it blue, but the dye didn’t hold. I’m gonna try another method using alcohol ink, but for now I’ve got a nice clear visor that looks and fits perfect! After dying, it’ll be coated on the inside with chrome paint for the (hopefully) mirror finish.
Before sanding, left; after sanding, right.
I should have more progress soon, no more huge gaps! The biggest struggle will be the last 13 bags, but I’ve gotten much better at sewing and think I could knock them out within two weeks or so. The armor itself, visor included, should be finished within a week. Thank you for anyone keeping up with this suit! I’ve learned a lot and have talked with some cool people.
Attachments
- Member DIN
- S241
Dude that looks really friggin good!!!! I love that you just made the pouches from scratch so that theyd have that tiny extra bit of accuracy to how the pouches actually look in game. I love the Halo 2A ODST definitely one of the more comfortable suits to wear. Id love to know how you made those pouches; did you freehand? What materials did you use?
I also really like how your adding in all the extra bits of detail seen in the model that are easy to over look; like patterning in the undersuit. Do you think youll shoot for tier 3?
I also really like how your adding in all the extra bits of detail seen in the model that are easy to over look; like patterning in the undersuit. Do you think youll shoot for tier 3?
- Member DIN
- S357
Thank you!! I picked up some 600d canvas to mimic actual military bags, and just some black cotton bias tape for the edges. The black accent materials are just the wrong side of some leftover faux suede I had. For the patterns I just totally eyeballed it. I made some notes and sketches to figure out how big they should be, and then just went for it. The process for them was mostlyDude that looks really friggin good!!!! I love that you just made the pouches from scratch so that theyd have that tiny extra bit of accuracy to how the pouches actually look in game. I love the Halo 2A ODST definitely one of the more comfortable suits to wear. Id love to know how you made those pouches; did you freehand? What materials did you use?
- make a basic rectangle bag template
- stitch on the black details
- close all the seams and add the bias tape
- stitch in the straps for the bags that need it
My first attempts I tried to have the flap together so it’s all one piece, but it made it a lot more annoying and you couldn’t even see the difference, so I just swapped to cutting it seperate and adding it on when the bag is finished.
- Member DIN
- S357
Totally didn’t see this question when I first responded lol. While that’s definitely the ultimate goal, I’m not nearly at the skill level to get it there. My choice of camouflage probably disqualifies me from Tier 2 as well. Still, to a bit more relaxed of an eye I want it to be a near perfect representation of the game model. And who knows, maybe I’ll revisit parts of it once I get some more skills under my belt!Do you think youll shoot for tier 3?
I’ll also take a chance to add a handful of pics I took of the making of the bags I forgot I had that should show my process more clearly.


Attachments

- Member DIN
- S241
But dont the H2A ODSTs have black camo? isnt your camo just black camo? I suppose looking at the official art its a slight bluish black camo.Totally didn’t see this question when I first responded lol. While that’s definitely the ultimate goal, I’m not nearly at the skill level to get it there. My choice of camouflage probably disqualifies me from Tier 2 as well. Still, to a bit more relaxed of an eye I want it to be a near perfect representation of the game model. And who knows, maybe I’ll revisit parts of it once I get some more skills under my belt!
I’ll also take a chance to add a handful of pics I took of the making of the bags I forgot I had that should show my process more clearly.
View attachment 363633View attachment 363634View attachment 363640
View attachment 363637View attachment 363636View attachment 363638
Im shooting for a tier 3 Halo 3 ODST and fussed over the color not being a perfect greenish black color as seen on The Rookie cosplay guide, but was told the EXACT color down to the color code didnt matter as long it looked similar
Still looking forward to the finished build!
- Member DIN
- S357
Yeah it’s like a sort of navy blue in the Blur render, a kind of aqua green in the remaster, and more basic black in the original graphics. I could just be particularly picky but I couldn’t find anything irl that was a great match, but yeah the one I went with I think is close enough.But dont the H2A ODSTs have black camo? isnt your camo just black camo? I suppose looking at the official art its a slight bluish black camo.


Looking good, hope it turns out great!!!!
- Member DIN
- S357
A small update, one that’ll be added to later tonight. The visor is colored! After initially trying some polyester dye and it having literally no effect, I attempted to dye it using alcohol ink. This worked great… except for the areas I had sanded perfectly smooth. Nothing to grab onto, I suppose. That left me with this:

So, I went with another technique I’d seen, which was airbrushing clearcoat tinted with the same alcohol ink onto the resin. This worked! My airbrush is really cheap though, and the cover wasn’t great, so I ended up brushing it on, which worked surprisingly well. Left me here:

The visibility at this point was actually still great, which surprised me because it was just model clear acrylic, brushed on no less. I still wanted a real two-part clear coat for real protection though. So, after letting the initial blue clear cure for almost two weeks and giving it another light sanding with a super high grit, last night I sprayed on a 2K clear, giving me this:

The color is fantastic, and visibility is perfect - kind of. I hadn’t done enough rough sanding of the initial tinted clear coat, and it was still pretty wavy. These waves were compounded by the extra clear, and on the edges there is some warping of the light coming through. With my face so close to it while the helmet is on, it’s not a huge deal, but I’ll still be giving it a good polish soon enough. Visibility looks like this:

And that’s what I’ve got right now! Tonight I’ll be spraying the chrome on the inside for the mirrored look, which I’ll try to add onto the thread after I’m finished. Depending on how resilient it is, I may clear over the chrome as well, but we’ll see.
Other than still needing to add the little “ODST” decals to the front and back of the chest piece, this will 100% complete the armor! I’ve been procrastinating sewing the bags, so that’ll still be a wait, but as for the “hard armor”, the suit is very nearly complete. And thanks again to everyone checking in, your words of encouragement mean a huge amount.
So, I went with another technique I’d seen, which was airbrushing clearcoat tinted with the same alcohol ink onto the resin. This worked! My airbrush is really cheap though, and the cover wasn’t great, so I ended up brushing it on, which worked surprisingly well. Left me here:
The visibility at this point was actually still great, which surprised me because it was just model clear acrylic, brushed on no less. I still wanted a real two-part clear coat for real protection though. So, after letting the initial blue clear cure for almost two weeks and giving it another light sanding with a super high grit, last night I sprayed on a 2K clear, giving me this:
The color is fantastic, and visibility is perfect - kind of. I hadn’t done enough rough sanding of the initial tinted clear coat, and it was still pretty wavy. These waves were compounded by the extra clear, and on the edges there is some warping of the light coming through. With my face so close to it while the helmet is on, it’s not a huge deal, but I’ll still be giving it a good polish soon enough. Visibility looks like this:
And that’s what I’ve got right now! Tonight I’ll be spraying the chrome on the inside for the mirrored look, which I’ll try to add onto the thread after I’m finished. Depending on how resilient it is, I may clear over the chrome as well, but we’ll see.
Other than still needing to add the little “ODST” decals to the front and back of the chest piece, this will 100% complete the armor! I’ve been procrastinating sewing the bags, so that’ll still be a wait, but as for the “hard armor”, the suit is very nearly complete. And thanks again to everyone checking in, your words of encouragement mean a huge amount.
- Member DIN
- S357
Yeah I didn’t have anything interesting or far away from me while it was still drying. So a treetop from 10 ft away was the best I could do lol. I’ll try to get a more clarifying pic later. It’s like 80% perfectly clear, with some stripes of waviness that distort it a bitHard to tell your visability from that picture though. But still great work!
- Member DIN
- S241
kinda makes me wanna have a 2nd go at doing a H2A ODST....
- Member DIN
- S402
Should definitely do it!kinda makes me wanna have a 2nd go at doing a H2A ODST....
Not biased at all
- Member DIN
- S357
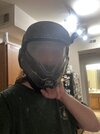
Alrighty amigos, the finished visor!


Not really anything to say, just sprayed in the chrome (Spaz Stix ultimate mirror chrome is recommended) and it’s done! Easy as that. Made sure to include a pic staring directly into a bright ass overhead light to show there’s no bleed-through, I’m stayin’ anonymous, baby! Visibility is surprisingly almost the exact same as before, it’s just the same as wearing darker-than-usual sunglasses. Very, VERY happy with this result!!
Not really anything to say, just sprayed in the chrome (Spaz Stix ultimate mirror chrome is recommended) and it’s done! Easy as that. Made sure to include a pic staring directly into a bright ass overhead light to show there’s no bleed-through, I’m stayin’ anonymous, baby! Visibility is surprisingly almost the exact same as before, it’s just the same as wearing darker-than-usual sunglasses. Very, VERY happy with this result!!
- Member DIN
- S357
DUDE I DIDN’T REALIZE THIS WAS YOU! The con pics from your old thread was a huge inspiration to start this build! One of the only H2A ODSTs I could find, and it looked great! Haha that’s so crazy, you definitely should revisit it! Your new ODST looks fantastic, I love the coloring of the Ark ODSTs. You’d kill it.kinda makes me wanna have a 2nd go at doing a H2A ODST....
- Member DIN
- S241
Ha ha that's so cool I got to inspire someone on making a great build! Excited to see the finished suit!DUDE I DIDN’T REALIZE THIS WAS YOU! The con pics from your old thread was a huge inspiration to start this build! One of the only H2A ODSTs I could find, and it looked great! Haha that’s so crazy, you definitely should revisit it! Your new ODST looks fantastic, I love the coloring of the Ark ODSTs. You’d kill it.
I think im still too knee deep into H3 ODST build, I thought I was done with it but now i'm back to working on it obsessing over other details
I absolutely love that shade of blue on the visor. That is gorgeous. Can't wait to see what's next!
- Member DIN
- S357
Thank you! I’m super happy with it too. I was so conflicted on whether to go with blue, purple, or maybe even silver since it’s different based on which game, art, or just lighting you’re seeing it in. The concept art in my banner has it as this shade of blue though, and I absolutely loved it.I absolutely love that shade of blue on the visor. That is gorgeous. Can't wait to see what's next!