Aztlan's Halo 4 Rogue + Binary Rifle + M6H + Exo-suit WIP, PIC HEAVY!

Status
Not open for further replies.
That arm up there is the first thing that has ever actually made me say "oh my god" out loud... Gotta say, I'm pretty envious of your talent :p But alas, school takes up the majority of time and I can' really do much armor work
 
Any reason this thread hasn't been moved from the Noob Forum yet?

I'm all for Elite status when the build's finished, definitely, but why is this masterpiece languishing in this section of the forum instead of being put where it rightfully belongs?
 
All of you that have taken time to comment on this thread, I seriously thank you so much.

Any reason this thread hasn't been moved from the Noob Forum yet?

I'm all for Elite status when the build's finished, definitely, but why is this masterpiece languishing in this section of the forum instead of being put where it rightfully belongs?

I think you hit the nail on the head. I believe it has not been moved because I have not finished anything yet (well, the M6H is done, but that does not count :)). Just the same, I am okay with it being here for now... I am in no hurry.

With that, I am currently working on finishing up the torso today, and will finish it shortly. Then I will complete the right arm (maybe today), and then I will take a small break on the Exo-suit and complete the Binary Rifle.

I am still waiting on the weather to warm up before I can even think about going back to the Rogue armor set. I refuse to get impatient and work in less than optimal weather conditions.

Thanks again for tuning in, and I will have a photo update shortly!
 
Thanks Renraku for the info and question. I did not hit the craft foam with heat. This was for a very specific reason. Unlike EVA, craft foam seems to be much lighter, porous, and comes in convenient 2mm and 6mm thickness (I am sure there are others, those are just the ones I have come across so far). Applying heat to craft foam has a tendency to distort it horribly. My technique I created is the only one I know of that allows the thinner foams to have a glossy surface, remain flexible without cracking/chipping, and retain its shape.

UPDATE TIME!!!! Front and back are mostly completed. I have about 6 more pieces to fabricate (sides) and then the torso shell will be done. I will be semi-loosely lining the inside to hide the unsightly elastic on the seams, as well as to give it added strength. I am doing it semi-loosely so that I am not defeating the purpose of the elastic :) Also, I am working on a design that I think will be fairly revolutionary.... but that will probably be in tomorrow's update!

To answer a couple of questions before they are asked. Yes, I have excellent mobility in the armor when it is on. No, it will not interfere with the exterior Rogue armor... in fact, the exterior armor mounting points are lining up beautifully with the exo-suit's mounting points

SAM_1000_zpsdfeee10f.jpg

SAM_0999_zps24e821ff.jpg


I'm ready to see it worn. This is truly some amazing work!!

-Matt
 

Attachments

  • SAM_1000_zpsdfeee10f.jpg
    SAM_1000_zpsdfeee10f.jpg
    160.2 KB · Views: 157
  • SAM_0999_zps24e821ff.jpg
    SAM_0999_zps24e821ff.jpg
    181.7 KB · Views: 167
Matt, I guess timing is everything!! LOL

Torso completed. Here is what I have so far... just the right arm to finish and the neck seal, then the whole upper body will be done :)

SAM_1035_zps905e58f6.jpg

SAM_1036_zps44f1abe5.jpg

SAM_1037_zps47692678.jpg
 

Attachments

  • SAM_1035_zps905e58f6.jpg
    SAM_1035_zps905e58f6.jpg
    154.1 KB · Views: 142
  • SAM_1036_zps44f1abe5.jpg
    SAM_1036_zps44f1abe5.jpg
    154 KB · Views: 160
  • SAM_1037_zps47692678.jpg
    SAM_1037_zps47692678.jpg
    159 KB · Views: 154
Ha! I guess so. Looks spot-on buddy!! Will the shoulders pieces end up contouring anymore, or did the detail prevent any additional compound curvatures?
 
Ha! I guess so. Looks spot-on buddy!! Will the shoulders pieces end up contouring anymore, or did the detail prevent any additional compound curvatures?

Your question is a difficult one to answer at this time :) I have plans, and could "fix" that gap as well as form the shoulders more, but I have to wait until the exterior Rogue armor is completed and mounted before I can do that. Reason being is that I need to be sure I have full range of motion, as well as the weight of the armor should help reduce/eliminate that gap.

I hope that answers your query.

Indeed it does....makes perfect sense to wait. Thanks!
 
Hey EVAkura. First of all, absolutely superb job on the undersuit. Seriously, you should be plastered all over the 405th home page with the kind of work you've been doing. Second, from what i've seen of your build so far, it seems like you're hand drawing these templates from pictures. I'm sure i'm not alone in saying that i'd be over the moon if you were to release these templates, even if you were to just scan the cut pieces you have and post them here, i'm sure there would be plenty of people willing to touch up and bundle them into a file.
 
Hey EVAkura. First of all, absolutely superb job on the undersuit. Seriously, you should be plastered all over the 405th home page with the kind of work you've been doing. Second, from what i've seen of your build so far, it seems like you're hand drawing these templates from pictures. I'm sure i'm not alone in saying that i'd be over the moon if you were to release these templates, even if you were to just scan the cut pieces you have and post them here, i'm sure there would be plenty of people willing to touch up and bundle them into a file.

That is not a bad idea :) Since I have an AIO, I can do that (didn't even cross my mind to scan them!). Funny though, I still have not even loaded the HP software that came with it. I will have to dig that disk up... wherever it is. The only bad part about this for me is that each template gets cut into smaller ones. Granted, I labeled each core template uniquely (ie. A1, A2, A3, or u arm1, u arm2, etc), but I have been putting all the parts and pieces into one large zip lock bag! I will have to sort them all out, and then puzzle-piece them back together, scan, save as .jpg, compress, then upload to 4shared. This may take a while :) Lemme finish my suit, then I will do it all in one shot. Sound good?
 
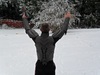
So, I have a question... what does gummy worms + coffee = ?

NECK SEAL :) Well, at least the beginning of one! I have to wait for daylight because I can not see what the heck I am doing, especially since the next part is black on black.

Here is what I have so far.

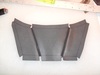
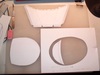
Here is the cut-out of the diameter of my neck, plus the back portion of the seal

SAM_1038_zps3c9f5a9f.jpg

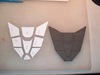
Here is the template and rough cut of the front piece

SAM_1039_zpsdb3018e9.jpg

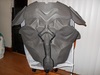
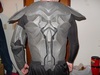
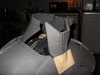
Finished front piece
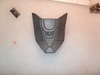
SAM_1040_zps05a9fff5.jpg

Finished rear

SAM_1041_zps6cdcc8e6.jpg

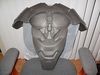
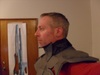
Propped (from the rear sort of). The tape I was using is horrible for holding onto the foam.

SAM_1042_zps60d14cf0.jpg

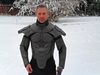
Propped from the front. These pieces will be attached with 3" wide black woven elastic so that I can get my head through it. It will need to stretch nearly 10" to clear my noggin. I will have to reinforce the craft foam piece with a couple of 1" black woven elastic to prevent it from taking the brunt of the stretching stress.

SAM_1043_zps89883a79.jpg

EDIT FOR UPDATE:

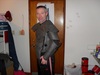
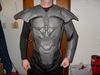
Well, I can scratch the neck seal off the to-do list! It may look a bit uncomfortable and seem like it limits my range of motion, but it is and does not! Unfortunately, after I took these photos, and removed the suit, I noticed four small tears in the back of the seal. Luckily, they did not spread and I was able to repair and reinforce them. Now you can not even tell it tore... but now I will reinforce the whole thing as a precautionary measure.

The front piece is attached by three 1" woven elastic pieces, and is "spring loaded". This keeps it tight to my neck, but also allows me to move it forward with little to no effort.

SAM_1045_zps873fce45.jpg

After I finish reinforcing it completely, I will take some more shots and post them. I am really happy with the way this came out. Far better than my expectations for sure :)

SAM_1047_zpsfc9329e9.jpg

EDIT AGAIN! After comparing my neck seal to the reference picture's, I realize that the chin sticks out WAY too far. Luckily, it is easier to cut away excess than it is to add! Also, I realized I missed a couple of detail cuts on the throat plate... also, easily fixed. Now for a nap and then I will correct these minor inconsistencies.
 

Attachments

  • SAM_1042_zps60d14cf0.jpg
    SAM_1042_zps60d14cf0.jpg
    157.8 KB · Views: 142
  • SAM_1041_zps6cdcc8e6.jpg
    SAM_1041_zps6cdcc8e6.jpg
    154.7 KB · Views: 136
  • SAM_1040_zps05a9fff5.jpg
    SAM_1040_zps05a9fff5.jpg
    150.4 KB · Views: 148
  • SAM_1039_zpsdb3018e9.jpg
    SAM_1039_zpsdb3018e9.jpg
    144 KB · Views: 149
  • SAM_1038_zps3c9f5a9f.jpg
    SAM_1038_zps3c9f5a9f.jpg
    136.3 KB · Views: 150
  • SAM_1043_zps89883a79.jpg
    SAM_1043_zps89883a79.jpg
    156.4 KB · Views: 136
  • SAM_1045_zps873fce45.jpg
    SAM_1045_zps873fce45.jpg
    139 KB · Views: 162
  • SAM_1047_zpsfc9329e9.jpg
    SAM_1047_zpsfc9329e9.jpg
    136.9 KB · Views: 157
Really really cool build! And some skills you have with the foam, its just over the top!

But I have a question for you or a tip. I think the undersuit looks fantastic, but I belive it is going to be hot as hell. In my Full Metal Jayce costume, which is a full covering torso but not as close fitting. Im pretty mutch melting away in it. Have you thought about the heat issue?
 
Yes, I have thought about the heat issue plenty. Until I actually get the chance to try it out, I won't know what I will have to do... if anything. I bought the compression suit and that really helps drop the temperature. That and I served in the Middle East with temps averaging 110F in full battle rattle, and yeah, it was horribly hot, but I handled it... and this would be fun whereas that was certainly NOT! :) Worst case scenario, I will work out some form of close artery recirculating water system with a radiator/fan cooling system.

Thanks for the query... 'tis a fantastic question
 
Ah okey. Knowing that you served in the "sandbox" clears it up abit. Still I think you can allready decide for a making a watercooling system. I dont have any pics of my Jayce here on site but you can find one HERE. Its 12mm EVA foam plates like you use, but I have 5-15cm room between my chest and the armor on the inside. Undersuit is a thin cotton-fabric, I still melted away. The picture is from a Con during summer, but still using it on a indoor con in november it was hot as hell.
 
WOOHOO!!! Full upper half of the suit is COMPLETED! I finished reinforcing the neck seal, and completed the lower right arm this evening/morning. Since it decided to snow, I figured I would take the photos outside for a change.

Next will be the COD and belt area.

I just wish the Binary rifle was photo ready because I think that would have been a wicked prop!

SAM_1050_zps10843b46.jpg

SAM_1055_zpsd40b13a9.jpg

And NO!!!!! I am not giving up!!!! I did this to give an example of my range of motion :)

SAM_1056_zps6c3b9cf0.jpg

One step closer!
 

Attachments

  • SAM_1050_zps10843b46.jpg
    SAM_1050_zps10843b46.jpg
    169.2 KB · Views: 170
  • SAM_1055_zpsd40b13a9.jpg
    SAM_1055_zpsd40b13a9.jpg
    155.5 KB · Views: 145
  • SAM_1056_zps6c3b9cf0.jpg
    SAM_1056_zps6c3b9cf0.jpg
    177.6 KB · Views: 134
Status
Not open for further replies.
Back
Top