AHHHHH i see the method i use at work!!!! The foamies really help dont they? This is looking amazing, a need to get beck to my helmet, as i am still doing research for what i am going to cast in with my new plaster mold of the undersuit. Loving the bondo work. What do you use to sand? a block, hand etc, you have very well defined lines.
You are using an out of date browser. It may not display this or other websites correctly.
You should upgrade or use an alternative browser.
You should upgrade or use an alternative browser.
Aztlan's Halo 4 Rogue + Binary Rifle + M6H + Exo-suit WIP, PIC HEAVY!
- Thread starter EVAkura
- Start date
- Status
- Not open for further replies.
Yes, thank you for the tip on the foamies! As for the material to use, I am not sure, but I may have a go at your idea with my polyamide epoxy and see what I come up with ")
To sand, I use files (various ones), hand, and my nifty mouse sander to knock down the big stuff.
To sand, I use files (various ones), hand, and my nifty mouse sander to knock down the big stuff.
It is time for a little fun!! Today, I will max out my picture limit on a thread post because finally, I was very thorough in each step I took... just because I was certain it would come out really cool... I hope I don't disappoint!
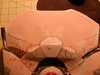
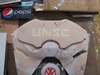
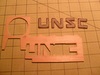
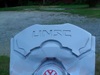
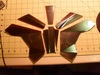
First off, a reference picture of what part I was working on. This is the center portion to the back of the torso.

First, there was a lot of work on the left side to do before I could progress any further. Previously, I somehow missed how far off the symmetry was on various angles signified by the red marker.

Then it was time to create and apply the Foamie outline for this detail piece. For this, I used 6mm craft foam.

One of the few times I just gob the Bondo on

And after it cured, a quick sand down with my mouse sander

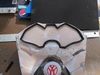
On to stage two! A quick print to cardstock, cut that out and then transfer to balsa, then cut that out

Dremel out and sand a portion of the piece I just build up. I also applied a thin coating of Vaseline to the balsa letters.

Another gob of Bondo, then set the balsa letters in place, making sure that they are level with the finished surface and coated on all sides.

Another sanding to make everything level.

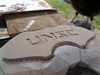
Then I carefully plucked out the letters

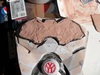
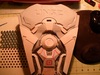
Another outline, this time I used both 2mm and 6mm craft foam. I had to do this part separately due to the fact that it has a sort of sweep that needed to be regulated and this was the easiest way I could think about doing it... and yet again, another gob of Bondo

Finally (as you can see, it was getting dark by now), another sanding and a quick coat of primer.

I still need to go around and clean up the mess I made with the Foamies before I move on to the center portion just below this part I finished today.... but the will be for tomorrow
First off, a reference picture of what part I was working on. This is the center portion to the back of the torso.

First, there was a lot of work on the left side to do before I could progress any further. Previously, I somehow missed how far off the symmetry was on various angles signified by the red marker.

Then it was time to create and apply the Foamie outline for this detail piece. For this, I used 6mm craft foam.

One of the few times I just gob the Bondo on

And after it cured, a quick sand down with my mouse sander

On to stage two! A quick print to cardstock, cut that out and then transfer to balsa, then cut that out

Dremel out and sand a portion of the piece I just build up. I also applied a thin coating of Vaseline to the balsa letters.

Another gob of Bondo, then set the balsa letters in place, making sure that they are level with the finished surface and coated on all sides.

Another sanding to make everything level.

Then I carefully plucked out the letters

Another outline, this time I used both 2mm and 6mm craft foam. I had to do this part separately due to the fact that it has a sort of sweep that needed to be regulated and this was the easiest way I could think about doing it... and yet again, another gob of Bondo

Finally (as you can see, it was getting dark by now), another sanding and a quick coat of primer.

I still need to go around and clean up the mess I made with the Foamies before I move on to the center portion just below this part I finished today.... but the will be for tomorrow
Attachments
-
 SAM_1397a_zps4895a6ca.jpg53.8 KB · Views: 318
 -
 SAM_1386_zps5d3295d5.jpg173.8 KB · Views: 304
 -
 SAM_1388_zpsfa4886eb.jpg177.5 KB · Views: 327
 -
 SAM_1389_zps7632f8fd.jpg194.7 KB · Views: 315
 -
 SAM_1396_zps624b9661.jpg169.7 KB · Views: 320
 -
 SAM_1395_zpsbc5043a0.jpg149.4 KB · Views: 315
 -
 SAM_1394_zpsfec62135.jpg174.2 KB · Views: 316
 -
 SAM_1393_zps9c9632e9.jpg175.2 KB · Views: 347
 -
 SAM_1392_zps58bed669.jpg174.7 KB · Views: 330
 -
 SAM_1387_zpseff6affb.jpg184.3 KB · Views: 320
 -
 SAM_1391_zps5c54f278.jpg164.9 KB · Views: 319
 -
 SAM_1397_zps04c1577e.jpg144.1 KB · Views: 317
THAT LOOKS AWESOME, i need to get that mouse sander, looks like it does wonders... The surface is so smooth Love the imprint UNSC FTW!!!
Love the imprint UNSC FTW!!!THAT LOOKS AWESOME, i need to get that mouse sander, looks like it does wonders... The surface is so smooth
As I'm sure Phil will agree: mouse sanders and power tools are best simply for removing large amounts of excess. Most of the smoothness in this work comes from applying the bondo well to avoid air bubbles, and later on, plenty of spot putty.
Good tools if you've got plenty to move and don't want to waste your time doing it by hand.
Regardless: good work as usual, Spartan. This is shaping up (hurr hurr pun) rather nicely indeed - will you be wearing this raw build or casting it, since I'm wondering now about the weight.
Kinggoobero
Member
Question: What do you plan on using to put your visor pieces together? They look incredibly clean cut and I'm just praying you aren't going to super glue them together and ruin something that looks like it will be gorgeous.
Question: What do you plan on using to put your visor pieces together? They look incredibly clean cut and I'm just praying you aren't going to super glue them together and ruin something that looks like it will be gorgeous.
On a test piece, I will try Locktite Plastics bonder and see if there is any fogging or anything else that may cause a problem. I won't test it until I am ready to glue the pieces though as I don't like having an open tube laying around that may go bad in the few days it will take me to completely get ready.
If that does not work, I will then try methylene chloride. That is what is supposed to be used for acrylic, but I will have to order it if the other stuff does not work.
And... if that does not work, more research will be in order to find something that will... but I am confident one of those two will
Today was a no-go working on the armor... but I did have a HALO related side project that I am working on
However, I have not posted updated pictures of the piece I have been working on, so.....
More detail is evolving

And if you look carefully, you will see the other project

However, I have not posted updated pictures of the piece I have been working on, so.....
More detail is evolving

And if you look carefully, you will see the other project

Attachments


Today was a no-go working on the armor... but I did have a HALO related side project that I am working on
However, I have not posted updated pictures of the piece I have been working on, so.....
More detail is evolving
And if you look carefully, you will see the other project

You are a very clever dude.
SB
Attachments

WHY DIDNT I THINK OF THAT *facepalm*
You are a very clever dude.
SB
Thank you
WHY DIDNT I THINK OF THAT *facepalm*
I could have sworn I told you about it in PM, but I went back through it and could not find it.... must have been a daydream or sumptin!
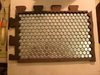
Just as an FYI, HEX pattern figuring SUCKS!!! I am using a 7/16" hex head. This makes the x axis between mid-point of the hexagon bolts + spacer = 31/64" and the y axis is 13/32". Luckily, I found a Hex generation program that let me take everything into decimals, so the pattern equaled .8" per Hex, for a total of 20 across and 15 high for a 8 1/2" X 11" page with .5" margins. After bisecting each hex "line" both laterally and longitudinally, I was given my exact drill coordinates. Problem was, even with a Brad Point drill bit on a drill press, my cardstock template "walked" up to 1/32".... which does not sound like a lot, but it is massive when you are going for absolute perfection. Out of all 454 holes I drilled, 33 of them have to be bored out by that 1/32" to allow a bit of wiggle room to manually set the bolts into perfect alignment.
After this, I will cut back one row on both axis and build a 1/2" wall. This will allow me to pour a 75/25 Resin to Bond Rondo mix to make the mold. It will also allow each of the pieces to be interlocked with each other
For those that have not experienced it before, I hope you now understand OCD a little better
So if you look in my thread, i found a hexagon graph paper generator that you can set the size of the hexes and it puts a dot at the mid point... and what material are you going to be casting from? If you are going to go with latex, do a plaster mold, it doesnt need a release agent. I am interested in how this is going to turn out.
I must have OCD as well, because i re did that hand carving 4 times:eek How are you planning to add this to your suit?I actually smashed my fingers in a door 2 days ago, and cant work on my helmet, so exo- suit for me
I am interested in how this is going to turn out.I must have OCD as well, because i re did that hand carving 4 times:eek How are you planning to add this to your suit?I actually smashed my fingers in a door 2 days ago, and cant work on my helmet, so exo- suit for me
So if you look in my thread, i found a hexagon graph paper generator that you can set the size of the hexes and it puts a dot at the mid point... and what material are you going to be casting from? If you are going to go with latex, do a plaster mold, it doesnt need a release agent.
I must have OCD as well, because i re did that hand carving 4 times:eek How are you planning to add this to your suit?I actually smashed my fingers in a door 2 days ago, and cant work on my helmet, so exo- suit for me
Sorry to hear about your fingers... I know that pain, and it SUCKS!!! As far as answering your questions: I am going to make the mold using Rondo. I don't mind using a release agent, but I really want to make sure it comes out perfect. I plan on using a 75/25 mix of Resin to Bondo respectively.
I know I will be doing a round of polyamide epoxy backed with woven fiberglass, but past that, I am not certain. Possibly latex and maybe silicone. As far as applying this to my suit, I don't think I will be... but maybe for a V2.0 if I ever go that route.
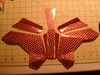
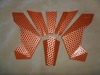
The last two days have been all about me waiting on our backwoods mail system here on the island. But, I finally received my hologram tint, as well as my mirror tint.
The company that sent me the materials, didn't get the samples of the holograms correct, and excluded the only one I was planning on testing... the computer chip version. I hope they correct that mistake, but either way, I will not be using it on my Rogue visor since I have already passed that point.
With that stated. The next step has been finished (mirror tint applied), and I am VERY happy with the results. This pretty much means that all I have left to do is glue them together, finish off some of the edges, and then adapt it to the helmet. I am certain there will be a few places where I will either have to add some buffer pieces, or build up the helmet, but nothing I can't figure out... and I am sure it will be easier than building this darned thing was!
Here is the outside:

The original before the tint was applied:

And the inside:

I know it was brought to my attention that the gold hex pattern was too pronounced, and I tested using a translucent orange coating over the top of it. It worked to a degree, but I feel it will impair my vision yet another degree, so I am simply going to have to live with it being the way it is
Attachments
King of Gondor12
Member
Hey there, I came late to this build as I have been away from the 405th for a while but this was the first project I have seen since coming back and having read through the whole thing in a day, I am stunned, you are doing a great job, can't wait to see this finished!
Its your visor, i think the gold looks fine
that mirror tint is pretty spiffy. so it basically makes it to where people cant see through the visor from the outside right? almost like an actual two way mirrow right?
That is exactly the way it works
How is your vision through the mirroring and what is the product you used my I ask?
My vision through the material is near perfect. It is just like wearing sunglasses. The only thing that obstructs my vision a bit is the hex pattern. The product is this: ONE WAY MIRROR FILM 20" wide
Hey there, I came late to this build as I have been away from the 405th for a while but this was the first project I have seen since coming back and having read through the whole thing in a day, I am stunned, you are doing a great job, can't wait to see this finished!
Thanks so much! I will keep updating this thread all the way through completion
Good progress today
Even though I ended up waiting at my local hardware store for over 2 hours for the fastener supplier to show up, I got done what I aimed to do. I finally got all the bolts I needed, even though there ended up being 4 different types
NOTE: It is really difficult to go into a hardware store and tell them you need a 3/8" head bolt with ABSOLUTELY NO markings on the head. They all insisted I tell them what thread pattern, how long, and what finish I needed! LOL
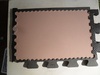
All the bolts hot glued into position and the seamless interlocking edges placed

1/3 Bondo to 2/3 Resin mix. I poured it as slowly as I could manage, and agitated it as much as I dared to release any air bubbles that might have gotten trapped.

Cured to the rubbery phase. Removed the interlocking edges

And now it sits in a tub with hot water to dissolve the particle board. This is the only way I can get it to release the mold without damaging it. I can always re-drill all the holes again

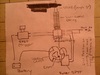
Now for the fun part, and one of the reasons I am in such a great mood. While waiting at the hardware store, I had an epiphany about how I was going to work the electronics/mechanics for the spikes on the Needle gun without having to go digital. I ran up to the counter and asked for some scrap paper, and here is what I came up with!

GO MEEEEE!!!!!!
Even though I ended up waiting at my local hardware store for over 2 hours for the fastener supplier to show up, I got done what I aimed to do. I finally got all the bolts I needed, even though there ended up being 4 different types
NOTE: It is really difficult to go into a hardware store and tell them you need a 3/8" head bolt with ABSOLUTELY NO markings on the head. They all insisted I tell them what thread pattern, how long, and what finish I needed! LOL
All the bolts hot glued into position and the seamless interlocking edges placed

1/3 Bondo to 2/3 Resin mix. I poured it as slowly as I could manage, and agitated it as much as I dared to release any air bubbles that might have gotten trapped.

Cured to the rubbery phase. Removed the interlocking edges

And now it sits in a tub with hot water to dissolve the particle board. This is the only way I can get it to release the mold without damaging it. I can always re-drill all the holes again

Now for the fun part, and one of the reasons I am in such a great mood. While waiting at the hardware store, I had an epiphany about how I was going to work the electronics/mechanics for the spikes on the Needle gun without having to go digital. I ran up to the counter and asked for some scrap paper, and here is what I came up with!

GO MEEEEE!!!!!!
Attachments
- Status
- Not open for further replies.
Similar threads
- Replies
- 2
- Views
- 467
- Replies
- 2
- Views
- 1,409