Blackwell's Destiny Warlock build log

Status
Not open for further replies.

mblackwell1002

Sr Member
Hi guys and gals of the 405th!

I've been behind the curtain for a little while when it comes to my projects, and my mysteriousness shall be explained via this build thread. Yes, I know what most of you are probably thinking: "Hey, what's he doing this time, doesn't he have his MC suit to work on?!" Well, the answer is yes, but I am currently printing some stuff for some friends, Thom A293, and after that, SavedbyGraceG12; so I won't be printing for a while. Plus, I just like having lots of things to work on. :p makes me use my noggin. ;)

So, I pepped the helmet this weekend, and I totally Dirtdived it. By Dirtdiving, I mean it was poorly scaled. But instead of doing the same thing that I did last time,(looking at you Dirtdives) I made some measurements based on the first pep and incorporated my mistake's useful information into my new pep for improved scaling. I don't want to pep this helmet 8 times! overall, my first helmet, I think, looked really good as it is my second pep. (on my first pep I used 90lb instead of 110, so it looked wonky)
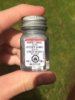
yes, it's big, but It seems like I did a decent job. You know how I know? Because my yogurt container told me so, and the yogurt container never lies:
110_0229.JPG


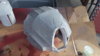
Weird cow jokes aside, the helmet was reeeeealy big, now let me take a selfie to show you what I mean: ;)

110_0230.JPG

Hehe, excuse the blurriness, I couldn't see what I was doing...
now I'm gonna ask you to give it to me straight: does this helmet make me look fat?
(don't answer that ;)):lol: no, just kidding, that's a Spider-Man 2 Tobey Maguire quote, to those of you who have played the game.

I plan on doing some detailing with EVA foam and cutting away shapes in the helmet to make lowered plastic card details, and I'll probably use this helmet as a practice template.

My plan is to make the Astrolord Robe with the Tengu operant helmet, but I haven't figured out what to do for the legs and arms yet. I'm open to suggestions.

Thanks for looking, and I hope to give you guys a much more in-depth look at how I'm constructing my suit with this thread, not to mention making an attempt to incorporate humor.

PerniciousDuke, have any pep tips to share? you're the master!

let me know what you think! :)

Also, I hereby allow everyone and anyone to use the word Papeesheewoosh!

Papeesheewoosh,
-Blackwell
 
Last edited:
Cool! I had a lot of fun with destiny for about a year and a half, but it got too repetitive for me (I don't have any friends who play on playstation which is what I played it on, so that might've made a difference) however, I am actually quite excited for Destiny 2 this year (at least that's what they're saying, only time will tell) Good luck on your build!
 
StayFrosty, yeah that's pretty much the purpose of this build. I'd like to get it done for Destiny 2's release and go to a few cons, but we'll see what happens with the amount of projects I have going at once.

I know lots of Warlock builders don't complete their builds, but I plan on finishing it. I will not fail! :p

But, yeah, come play Destiny again. the Taken King makes it a lot more fun and adds new stuff, so give it another go!
 
Last edited:
StayFrosty, yeah that's pretty much the purpose of this build. I'd like to get it done for Destiny 2's release and go to a few cons, but we'll see what happens with the amount of projects I have going at once.

I know lots of Warlock builders don't complete their builds, but I plan on finishing it.

But, yeah, come play Destiny again. the Taken King makes it a lot more fun and adds new stuff, so give it another go!
At this point I'm just waiting for destiny 2. I might consider it if I still played on Xbox, but I've pretty much moved to PC now that Destiny will be on it and Halo also probably will.
 
Update time!! Did I mention this thread would be pic heavy? :D

progress has been slow, lots of progress over these 2 weeks, though. helmet construction is pretty much done, and Here's the steps I took:

Firstly, I made the helmet out of foam, I pepped the helmet twice, the first was too big, the second was too small; so I edited the templates for foam. I changed my plans as well, I am now going to make this helmet look like it is made of bone:
111_0253.JPG
Then, I pieced together the helmet as usual:
111_0256.JPG
Added some holes for bone texture and dremeled the edges to look worn:
111_0258.JPG
this^ pic is a test piece, the actual helmet holes looked like this:
111_0261.JPG
After that, I brushed on some XTC-3D and Smooth-Cast 300 to harden it and make it rigid enough for bondo:
111_0264.JPG
111_0259.JPG
I then applied the first messy coat of Bondo to smooth out the rear portion:
112_0269.JPG
Bondo, sanding, Bondo, sanding, Bondo, sanding.........saaannndiiingggg.....then the great revealer:
112_0267.JPG
not even close to done. :'(
Then I put some more bondo on, applied another coat of primer, then some spot putty.
I re-drilled the "bone holes" and sanded some more...
112_0278.JPG 112_0279.JPG 112_0280.JPG
looking better, but not done...
I sanded more, applied some more putty, sanded, and primed the part:
113_0281.JPG
Yaaay! I think that looks pretty bone-like, with lots of wear and tear apparent. It's not meant to look perfect, and I'll be applying XTC-3D in some areas on the finished product to make it look waxy and smooth; a little more natural.

Meanwhile, I also did some work on the other Warlock helmet while I was waiting on stuff to dry: I'll be putting a lot more time into this helmet to make it look near perfect.
112_0271.JPG
First, I cut a rectangular hole in the side of the helmet.
Then I used that as a template and drew on a piece of foam:
112_0272.JPG
It wasn't as rectangular as I wanted it to be, so I re-drew it freehand and cut it out:
112_0274.JPG
I glued the pieces together:
112_0276.JPG
And glued it inside the helmet:
112_0277.JPG
Not much done with that helmet, but it's a fun project nevertheless.

I hope you all have enjoyed, and feel free to comment and criticize! I love getting new ideas, and you guys are the best source of those ideas!
Thanks for looking,
-Blackwell
 

Attachments

  • 112_0268.JPG
    112_0268.JPG
    1.3 MB · Views: 373
  • 112_0275.JPG
    112_0275.JPG
    808.8 KB · Views: 351
I agree with the yogurt udderly fabulous. When I used to play Destiny, I always had a stupid thought that most of the hunter boots looked like dam motocross boots and that the warlocks looked like cowboy boots. I don't know I have weird thoughts when I play games. o_O I would someday like to do a destiny build too. But someday and today seem very far apart
 
SI3RRA 117, Haha, I know the feeling. When you always have a project in mind, but you're so busy with things for other people that you can't get stuff done. lol, happens all the time.

StayFrosty, thanks for the advice, as soon as I saw your post, I pretty much agreed. I don't want to rid the lines completely, but I will blend the pieces together a little more.

Actually, I have more progress: I added some bone perforations and details all over the place, too.
113_0283.JPG

It's not really a 'crease' anymore, more of a blended seam.
As I was doing this, I went and filled in some imperfections that I figured could look more natural.

In fact, I did a lot of painting last night:
first I did a tan wash, then a brown wash, then a black wash, then some detail painting, then the red Thrall markings, then a black smear over the Thrall markings, then another brown wash.
113_0284.JPG 113_0285.JPG 113_0286.JPG
I used the Hive Thrall model as a reference, and mimicked the markings: Bondo does a really good job of replicating the porous surface of the Thrall armor.
Hive_Thrall.png

So look at the dome part of the head, see the slime?
that'll be coming up next. ;)

Any comments, criticisms, and ideas are welcome.

Thanks for looking!
 
Last edited:
That looks WAY better. Maybe do the back part of the helm like the top of the thrall's head? It'd be really cool if you used like a dark colored glow in the dark paint for it.
 
StayFrosty, I was thinking the visor looking like the top head part, with some glow in the dark paint on it. the visor would be pretty dark anyway because it's inset a bunch, and it would be dark under the visor thing.

So your dome idea is a fantastic one, but there's a problem...I blended the edges of the rear, can you think of any way to separate the dome portion and the bone portion aesthetically? I'm thinking about placing some faux leather straps or something on the rear dome to separate the glow area from the bone. the Hive Acolyte has some robe thingies, and I think it would fit in nicely with the species' designs:

Hive_Acolyte.jpg
let me know what you think...

[EDIT]
I was also debating sculpting a thrall jaw and placing that under my visor, after removing the old stuff that is under the visor.
 
Last edited:
How about a foam part that sticks out a little on the back? It could be that maroon color that some of the hive have and you could sculpt it a little with some bondo to make it look like one of the things on the acolyte's head. It would leave the top part looking recessed and be enough of an aesthetic cue to make the top part look like it belongs there. Think like a reverse version of the back neck seal on a Mk V. The top "hood" sort of part above the visor would then separate the green part from the front. A thrall jaw would look really neat, but instead of cutting away the bottom of the visor, you should make it go over, similar to the Skull of Dire Ahamkara, except a full jaw. Hopefully that wasn't super difficult to understand, it's tough to explain stuff like this without actually pointing out the parts on the helmet.
 
StayFrosty, dang! your head is full of ideas!How far were you thinking the rear part would jut out while still retaining the dome part? Are you saying I should make the cone-like pieces on the thrall's head in the front, or back? Here, let me take a bunch of pics for you to scribble on with Paint:
113_0288.JPG 113_0289.JPG 113_0290.JPG 113_0291.JPG
can you draw on these pics to depict what you're thinking a little more? It is a little hard to type what you're meaning to express.
 
113_0288.JPG
This is to show what I mean about the jaw. I think it'd look cooler if you put it over the existing chin, instead of replacing it all together (If you decide to do it all)
113_0289.JPG 113_0290.JPG 113_0291.JPG
The green is the sort of Thrall head thing and the red is the acolyte maroon-sort of bone stuff that comes out of their faces on the sides.
 
StayFrosty Oh, Ok. I see now. I think I'll pass on the Acolyte part, that shouldn't be needed.

for the jaw, I was thinking to put it under the current chin, but trash those 2 thin pieces currently there:
jaw.jpg '
see what I mean?
The part that I was worried about is this:
helmet reference.jpg
it's a little more shallow than it looks in the pic, it blends together pretty smoothly...
 
I think the jaw idea looks really good. I sort of agree with the whole acolyte part. After looking at it, it does look a little too busy. Not sure if I'm getting this, but what you're worried about is that the outlined thing blends together too much? I can't really think of a good way to separate the parts of the helmet other than what I had before. Doing the whole back would be too much. Maybe it'd be better to leave it I guess?
 
Wow, you pulled off the bone look pretty well! I like that you added the little divots in addition to the big ones. Much more realistic. I like the idea of a jaw too. Looking forward to more updates.
 
Looking good so far! I really want to do a warlock build as well so I'm eagerly waiting to see how you will do the robe for the warlock. Helmet looks so awesome already!
 
Looking good so far! I really want to do a warlock build as well so I'm eagerly waiting to see how you will do the robe for the warlock. Helmet looks so awesome already!
Thanks :)

Yeah, I hear the robe is tough as well. I bought a pattern already, and I hope to show you guys the mock-up sometime soon. Right now, I'm working on the forearm and shoulder armor. I'm sure they'll be up soon.
 
Okay...so I'm late on updates. I've made progress, but have been busy with other stuff lately.
Anyhow, I've been working on my gauntlets and shoulder armor:
IMG_3968.JPG

I freehanded all of these and I think they turned out great. for weathering, I need to do another coat of brushed silver to make it look a little better; but I'm getting there. Here's the silver I used:

It's kinda expensive, so it's pretty high quality. When done right, it looks great. I'll be doing a little painting tutorial soon, so stay tuned! :)

till soon guys and gals!!
 

Attachments

  • IMG_3972.JPG
    IMG_3972.JPG
    695 KB · Views: 296
Last edited:
Status
Not open for further replies.
Back
Top