You are using an out of date browser. It may not display this or other websites correctly.
You should upgrade or use an alternative browser.
You should upgrade or use an alternative browser.
Build 2 - MK-VI gen-3. With some silver timeline influence
- Thread starter SgtSaint
- Start date
- Status
- Not open for further replies.
- Member DIN
- S027
Fair enough. I was just thinking the same thing. Real life has been getting in the way of what is supposed to be "slow but steady work to avoid 'con crunch' in the last week." It's just so easy to look at the countdown and think...Any updates!
> I've got so much time, I can skip a day and focus on other things like earning a living.
The next thing you know an entire week has slipped with no progress. 4 months to the next convention are going to go by in a snap.
The Spartan inside the armor.
I've been pretty good about hitting the gym regularly. I've stayed on weight at 92kg but dropped 3% body fat. So that's progress in the right direction.
Under suit
Finally cleared out and setup a dedicated sewing room. Ran some experiments for various bits and techniques to make a silver timeline under suit. Gathered pretty much all the materials I think I'll need. Now I just need to actually do the work.
The Armor itself
Boots, shins, thighs, helmet, belt/cod/butt - all printed.
Then when it came to the chest & back... well... I just couldn't find a scaling that I was in love with. I'm pretty barrel-rib-cage. So every time I would widen out the torso enough to get on, the over-the-shoulder width was just so wide it severely limited range of motion. Maybe I'm dreaming but I'd like to be able to reach my own rifle slung on the back.
Then I came learn that Armorsmith does distortion as well as just scaling. I had never known this. In all the posts I had never seen this and the program doesn't have any kind of 1 week free trial so you can learn some things hands-on. If it weren't for a YouTube by 'Frankly Built' I don't think I ever would have found out. Armed with that new information I bought the program and have immersed myself in learning it. I was able to take the torso parts and tweak them in a trapezoidal way where the shoulders stayed closer to the neck but I pulled the ribs wider /[]\
Another few days on the printer for the {next} new chest and I love it. Now the back is on a printer for the next 17 days. Yes, 17 days to print the back as a single part, no seams. Yeah it seems like a while, but to me, just one guy's opinion, I like it better than 8 parts, 2 days each for the same amount of printer time and then I'd have to glue & seam it all. And then trust that I don't bust it at a seam some time showing off, playing combat photo shot at a convention or something silly like that.
Then comes the daughter
When your 28y.o. princess comes to you and asks... "Do you think you could make me a Bo Katan Kryze so we could go to the convention together?" What are you going to do? You tell her that you'll print it and teach her to do all the sanding, painting, sewing etc. And it was a good way to get better with Armorsmith. Nothing like father-daughter bonding time, over power sanders.
Next
I have got to get in there and start sanding, painting & sewing.
watch this interview the 405th did with the creators of Halo tv series:
They had a serious problem with the hero not able to reach behind to grab their weapon. They had a special suit made just for that scene.
Hope you find that helpful. Cant wait to see what you do.
They had a serious problem with the hero not able to reach behind to grab their weapon. They had a special suit made just for that scene.
Hope you find that helpful. Cant wait to see what you do.
- Member DIN
- S027
They had a special suit made just for that scene.
Thanks. I have all the specials, YouTubes and behind-the-scenes that I'm aware of on my home server so I can scrub them as needed.
And far more screen captures than I should admit to, considering how much time they total in frame-by-frame scrubbing, dissecting and annotating.
As cosplayers we don't have the luxuries the show does. We don't have their budget. And we don't get to say "Hey, let me take off this version of the suit and put on the other without the zipper" 3 times during the convention day.
Nor do we have a team of attendants getting us bathroom ready should the need arise. In many ways the cosplay community has to be *more* creative than the show production team since our suits have to hold up to live scrutiny sometimes closer than a meter distant to our audience.
That's what I love about cosplay, and cosplayers - Such an imaginative group of problem solvers that have to find a way to achieve up close what people are told to see through their screens. It reminds me of why I think close-up magicians are so much more talented than the big-names that perform on stage with the benefit of advance setup, rigging and distance. The magician on the sidewalk has to make it work up close, with no re-takes and that's what cosplayers do.
Love your attitude and the work you produce! Well thank you for sharing all your steps and what you find out. It is immensely helpful to all of us! Ill be sure to retun the favor when i get a bit closer with my armor. I am still persevering with the galactic armory infinity model. I have made alot of digital modifications to add strap loops and such. I bought a thinned down version on cgtrader, but when i checked them out they werent much lighter than the bulkier galactic armory version which was surprising. I think the weight for me is in the walls of the model when printed and not really in the infill.Thanks. I have all the specials, YouTubes and behind-the-scenes that I'm aware of on my home server so I can scrub them as needed. View attachment 333595
And far more screen captures than I should admit to, considering how much time they total in frame-by-frame scrubbing, dissecting and annotating.
View attachment 333596
As cosplayers we don't have the luxuries the show does. We don't have their budget. And we don't get to say "Hey, let me take off this version of the suit and put on the other without the zipper" 3 times during the convention day.
View attachment 333597
Nor do we have a team of attendants getting us bathroom ready should the need arise. In many ways the cosplay community has to be *more* creative than the show production team since our suits have to hold up to live scrutiny sometimes closer than a meter distant to our audience.
That's what I love about cosplay, and cosplayers - Such an imaginative group of problem solvers that have to find a way to achieve up close what people are told to see through their screens. It reminds me of why I think close-up magicians are so much more talented than the big-names that perform on stage with the benefit of advance setup, rigging and distance. The magician on the sidewalk has to make it work up close, with no re-takes and that's what cosplayers do.
- Member DIN
- S426
The printed morph suit is so smart! Just a shame bathroom breaks become much more difficult x)
Love all the in-deph writing and edited screenshots, great quality buildlog!
Love all the in-deph writing and edited screenshots, great quality buildlog!
- Member DIN
- S027
Thanks guys - I really appreciate the feedback. Sometimes I wonder if I'm doing all the logging for an audience of zero, so it really is appreciated.
With my Martian Goliath power armor ("The Expanse"), I split the morph suit into shirt and pants... adding elastic waist bands to both and few squares of Velcro so the pants overlapped the shirt and they kept each other from separating. I'll do the same with these morph suits. But, another good route that requires no sewing skills is athletic-wear compression clothes. I mean its literally "UnderArmor", right? I noticed this complete set on Amazon that has a compression hoodie and pants. Well... Isn't that just a two-piece morph suit, with a built-in balaclava for the helmet/neck-seal?

The printed morph suit is so smart! Just a shame bathroom breaks become much more difficult
With my Martian Goliath power armor ("The Expanse"), I split the morph suit into shirt and pants... adding elastic waist bands to both and few squares of Velcro so the pants overlapped the shirt and they kept each other from separating. I'll do the same with these morph suits. But, another good route that requires no sewing skills is athletic-wear compression clothes. I mean its literally "UnderArmor", right? I noticed this complete set on Amazon that has a compression hoodie and pants. Well... Isn't that just a two-piece morph suit, with a built-in balaclava for the helmet/neck-seal?
I know this might be a bit too warm for your bit of the world, but i found this padded shirt to fit quite nicely under the armor and adds a bit of muscle physique definition:
HK Army Crash Chest Protector
There are more expensive options that work even better but this paintball armor was within by budget
HK Army Crash Chest Protector
There are more expensive options that work even better but this paintball armor was within by budget
- Member DIN
- S027
I gotta wonder if the heat is worth the limited amount that peeks out under the armor. By the time you're armored up its just the stomach and lower back that's going to show these contours.I know this might be a bit too warm for your bit of the world, but i found this padded shirt to fit quite nicely under the armor and adds a bit of muscle physique definition:
HK Army Crash Chest Protector
There are more expensive options that work even better but this paintball armor was within by budget
- Member DIN
- S027
I was recently asked on another platform regarding my Klingon costumes:
And since its the same technique for all of my cosplays I thought I would put it up here.
I love multi-monitor setups; its really nice to have different views or different tools on different screens.
Thus the earlier post with one puppy or another on my lap for an hour or two at a time.


How do you study/get all the details for your costume?
And since its the same technique for all of my cosplays I thought I would put it up here.
- Lots and lots and lots and lots, of watching the source material (TV episodes, movies, etc.)
- Frame grabbing anything that looks like it might be useful later.
- Keeping all those grabs organized by folder
- Clean up, crop edit, markup to what matters in Photoshop and SnagIt
- Sometimes make a single big infographic image by compositing several angles and details to one so I don't keep flipping back and forth
- Catalog it all in Darktable because I like non-destructive tools.
I love multi-monitor setups; its really nice to have different views or different tools on different screens.
Thus the earlier post with one puppy or another on my lap for an hour or two at a time.
- Member DIN
- S410
As am I!!I'm digging it
- Member DIN
- S027
I'm lazy and I admit it. I  love having the big parts as single-piece prints. No gluing, seaming, hiding, smoothing... fearing they pop at the seams. Armor that feels like freaking •ARMOR•.
Boot is cleaned and primed. Shin and thigh haven't even received their first sanding pass.
Just needed to try them on, confirm lack of joint conflict etc.

#halo #haloreach #reach #haloinfinite #infinite #3DPrint #3dprinting #helmet #cosplay #cosplaying #noble6 #markv #markvb #mjolnir #mjolnirarmor #odst
love having the big parts as single-piece prints. No gluing, seaming, hiding, smoothing... fearing they pop at the seams. Armor that feels like freaking •ARMOR•. Boot is cleaned and primed. Shin and thigh haven't even received their first sanding pass.
Just needed to try them on, confirm lack of joint conflict etc.
#halo #haloreach #reach #haloinfinite #infinite #3DPrint #3dprinting #helmet #cosplay #cosplaying #noble6 #markv #markvb #mjolnir #mjolnirarmor #odst
- Member DIN
- S027
Saturday...
Laid it all out, visual inventory, mental refresh of status.
• Helmet at about 50%
• Chest first sanding pass
• Boot Right - done to primer.
Today:
• Organize and label some paints
• Paint sample/state sticks (more on that later)
Sand to paint ready, then adhesion promoter coat, cure, plastic primer coat, cure for the following:
• Boot left, both forearms
Helmet UA - Metal coat, cure, and mask for chipping effect


#halo #haloreach #reach #haloinfinite #infinite #3DPrint #3dprinting #cosplay #cosplaying #405th #markvi #mjolnir #mjolnirarmor #halospartan #comiccon #3dprintedarmor #halocosplay
Laid it all out, visual inventory, mental refresh of status.
• Helmet at about 50%
• Chest first sanding pass
• Boot Right - done to primer.
Today:
• Organize and label some paints
• Paint sample/state sticks (more on that later)
Sand to paint ready, then adhesion promoter coat, cure, plastic primer coat, cure for the following:
• Boot left, both forearms
Helmet UA - Metal coat, cure, and mask for chipping effect
#halo #haloreach #reach #haloinfinite #infinite #3DPrint #3dprinting #cosplay #cosplaying #405th #markvi #mjolnir #mjolnirarmor #halospartan #comiccon #3dprintedarmor #halocosplay
Attachments
- Member DIN
- S027
Sunday...
Day of rest... My *$&#
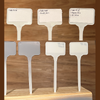
Yesterday I said there'd be more about the paint tests/flags. Here it is. I found these herb garden flags at the discount store and realized they'd be great for paint testing: Paint on the front, description on the back. Drill a 2x4 for a stand-Punch them in some floral foam, whatever.

For the paint testing chips:
Then I realized they would also make great status flags because I can highlighter on the paper label.

These labels just have the entire process so I can make 20 of them or whatever, bam bam bam. As part works it way through from day to day, highlight where its at and leave the flag with the part. Since I leave paint to cure 24-72 hours and have 50 parts at any stage at any given time, this will help keep me sane(-ish).

Day of rest... My *$&#
Yesterday I said there'd be more about the paint tests/flags. Here it is. I found these herb garden flags at the discount store and realized they'd be great for paint testing: Paint on the front, description on the back. Drill a 2x4 for a stand-Punch them in some floral foam, whatever.
For the paint testing chips:
- Started with a dozen flags. They all get the first layer of Adhesion Promoter and let dry.
- Take first flag away. Hit all the remaining with Plastic Primer and let dry.
- Take next flag away. Hit all the remaining with 2-in-1 Primer and let dry.
Then I realized they would also make great status flags because I can highlighter on the paper label.
These labels just have the entire process so I can make 20 of them or whatever, bam bam bam. As part works it way through from day to day, highlight where its at and leave the flag with the part. Since I leave paint to cure 24-72 hours and have 50 parts at any stage at any given time, this will help keep me sane(-ish).
Attachments
Looking amazing! Wow your painting process is intense. I am not sold on the chipping method myself. I know it adds realism but man does it make the painting process that much longer and intense. And you definitely dont want to make any mistakes.
How the hell do you get your leg into that shin piece?! I have mine detach so i can slide my foot in and even that is a pain.
How the hell do you get your leg into that shin piece?! I have mine detach so i can slide my foot in and even that is a pain.
- Status
- Not open for further replies.
Similar threads
- Replies
- 0
- Views
- 255
- Replies
- 79
- Views
- 4,275
- Replies
- 4
- Views
- 401