Centurion Build

Status
Not open for further replies.
Another quick update before the weekend:

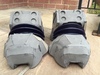
Almost finished w/ the foaming of the front of my chest piece. I have some pieces that still need fabrication and some that need modification. As I said, some of the templates are not translating to foam well or even the correct size(!?!?!) Not sure how that happened but This is what I have so far:

IMG-20160805-01432.jpg

I know......I know.......the center piece is tilting a little to the left, I just couldn't get it to sit straight while holding it till the glue dried. I mighty have to cut out that whole center section and redo. Either the templates were not cut exactly or the foam pieces......or it's just me........I'm also seeing the difference between the pep print-out and the "screen shot".

Pep looks nothing like this Halo5_Fred.jpg but I'm going to try my best to get it there. Even If I have to lay on a thin layer of foam on top of my armor to get that layered look to the armor. Might get a bit heavy....but it will look better for it. Size-wise, it fits nicely. I started cutting out some of the shoulder pieces for the inside portion, this way it will sit across all of my shoulder rather than 1/2 inch if it. Then its on to the booster pack for the back.....wish I had my mannequin w/ me but I have no room for it at the moment. It would help me knowing if the pieces are pulling too tight as the mannequin is my exact size.....across the chest that is.......he's go the 6 pack and I'm still sporting the keg look........This weekend is going to be nice....so back to the helmet.....got to finish resining and fiber-glassing it up. It was just to rainy out the past few weekends to do w/o potential warping due to moisture.

That's all for now folks, see you after the weekend. Now is time for some fun and sun at the beach.......don't forget the drinks!!!!!! (and I wonder why I still have the spare tire!!!!)
 
Pictures don't work for me. I want to see your progress!!
 
Thanks, fixed.
Lol. I thought for sure you would have laughed at that. :p

As for your chest piece it is looking good. You have to remember that each piece is only part of a whole, so if that piece has an even smaller piece on it that is crooked, big deal. If you have time and capability to fix it great, but if not it will blend in with the rest of the suit. Also remember you're just making the base out of eva foam. For details you build it up with craft foam and do-dads like real nuts and bolts.

Good luck on the helmeting, I'm looking forward to seeing it come along.
 
I was going to say something very stupid but.......I must have take a stupid pill this morning......didn't get the joke either.........It just irks me that I want it to look great.....and it just looks ok to me....I know "you are your own worst critic", but it's crooked to my eye......got to fix it.....have been obsessing over it all day. OCD?
 
Good morning all!!! How was your weekend? Sat was 1/2 and 1/2....But yesterday........WOW!!!! Full day at the beach w/ no kids in tow!!!! Just friends, fun and a few drinks.........And a good time was had by all.....until the kids arrived.........didn't get much done this weekend but every bit done, gets me closer to completion. As I said some of the pieces aren't translating to foam so I managed to find a super clean and crisp picture of the centurion armor and I think I'm going to have to free hand some things.

IMG-20160808-01435.jpgIMG-20160808-01436.jpg

I had to re-cut the lower cross piece in the chest several times to get the correct angle along the sides and then the under cut for the curvature inward. Now there is a template for a piece that goes within that open area but again.....it doesn't fit......So I guess I'll just put a piece a paper on the inside, trace out a template and cut a new foam piece and trim as needed. I did get those inside shoulder pieces in and they sit perfectly along the length of my shoulders....Now just a piece of thin foam to close the bottom off to keep the whole thing solid and then its on to the back.

This is where I foresee a problem......how to ensure proper shape and circumference w/o being able to take it off and on, once I assemble the back? Once the back is assembled, I won't be able to put it on. I will have to hing it or separate it before hand. When I did my son's suit I hinged the top and used Velcro on the bottom to connect front to back. Unfortunately that pulled at the armor funny and left a gap at that point. The armor stayed on...don't get me wrong but I just didn't like the look of it.

I also started cutting pieces of foam for the jet packs.....and some of those pieces.....(uuuucccchhhhhhI I sound lie a broken record.....) don't translate!!! Is it possible to do a pep piece and attach to foam? If so that might help a lot. Do a basic foam pack shape and then detail w/ pep........Well since I won't be able to work on my helmet......going to rain all this week (so much for my camping plans) I'll continue w/ the armor.

Slowly I turn. Step by step, Inch by inch.......getting there!!!
 
Looking good man! Don't be afraid of free handing as well! You have the pep model already printed, so at least you can quickly figure out the size and scale of a part easily. That was the biggest battle when I was scratch building, as the shape of the part wasn't an issue, just how large it should be in relation to other parts. There was a lot of suiting half way up and staring at myself in the mirror while holding a few chunks of rough cut cardboard haha.
 
Holy Crow!!!! My daughter was going to kill me!!! I was using her as my mannequin for almost an hour yesterday (not the full hr mind you just a few minutes here and there within 1 hour) then she ran away......I had to get my Niece's husband to stand in......for someone about 6-8 inches shorter than I am, his chest was broader than mine. I know I was loosing weight but that blew my mind!!!! And yes.......countless runs to the bathroom to where the full length mirror was......and dragging the mannequins w/ me sometimes......totally relate.
 
Thanks PerniciousDuke....Small cut on my knee, scrapped elbow and a bruised ego; and normal is a matter of perspective :wacko. I need a better bike but at 800-1k$ for a decent low end one, isn't happening any time soon........

So, finish fiber-glassing, then bondo and smooth then cut so both halves are the same thickness......Got it. Didn't think of that aspect of it. Now to find the right hinges and locking clasps.

Thanks SavedbyGraceG12, I plan on not sacrificing detail and not looking like a bobble head.

I'd recommend using elastic on the inside as "hinges" and rare earth magnets on the inside of the helmet, held in with some epoxy putty to keep it together. You can even just make an entire section removable and held in with magnets if you don't want to bother with "hinges" or the geometry of the helmet doesn't allow it.

When you're making the cut for the removed section, try to make it follow the lines already in the helmet, so it isn't noticeable (weathering really helps to cover it up too). But as it has been already said, get the helmet to the finished state (minus paint) and then make the cut... from looking at the helmet, a small section of the back could be removed, behind the two box looking things on either side of the helmet.

you can see here how I removed the back of my clone helmet here, held in with magnets. I have elastic straps as mentioned above attached at the top of the join, but didn't have them on at the stage this photo was taken.

_MG_9935_zpse9284888.jpg


you can see here that after painting and weathering, the gap is quite hard to see. Also, being the back of the helmet it is less likely to get noticed

04-_MG_0373_zps17a3c61c.jpg
03-_MG_0371_zpsb64eeaf6.jpg


_MG_9935_zpse9284888.jpg


04-_MG_0373_zps17a3c61c.jpg


03-_MG_0371_zpsb64eeaf6.jpg
 
Last edited by a moderator:
Update Time:

I haven't had much time to myself lately......life.......but I managed to get some stuff done this weekend..........
IMG-20160822-01451.jpgIMG-20160822-01450.jpg

Ok just for the moment, ignore the fact that the boosters are not even, I just threw some tape on them to hold them for the picture. So the basic shape is done, I have to get to sanding down the edges and seam and then seal it up and I should be done.....I'm going to leave the lights for last and I am running out of time, as usual. I left the top portion of the boosters open as well as the top of the back piece for the installing of lights. I have some translucent Plexiglas which I'm cutting to size to close up the lights in to, this way I'll still have access to them. The next thing after the filling in and sanding will be to accent the hell out of this thing. Adding the details hopefully will really bring the HALO look to it.

In addition to the chest piece (near) completion, I got in some knee armor!!!

IMG-20160822-01452.jpg

Again, it is in need of some sanding/filling and detailing but I was very pleased w/ the overall look and size.

Question, I was wondering on how to get those 4 circular indentations in to the foam w/o messing it up. I have a drill press but I feel that any attachment is just going to tear this thing to shreds. I thought of getting some type of circular piece of metal and heating it up and actually branding the holes. Any other advise or technique would be helpful and appreciated.
 
I don't do foam. Branding sounds like it would work. I'm pretty sure foam is also sandable so I would probably try a cone shaped dremel attachment. Chest looks good man! I also love how that piece pops out on the knee guards.
 
I used the round grinding attachment for my dremel.

16d716f9a55b1ebbac9b327d383bb4a8.jpg


"I don't know what's weirder, that you're fighting a stuffed animal, or that you seem to be losing" - Suzie
 

Attachments

  • 16d716f9a55b1ebbac9b327d383bb4a8.jpg
    16d716f9a55b1ebbac9b327d383bb4a8.jpg
    656.2 KB · Views: 301
Ill be honest The shoes look good, Some touching up and sanding where the glue marks are and those boots look legit. In what order do you plan on making the parts to the suit? Or are you just making it random as you go? Looking forward to the finish product as iv always liked Halo suits since i was a little boy, back with halo combat evolved! ha
 
I don't do foam. Branding sounds like it would work. I'm pretty sure foam is also sandable so I would probably try a cone shaped dremel attachment. Chest looks good man! I also love how that piece pops out on the knee guards.

Thanks PerniciousDuke, Yeah the pieces are starting to come together nicely. It's the little things that when they work.....your build gains momentum and all of a sudden stuff gets completed.....I am way behind in my own timetable so I tossed that notion out and just dropped off all that pressure. Just build......and it works.

I used the round grinding attachment for my dremel.

I like than idea Jme,thank you. It will leave those "divots" nice and smooth. Just like yours.....speaking of which your suit is coming out great BTW!!!

Ill be honest The shoes look good, Some touching up and sanding where the glue marks are and those boots look legit. In what order do you plan on making the parts to the suit? Or are you just making it random as you go? Looking forward to the finish product as iv always liked Halo suits since i was a little boy, back with halo combat evolved! ha

Bulbxsaur, actually the boots are Jme's so I can't tell you what order he is building his suit in.

Thanks Jme, you just hijacked my thread.........;).....but the boots do look really good. Can't wait to see the rest of it.
 
Yeah, sorry about that. I just wanted to show you what the divots looked like.

My build is coming along well. I think I have finally figured out the Smooth Cast. I'll post an update tonight hopefully.


"I don't know what's weirder, that you're fighting a stuffed animal, or that you seem to be losing" - Suzie
 
Cant believe i Didn't catch That! xD Your Pepping is coming out clean btw!
And Smooth cast 300 i personally believe is a way better choice then fiber glassing and it decreases the weight significantly.
 
Wow, its been 4 weeks since my last update........I have 10 days left till Comicon and no end in sight for my suit. I don't have pics on me and I'm burning the candle at 3 points right now: both ends and the middle.....between 2 jobs and family life......."me" time is non- existent. I did manage to get some things done:

Chest sanded smooth, seams filled, plasta-dipped ready for paint
Biceps and shoulder ready for painting
Gloves/hand plate ready for painting
Helmet ready for Bondo


Think I bit off more than I could chew for the time frame I had. Comicin will still be great even w/o me in the suit. Is it bad if I went in just the upper half of the suit? What is the protocol? All or nothing? I haven't been to a comic convention since I was a teen......30 years ago.......dam I'm old..........Cosplaying wasn't even around till the late 80's. I was 15 or 16 at the time and that was still overseas in Japan.

Still going to finish the suit but as I said, not going to make NY Comicon this time round. Always next year and other Cons in the area. Next closest one is in Pittsburgh in December. Who knows.........As soon as I have pics I'll post.

Building.....building, Just keep build....just keep building.......Ha ha ha La la la.......
 
Just keep plugging along, Dirts! I do my pep work during lunch these days because I'm in the same boat as you.
 
Status
Not open for further replies.
Back
Top