CosmoCornelius
Member
Hey all! I've been lurking around here for a while, even before making an account, but I finally have the ability to join and attempt to make a set of armor (hopefully more than just one!), but you have to start *somewhere* so here we are!
Quick intro, I'm Cosmo! I'm in my mid 30's, a professional musician, and I've been a huge halo fan since the beginning. I'm a fan of all games, but the lore and world of Halo has always been one of my favorites.
I've always been intimidated by the process of building a set of armor like this, but it's always been a dream of mine. I had the chance to get a 3D printer in December of last year, and since I've started printing little things here and there, and slowly getting to bigger things, I'm feeling more confident that I might be able to pull something off that I'm happy with, even though I know I have a LOT to learn. For reference, I'm printing on a completely stock Ender 5 Plus. I like it a lot so far, especially for the relatively low cost of entry.
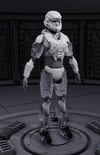
THE PLAN is to make a set of MkVb armor, and after I've made the completely base set hopefully then grab some additional more unique pieces, ideally asymmetric shoulders and a couple other additions. The files I'm starting with are Nerd Forge Design's base set, with the MkVb helmet. I was realizing when starting to make this post that I probably should also poke around these forums and find other instances of people printing this set, because I have to assume it's pretty well-known? I've seen someone mention it on the Discord server as a good set of files and a good creator. But if any of you have built this I'd LOVE to see your finished product, and any advice you might have. I was particularly interested in this set when I was looking around because it had removable pieces for magnets to help with mounting it to your undersuit? Is that something that people are actually able to use? I'm really excited at the idea that it can actually be fit on like that, maybe make the don/doff process a little easier than I feared. ANYwho, I'll attach a picture of the mock-up I've been working on. I picked up Armorsmith so that I could visualize the relative size of the pieces to my figure. I'm just shy of six feet tall (71.5 inches), and around 170 pounds, so I wasn't sure if I would need to size anything up or down on these. The helmet in particular seemed really big at 100% scale? Would it be weird to scale the helmet down to like 95% and not change any other pieces?
I am not quite ready to start printing yet, I'm waiting on another prop that I'm printing for a different costume idea, but likely by the end of the week I could start printing this. In the meantime I hope some people will chime in with questions or comments, or advice of what to do/not to do! And I'll continue to update with more that I learn, I'm not sure what most people do but I might also post things I find that I want to refer back to for my own project.
PARTS & PROGRESS
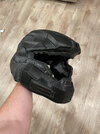
Helmet: Printed (may be redone for size/material?)
Visor:
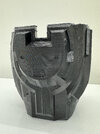
Chest (Front):
Chest (Back):
Upper Arm(L/R): Printed/Printed
Lower Arm(L/R): Printed/Printed
Shoulder(L/R): Printed/Printed
Hand Pad(L/R): Printed/Printed
Waist:
Upper Leg(L/R): Printed/Printed
Knee(L/R): Printed/Printed
Lower Leg(L/R): Printed/Printed
Foot(L/R):
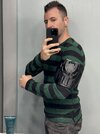
Undersuit: Purchased, got these parts:
Amazon.com (TOP)
Amazon.com (BOTTOM)
Shoes/Gloves: Planning to use old shoes/Purchased these gloves: Amazon.com
Thanks for reading!
Quick intro, I'm Cosmo! I'm in my mid 30's, a professional musician, and I've been a huge halo fan since the beginning. I'm a fan of all games, but the lore and world of Halo has always been one of my favorites.
I've always been intimidated by the process of building a set of armor like this, but it's always been a dream of mine. I had the chance to get a 3D printer in December of last year, and since I've started printing little things here and there, and slowly getting to bigger things, I'm feeling more confident that I might be able to pull something off that I'm happy with, even though I know I have a LOT to learn. For reference, I'm printing on a completely stock Ender 5 Plus. I like it a lot so far, especially for the relatively low cost of entry.
THE PLAN is to make a set of MkVb armor, and after I've made the completely base set hopefully then grab some additional more unique pieces, ideally asymmetric shoulders and a couple other additions. The files I'm starting with are Nerd Forge Design's base set, with the MkVb helmet. I was realizing when starting to make this post that I probably should also poke around these forums and find other instances of people printing this set, because I have to assume it's pretty well-known? I've seen someone mention it on the Discord server as a good set of files and a good creator. But if any of you have built this I'd LOVE to see your finished product, and any advice you might have. I was particularly interested in this set when I was looking around because it had removable pieces for magnets to help with mounting it to your undersuit? Is that something that people are actually able to use? I'm really excited at the idea that it can actually be fit on like that, maybe make the don/doff process a little easier than I feared. ANYwho, I'll attach a picture of the mock-up I've been working on. I picked up Armorsmith so that I could visualize the relative size of the pieces to my figure. I'm just shy of six feet tall (71.5 inches), and around 170 pounds, so I wasn't sure if I would need to size anything up or down on these. The helmet in particular seemed really big at 100% scale? Would it be weird to scale the helmet down to like 95% and not change any other pieces?
I am not quite ready to start printing yet, I'm waiting on another prop that I'm printing for a different costume idea, but likely by the end of the week I could start printing this. In the meantime I hope some people will chime in with questions or comments, or advice of what to do/not to do! And I'll continue to update with more that I learn, I'm not sure what most people do but I might also post things I find that I want to refer back to for my own project.
PARTS & PROGRESS
Helmet: Printed (may be redone for size/material?)
Visor:
Chest (Front):
Chest (Back):
Upper Arm(L/R): Printed/Printed
Lower Arm(L/R): Printed/Printed
Shoulder(L/R): Printed/Printed
Hand Pad(L/R): Printed/Printed
Waist:
Upper Leg(L/R): Printed/Printed
Knee(L/R): Printed/Printed
Lower Leg(L/R): Printed/Printed
Foot(L/R):
Undersuit: Purchased, got these parts:
Amazon.com (TOP)
Amazon.com (BOTTOM)
Shoes/Gloves: Planning to use old shoes/Purchased these gloves: Amazon.com
Thanks for reading!
Attachments
Last edited: