Custom Halo 4 Armour Build+Lightrifle+Magnum [Commander Button Fox now a musical!]

Status
Not open for further replies.
> Mr. Wilson , blackout11c:

Thanks guys.
I think for this build though I will stay with the Pva glue due to time constraints.
Only have 20 days left to finish.

So it is time to start the countdown with this big update.
I have recently been working on a lot of different things at the same time and hadn't really had the chance to update until now.
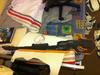
Here is a list of things I have done:
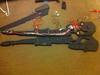
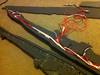
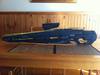
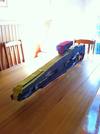
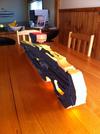
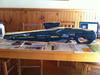
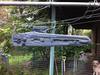
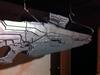
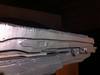
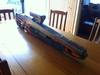
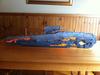
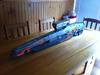
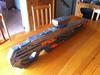
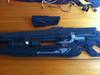
Lightrifle-

-Used a dremel to cut out and attach the plastic flashing light pieces.
-Created some clear like hinges for the motors that move parts.
(Been doing a lot of testing mainly to make sure everything will work the first time)
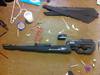
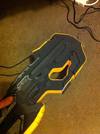
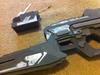
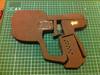
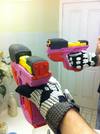
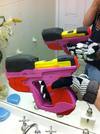
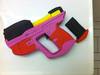
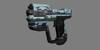
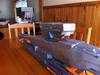
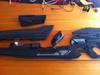
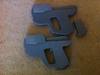
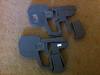
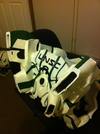
LightrifleProgress35_zps9721cbe6.jpg

LightrifleProgress37_zps780d54e4.jpg

LightrifleProgress38_zps569ce372.jpg

Magnums-

-Started to build them using reference pictures from the game.
-Base layers done.
-Magnets attached.
-Working on removable clips.
(Going to be using springs to make the trigger / top piece move)
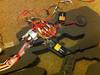
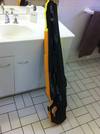
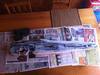
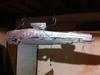
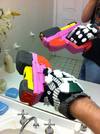
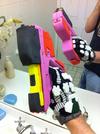
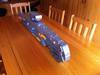
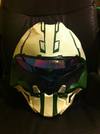
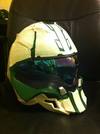
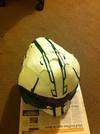
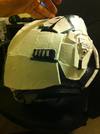
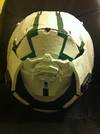
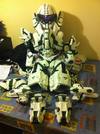
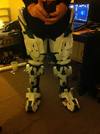
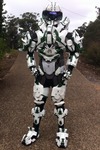
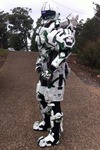
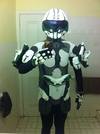
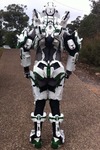
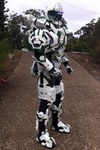
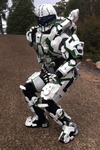
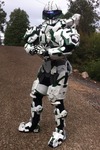
MagnumProgress1_zps70b65bec.jpg

MagnumProgress4_zpsfef9203b.jpg

MagnumProgress5_zps3aa27871.jpg

Halo 4 Armour-

-Pva'd / Repainted the Pathfinder Helmet
-Added more eva foam around the bottom of the helmet / inside.

PathfinderHelmetRepainted1_zps3ea9932c.jpg

PathfinderHelmetRepainted2_zps8f4f455b.jpg

PathfinderHelmetRepainted5_zpsc22c97e6.jpg

PathfinderHelmetRepainted3_zpsbff292ff.jpg

PathfinderHelmetRepainted4_zpsb4bf7d56.jpg

-Repainted the green detail on the Rogue Chest and Shoulders.
(Tried to add clips to the chest but they weren't practical)

RogueChestComplete2_zpsabfdb305.jpg

-Added straps to the boots, of which allows me to move in them like normal shoes.
(I put them though the pain of running, jumping, up and down stairs / ramps and no damage at all)

BootCompletewithStraps1_zpsae0e11a5.jpg

Sewed the wrists of the handplate gloves to make them more durable.

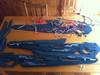
-Touched up all Armour Pieces to the point where all pieces are 100% done.
(Only need to add velco to some pieces when I finish touching up the undersuit)

ArmourOn11_zps6cf9c5bb.jpg

ArmourAllCompleteLayout1_zps3d0f4c4b.jpg

Undersuit-

-Still working of touching up things.
(Mainly sewing)
-Bought a some training gear to use for the rest of the undersuit.
(It also allows me to get the undersuit on very easily now)

Planning to work on the undersuit tomorrow and try to get all the pieces velco'd.
If I get that done then I will be able to finally test it all on together.
Until tomorrow
Keep marching on...
 

Attachments

  • LightrifleProgress35_zps9721cbe6.jpg
    LightrifleProgress35_zps9721cbe6.jpg
    88.8 KB · Views: 171
  • LightrifleProgress37_zps780d54e4.jpg
    LightrifleProgress37_zps780d54e4.jpg
    75.6 KB · Views: 176
  • LightrifleProgress38_zps569ce372.jpg
    LightrifleProgress38_zps569ce372.jpg
    70.9 KB · Views: 173
  • MagnumProgress1_zps70b65bec.jpg
    MagnumProgress1_zps70b65bec.jpg
    59.2 KB · Views: 181
  • PathfinderHelmetRepainted1_zps3ea9932c.jpg
    PathfinderHelmetRepainted1_zps3ea9932c.jpg
    64.5 KB · Views: 190
  • MagnumProgress5_zps3aa27871.jpg
    MagnumProgress5_zps3aa27871.jpg
    134.1 KB · Views: 180
  • MagnumProgress4_zpsfef9203b.jpg
    MagnumProgress4_zpsfef9203b.jpg
    129.9 KB · Views: 189
  • PathfinderHelmetRepainted2_zps8f4f455b.jpg
    PathfinderHelmetRepainted2_zps8f4f455b.jpg
    71.7 KB · Views: 166
  • PathfinderHelmetRepainted5_zpsc22c97e6.jpg
    PathfinderHelmetRepainted5_zpsc22c97e6.jpg
    102.1 KB · Views: 174
  • PathfinderHelmetRepainted3_zpsbff292ff.jpg
    PathfinderHelmetRepainted3_zpsbff292ff.jpg
    65.4 KB · Views: 170
  • PathfinderHelmetRepainted4_zpsb4bf7d56.jpg
    PathfinderHelmetRepainted4_zpsb4bf7d56.jpg
    68.4 KB · Views: 161
  • ArmourAllCompleteLayout1_zps3d0f4c4b.jpg
    ArmourAllCompleteLayout1_zps3d0f4c4b.jpg
    108.3 KB · Views: 182
  • ArmourOn11_zps6cf9c5bb.jpg
    ArmourOn11_zps6cf9c5bb.jpg
    66.5 KB · Views: 182
  • BootCompletewithStraps1_zpsae0e11a5.jpg
    BootCompletewithStraps1_zpsae0e11a5.jpg
    59 KB · Views: 174
  • RogueChestComplete2_zpsabfdb305.jpg
    RogueChestComplete2_zpsabfdb305.jpg
    77.1 KB · Views: 173
Well after some hard work today I have finally finished making the undersuit.
Everything armour wise is now 100% complete WOOT!

Just a few teaser pics for today.

TestFit1_zps3252584b.jpg

TestFit2_zps4a971716.jpg

Ran out of light so you will have to wait until tomorrow morning to see me all armoured up.
19days to go.

......................................................................................................................................................................................................................................


Well after 6 long months I can FINALLY say that my Halo 4 Custom Armour is 100% complete.
I am happy to say that I can take the whole suit on and off by myself.
It takes about 5-10min to do so.
Just got to adjust a few tiny things.
The long wait ends and the pictures begin...

Front on-
Halo4ArmourCompleteCloseup1_zps7cda6508.png

Side Views-
Halo4ArmourCompleteCloseup2_zpsb8bc440f.png

Halo4ArmourCompleteCloseup3_zps10996d83.png

Back view-
Halo4ArmourCompleteCloseup4_zpsc0929f68.png

Wounded-
Halo4ArmourCompleteCloseup5_zps5126f53d.png

Menace Stance Pose-
Halo4ArmourCompleteCloseup6_zps7c5f24c3.png

Now onto completing the magnums and lightrifles.
18 days to go...
 

Attachments

  • TestFit2_zps4a971716.jpg
    TestFit2_zps4a971716.jpg
    90.6 KB · Views: 176
  • Halo4ArmourCompleteCloseup1_zps7cda6508.png
    Halo4ArmourCompleteCloseup1_zps7cda6508.png
    1.4 MB · Views: 177
  • Halo4ArmourCompleteCloseup2_zpsb8bc440f.png
    Halo4ArmourCompleteCloseup2_zpsb8bc440f.png
    1.4 MB · Views: 183
  • TestFit1_zps3252584b.jpg
    TestFit1_zps3252584b.jpg
    74.2 KB · Views: 179
  • Halo4ArmourCompleteCloseup4_zpsc0929f68.png
    Halo4ArmourCompleteCloseup4_zpsc0929f68.png
    1.4 MB · Views: 183
  • Halo4ArmourCompleteCloseup3_zps10996d83.png
    Halo4ArmourCompleteCloseup3_zps10996d83.png
    1.4 MB · Views: 164
  • Halo4ArmourCompleteCloseup5_zps5126f53d.png
    Halo4ArmourCompleteCloseup5_zps5126f53d.png
    1.4 MB · Views: 167
  • Halo4ArmourCompleteCloseup6_zps7c5f24c3.png
    Halo4ArmourCompleteCloseup6_zps7c5f24c3.png
    1.4 MB · Views: 171
Very happy to see it all come together! It really does look awesome, especially knowing how you made all that Rogue gear on-the-fly! Kudos to you for sure!
 
Holy crap! I'm still going to call it the buzz light year suit but damn, the colour scheme works great, the undersuit really pulls it all together and even the floating leg pieces (not directly connected) look, well, like they'd save your legs from a bullet. I'm rambling but I'm super impressed by the suit. *Virtual high five* I think I just lost the Cosplay :)
 
Great Job man! Especially on the undersuit!!!! If it's possible, could you explain or list down the process of making the undersuit? I myself am also in the midst of making my very own Spartan IV suit but the only problem I'm having now the the undersuit
 
Very happy to see it all come together! It really does look awesome, especially knowing how you made all that Rogue gear on-the-fly! Kudos to you for sure!

Thankyou :)
Can't wait to see your rogue gear done too.

Dude, this ended up looking amazing. Those stances outdoors really bring out the colors amazingly, great job.

Thanks man.
I really think repainting the helmet, chest and shoulders helped alot. :)
Should be able to do some of the other stances when finish my weapons.
I can still melee... for now

One word: Beast

Thankyou :)
Gives me the idea to wear my lizard head with the armour on...
'This is what happens when a Spartan removes his helmet :p

Holy crap! I'm still going to call it the buzz light year suit but damn, the colour scheme works great, the undersuit really pulls it all together and even the floating leg pieces (not directly connected) look, well, like they'd save your legs from a bullet. I'm rambling but I'm super impressed by the suit. *Virtual high five* I think I just lost the Cosplay :)

To 'Infinity' and beyond!
Thanks man :)
I wouldn't count you out yet because I know your iron man suit is going to look badass too.


So many colours :O=====

Great Job man! Especially on the undersuit!!!! If it's possible, could you explain or list down the process of making the undersuit? I myself am also in the midst of making my very own Spartan IV suit but the only problem I'm having now the the undersuit

Thankyou :)
I am planning to upload my templates I created for it after Supanova.
I will write up some processes too, but I will warn you some of the things I did, didn't work out well.
Your Warrior helmet looks awesome btw.

No pictures to show you all today.
I have been at work alot the last few days, so I haven't done anything too major.
I am currently still working on cutting out the interior of the lightrifle for the electronics.
I have also worked out the easiest way to final detail / paint too.
I plan to do it piece by piece.
What I mean by this is I will attach the electronics into the main piece and then fine detail / paint that part.
After that I will begin on the next big piece, and then finally the scope and the reload chamber.

15days to go...

Things left to do:
Finish lightrifle
Finish magnums
Build H4 Mc Helmet and Gloves

r2.jpg
 
Last edited by a moderator:
This is absolutely amazing! Would you happen to be willing to share the files to make the pathfinder helm and the rogue shoulders? I always wanted to make myself a suit and I would love to get started! This is where I am heading towards:

Helm: Pathfinder
Torso: Venator
Left Shoulder: Rogue
Right Shoulder: Rogue
Forearms: GV-09
Legs: RG-63
Weapons: Binary Rifle

From the looks of many other peoples work it seems that sliced model would be the best course of action. Any thoughts?

I am not sure about the Pathfinder helmet, but the Rogue shoulders are openly shared by Aztlan here. They are in pep form only... as Black Underdog custom made his shoulders using that file as reference.

And when you are asking about sliced model, I take it you are referring to the Binary Rifle? If so, only DFT and myself have made them that I am aware of. DFT used styrene and crafted his by carving it (his is one sided only... for display purposes). Mine is a sliced/pep style hybrid. To my knowledge, there are no files, sliced or otherwise, for the Binary Rifle. It could be made using the sliced technique, but it would be a serious pain... there were too many angles for me to even consider using only the sliced technique. I believe that DFT, as well as myself, freehanded our rifles.

Thank you! I looked at the one you made....I am stunned! Looks completely tedious and well worth it in the end! I will look into it a little more later to see what I need to get and how much. Thank you for sharing this with me!
 
I am not sure about the Pathfinder helmet, but the Rogue shoulders are openly shared by Aztlan here. They are in pep form only... as Black Underdog custom made his shoulders using that file as reference.

And when you are asking about sliced model, I take it you are referring to the Binary Rifle? If so, only DFT and myself have made them that I am aware of. DFT used styrene and crafted his by carving it (his is one sided only... for display purposes). Mine is a sliced/pep style hybrid. To my knowledge, there are no files, sliced or otherwise, for the Binary Rifle. It could be made using the sliced technique, but it would be a serious pain... there were too many angles for me to even consider using only the sliced technique. I believe that DFT, as well as myself, freehanded our rifles.

Hey EVAKura! Not long ago, bout last week or two, another guy also completed his Halo 4 Binary Rifle and he's called SpicyThaiDesign on Facebook and on YouTube... Check him out!
 
YAY! You got it! Congrats! That looks fantastic! Love the color scheme!

Thanks man :)
Just glad that its done.

This is absolutely amazing! Would you happen to be willing to share the files to make the pathfinder helm and the rogue shoulders? I always wanted to make myself a suit and I would love to get started! This is where I am heading towards:

From the looks of many other peoples work it seems that sliced model would be the best course of action. Any thoughts?

Thankyou :)
What EVAkura stated about my rogue shoulders is true.
As for the pathfinder helmet I originally went about making it with DigitalCantina's 3d file of which Zaff unfolded, but after my mistakes with the pep/bondo I decided to make it out of foam.
Here's the link for the pep pathfinder helmet.
http://www.4shared.com/file/AlGekphe/H4_Pathfinder_HD.html
With my foam one, I did the same kind of idea than that of the rogue shoulders, but changed a few things.
If you are wanting some templates for foam I would be happy to make some kind of document (like Microsoft word) and have them in it, but you will have to wait until I come back from Supanova in April.
This is because I will need to remake the templates.
I will warn you though, its not the best it could be, but its the only one I know of that has been made.
As for the visor, the best way to make it would be to vacuum form, but you can always use a easier method like mine.
(Back on page 2 of this thread I go through how I made it)

Lastly, I prefer the sliced method for weapons.
It is what I have been doing for the lightrifles / magnums.

Hope this helps, and good luck with your build :)

Note: Should have an update later tonight on the lightrifle...

......................................................................................................................................................................................................................................

Now for the update I promised.
Slowly but surely I am getting closer and closer to completing my lightrifle.
I have mainly been doing a lot of testing to make sure that everything works fine 1st go.
Currently installing the electronics to the main part.

Here are some pictures so far:

LightrifleProgress39_zps39b3e3f3.jpg

LightrifleProgress40_zps8ed63f17.jpg

LightrifleProgress41_zps307f221a.jpg

There has been only 1 big difference to the video I uploaded on the electronics.
The back moving part will no longer be moved by a motor for 2 reasons:
1. Mainly due to space constriction.
2. I just can't get it to move how I want it to.

My new plan is simple:
The piece will be able to slide back and forth manually by a simple contraption (A bit like how a nerf gun loading slide works but without the spring).
More on that when I get to it.

With 14days left I better get a move on if I want to finish, so expect more updates soon...

......................................................................................................................................................................................................................................

Small update today.
Been working on the lightrifle.
Managed to connect all of the electronics into the main piece and get everything in place.
Unfortunately though there has been a few issues.
1: The motors weren't strong enough to move the other pieces (This was most likely caused by myself somehow when I sealed the gun) :(
2: The lights aren't bright enough.

Not to fear I plan to make sure the other 2 work perfect with the electronics.
Due to my timeframe I will have to go to plan B on it...
After supanova I will give this one to one of my mates (due to he doesn't really want electronics anyway...)
and work on the other 2.

On a plus, the sound works great.
It can be easily heard through the foam :)

Due to the rifle now not having motors I will make this one have now moving pieces, of which should allow me to finish it a lot quicker.
In the end I am in a progress of fine detailing.

Here are some pics so far:

LightrifleProgress42_zpsd6765085.jpg

LightrifleProgress43_zpsdf215126.jpg

LightrifleProgress46_zps8e0bda75.jpg

LightrifleProgress45_zps6f02d649.jpg

Will be continuing on the finer detail tomorrow...
 

Attachments

  • LightrifleProgress39_zps39b3e3f3.jpg
    LightrifleProgress39_zps39b3e3f3.jpg
    124.3 KB · Views: 143
  • LightrifleProgress42_zpsd6765085.jpg
    LightrifleProgress42_zpsd6765085.jpg
    132.7 KB · Views: 159
  • LightrifleProgress41_zps307f221a.jpg
    LightrifleProgress41_zps307f221a.jpg
    133.4 KB · Views: 140
  • LightrifleProgress40_zps8ed63f17.jpg
    LightrifleProgress40_zps8ed63f17.jpg
    138.1 KB · Views: 134
  • LightrifleProgress46_zps8e0bda75.jpg
    LightrifleProgress46_zps8e0bda75.jpg
    101.5 KB · Views: 139
  • LightrifleProgress45_zps6f02d649.jpg
    LightrifleProgress45_zps6f02d649.jpg
    122.3 KB · Views: 155
  • LightrifleProgress43_zpsdf215126.jpg
    LightrifleProgress43_zpsdf215126.jpg
    141.6 KB · Views: 157
Can't wait to see it finished,

I really didn't like halo 4's armor style, but your suit is making it grow on me :)

Me too :)

Small update:
Been working some more on the lightrifle today.
This is how far I got today before work.

LightrifleProgress47_zps1f683b6c.jpg

LightrifleProgress48_zpsdce558ca.jpg

Going to take a break and get ready for eso early launch woot!

......................................................................................................................................................................................................................................

Update time:

All pieces are now connected, and all that is left before painting is:
- Finish the extra detailing
- Gap seal where needed

LightrifleProgress49_zps0637489a.jpg

LightrifleProgress50_zps81cf89b8.jpg

I have a total of 10 working days left to finish this.
I am planning to use the 1st 5 days to finish the lightrifle and magnums.
This will leave me with 5 days to make the H4 mc helmet and gloves for a friend too.
Hopefully it will be enough time to do it all.

......................................................................................................................................................................................................................................

Its time for another update:

Today was my day off from work so I decided to make it worth while.
The majority of the day I has working on the lightrifle, and near the end the magnum.

Lightrifle:
-All detailing Completed
-All Gap sealant Completed
-2/3 of the rifle has been multi layed with pva glue.

Planning to do the other 1/3 tomorrow and begin painting woot!

LightrifleProgress55_zps9a48c0e8.jpg

LightrifleProgress56_zpsdc53acce.jpg

LightrifleProgress57_zps9b12de82.jpg

Magnum:
-Attached spring mechanism
-Base detailing Complete

I decided to just have the trigger move instead of the top too.
When you move the trigger the spring makes a clicking sound which sounds like the 'I'm out of ammo' noise (a small bonus).

Planning to start on the finer detailing tomorrow.

MagnumProgress6_zpsecaf921c.jpg

MagnumProgress7_zps8507839c.jpg

Note: Magnets in thigh pieces aren't strong enough to hold the weight of the magnum.
Going to make some kind of strap for it.

9 days to go...

......................................................................................................................................................................................................................................

The other 1/3 of the lightrifle has now been multi pva'd.
Note: The amount of time it takes to do 1 layer of glue, I can begin to add the next layer on straight after due to where I started already dried :)

Thought I would put a pic up of the size difference between the magnum and the rifle...

LightrifleProgress58_zps8eb925dd.jpg

Now to work on the magnums detail.
 

Attachments

  • LightrifleProgress47_zps1f683b6c.jpg
    LightrifleProgress47_zps1f683b6c.jpg
    84 KB · Views: 157
  • LightrifleProgress48_zpsdce558ca.jpg
    LightrifleProgress48_zpsdce558ca.jpg
    60.7 KB · Views: 142
  • LightrifleProgress49_zps0637489a.jpg
    LightrifleProgress49_zps0637489a.jpg
    93.1 KB · Views: 127
  • LightrifleProgress50_zps81cf89b8.jpg
    LightrifleProgress50_zps81cf89b8.jpg
    58 KB · Views: 137
  • LightrifleProgress55_zps9a48c0e8.jpg
    LightrifleProgress55_zps9a48c0e8.jpg
    70.1 KB · Views: 136
  • LightrifleProgress56_zpsdc53acce.jpg
    LightrifleProgress56_zpsdc53acce.jpg
    88.8 KB · Views: 133
  • LightrifleProgress57_zps9b12de82.jpg
    LightrifleProgress57_zps9b12de82.jpg
    93 KB · Views: 125
  • MagnumProgress6_zpsecaf921c.jpg
    MagnumProgress6_zpsecaf921c.jpg
    134.3 KB · Views: 125
  • LightrifleProgress58_zps8eb925dd.jpg
    LightrifleProgress58_zps8eb925dd.jpg
    121.2 KB · Views: 140
  • MagnumProgress7_zps8507839c.jpg
    MagnumProgress7_zps8507839c.jpg
    98.5 KB · Views: 139
Hey all big update today :)

Lightrifle - All painting completed except for Orange Details.
Sorry that some of the pictures aren't the best, it was a bit tricky to get the correct light reflection.
The hexagon pattern of the top part of the gun was created by using some left over grip liner from the undersuit (The white stuff).

LightrifleProgress59_zps4f626e6d.jpg

LightrifleProgress60_zpsa6688e6b.jpg

LightrifleProgress61_zpscbcb1755.jpg

LightrifleProgress62_zpsde6cd680.jpg

I will take some better pictures after I have completed the final details tomorrow...


Magnum - Fine detailing is now complete.
Just got to pva, and paint.

MagnumProgress10_zpsbdcee4d4.jpg

MagnumProgress11_zps9c4c8b0d.jpg

MagnumProgress12_zps66079a19.jpg

MagnumProgress13_zps7020d9c0.jpg

MagnumProgress14_zps5afc023b.jpg

I am planning on using this paint scheme for the magnum (if I have enough time I will before Supanova, otherwise I will repaint afterwards).

OperatorMagnumWeaponSkin_zpscebe63af.jpg

5 DAYS to go...

Things left to do:
Lightrifle - Orange Details
Magnum - Pva, paint
H4 MC Helmet / Gloves - Start
 

Attachments

  • LightrifleProgress60_zpsa6688e6b.jpg
    LightrifleProgress60_zpsa6688e6b.jpg
    70.4 KB · Views: 123
  • LightrifleProgress59_zps4f626e6d.jpg
    LightrifleProgress59_zps4f626e6d.jpg
    173.1 KB · Views: 132
  • MagnumProgress10_zpsbdcee4d4.jpg
    MagnumProgress10_zpsbdcee4d4.jpg
    76 KB · Views: 121
  • MagnumProgress11_zps9c4c8b0d.jpg
    MagnumProgress11_zps9c4c8b0d.jpg
    89.3 KB · Views: 138
  • LightrifleProgress61_zpscbcb1755.jpg
    LightrifleProgress61_zpscbcb1755.jpg
    71.9 KB · Views: 134
  • LightrifleProgress62_zpsde6cd680.jpg
    LightrifleProgress62_zpsde6cd680.jpg
    66.6 KB · Views: 131
  • MagnumProgress14_zps5afc023b.jpg
    MagnumProgress14_zps5afc023b.jpg
    52.7 KB · Views: 127
  • MagnumProgress12_zps66079a19.jpg
    MagnumProgress12_zps66079a19.jpg
    95.5 KB · Views: 124
  • MagnumProgress13_zps7020d9c0.jpg
    MagnumProgress13_zps7020d9c0.jpg
    94.2 KB · Views: 122
  • OperatorMagnumWeaponSkin_zpscebe63af.jpg
    OperatorMagnumWeaponSkin_zpscebe63af.jpg
    25.3 KB · Views: 126
Dude! This is looking absolutely awesome! Your foam work is incredible and I love the look of your undersuit. Good luck with the rest of it, I can't wait to see how it all looks together :)
 
Dude! This is looking absolutely awesome! Your foam work is incredible and I love the look of your undersuit. Good luck with the rest of it, I can't wait to see how it all looks together :)

Thankyou very much :)
When I look at other peoples builds they look so much better, but saying that I am truly happy with what I have been able achieve.
Btw your armour pepping is looking pretty sweet too :)

Now for the update I promised.

Today the 1st lightrifle has been Completed!!!
Woot.

Picture Time:

LightrifleComplete1_zpsdd339810.jpg

LightrifleComplete2_zps508705a2.jpg

LightrifleComplete3_zps4fede8ee.jpg

LightrifleComplete4_zpsa5e285df.jpg

LightrifleComplete5_zpsc6b7d71d.jpg

LightrifleComplete6_zps5fc768e3.jpg

With 4 days left I am ahead of schedule.
One of my friends of which I was going to build a H4 mc helmet for Supanova, changed his mind.
This means I only have 1 item left to complete :)
The magnum.

It recently had its last coat of pva put on it, so after it has dried all I will need to do is sand and paint.

My Halo 4 journey is coming to an end...
 

Attachments

  • LightrifleComplete3_zps4fede8ee.jpg
    LightrifleComplete3_zps4fede8ee.jpg
    81.9 KB · Views: 126
  • LightrifleComplete1_zpsdd339810.jpg
    LightrifleComplete1_zpsdd339810.jpg
    76.7 KB · Views: 122
  • LightrifleComplete2_zps508705a2.jpg
    LightrifleComplete2_zps508705a2.jpg
    97.7 KB · Views: 122
  • LightrifleComplete4_zpsa5e285df.jpg
    LightrifleComplete4_zpsa5e285df.jpg
    104.8 KB · Views: 128
  • LightrifleComplete6_zps5fc768e3.jpg
    LightrifleComplete6_zps5fc768e3.jpg
    91.4 KB · Views: 116
  • LightrifleComplete5_zpsc6b7d71d.jpg
    LightrifleComplete5_zpsc6b7d71d.jpg
    97.6 KB · Views: 137
Status
Not open for further replies.
Back
Top