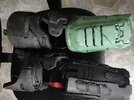
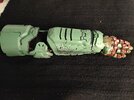
Doom 2016 Praetor suit

Argent

Member
~Editing with recent picture because Google shows the first one in the thread~
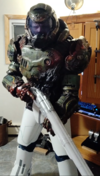
Doom cover.PNG


I started an EVA foam Praetor Suit build a little while ago, with the goal of having something to do during the great quarantine of 2020. I've been messing around with it for a while and feel like I finally have something to contribute to this site. So far I have the helmet done-ish, the arms mocked up pretty well, and the cuirass details about 70% of the way done with. Soon I'm going to have to figure out the codpiece/belt and how to keep it from sagging I think I may have to embrace suspenders as my primary option.

Here's a pic from early in the build process. My phone bricked a week ago, so most of the old pictures were lost.
IMG_20200320_170436.jpg


Here's the suit as of a few days ago:
IMG_20200710_125011.jpg

And here's the midsection fleshed out a bit. I'm happy with the disassembly system I've worked out, you rip the front ab section upwards and the whole thing sort of folds out. It feels about as nice as taking off 15lb of floor mats can be.
IMG_20200710_232948.jpgIMG_20200711_000152.jpg

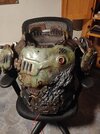
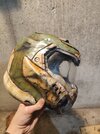
Here's the helmet, painted up with EL wire to light up the acrylic visor:
IMG_20200710_125150.jpg
It's EVA, not printed because I'm too lazy to sand. This was the only piece I didn't do freehand. The template was on Mellowmind Cosplay's Etsy, but it seems to have disappeared. I don't know why they stopped selling it, it was a really good template. I can provide the files to anyone who wants them, assuming Mellowmind is contacted and doesn't care. EDIT: see later update for links

And the full suit lit up.
IMG_20200710_232923.jpg
 
Last edited:
I'll update with more as I complete bits. Up next should be finishing and painting the cuirass, and then getting the belt done. I'll probably need to get the belt mocked up just to know what to do with the cuirass, but I've got a bunch of stuff to do before I have to worry about that. I have the upper body shape done-ish, so my main issue from this point forward is to get the legs looking right. Thankfully, Doomguy seems to have pretty normal proportions under the armor (unlike spartans) so I shouldn't have to cheese it.
 
Last edited:
OUTSTANDING!! And that ab piece being Velcro to the sides, GENIUS!! I was looking at your photos and immediately thought that helmet was what I thought it was. I was also bummed to see that she did not have it in her store as well.
 
Worked a bit on various trim pieces and interior padding for comfort, along with the back of the suit. I think at this point all the cuirass needs is detailing on the sides and lower back, and then I get to paint it up (which will hopefully hide some of the goofs I've made). Picture is of the backplate detailing so far.
IMG_20200724_161128.jpg
 
Hey-o, since the last update I've got a ton of small things done that I wasn't entirely happy with. It's a long list, but most of it has to do with annoying asymmetry. Since I never use full templates, most of my eyeballing has to be corrected later on. The stuff I did:

-Fixed helmet lopsidedness as best I could. It's still there, but It's not really noticeable unless you look closely. I've found that battle damage is a great way to hide it; adding in a bit of intentional asymmetry makes the sloppy stuff less obvious.

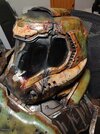
-Finished painting helmet (mostly, ignore the spot on the top air intake). I decided to go with a really old, rusty finish. This was all done with tons of washes of acrylic, mostly yellow ochre and burnt umber in different mixes and layers. I find that slopping a ton on mixed with plenty of water and dabbing it off with a paper towel is the best way to get an evenly grimy finish. I got some silver leaf rub n buff for the scuffs and dents, it really is fantastic. Applied it with a paper towel in extremely small quantities.
IMG_20200902_134324.jpg

-Finally managed to get a nice finish on the helmet visor. I used really old, ratty acrylic and couldn't get it to a nice polish with any method I found. Headlight polish, sandpaper, and clearcoat used in tandem did nothing. After a few hours I finally found a post online that said to hit it with a heatgun, and it worked perfectly. Apparently it melts the surface scratches. This has had the convenient side effect of making my EL wire really light up the plastic. It's not as bright as I'd like, but in the dark it looks fantastic.

-Redid the abdomen to try and slim down the waist and fix asymmetry. It definitely helped, but I'm never going to be able to get that in game look, and there is an embarrassing difference between the two armpit regions. Can't see both sides at once though, so I'm not particularly worried. It looks fatter in the pictures than it really is, mostly because of the weight of the rest of the suit flattening it. I suspect my phone's lens' fisheye lens doesn't help either.

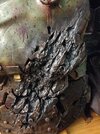
-Tons of little details in the sides, neck, and back. I tried adding texture to the leather areas by lightly scribbling with a rounded grinding stone dremel bit, and I like how it came out. It makes it look a bit more interesting, hopefully acrylic washes will really bring out the effect.
IMG_20200831_154936.jpgIMG_20200831_154940.jpgIMG_20200818_015447.jpgIMG_20200818_015557.jpg
-Got priming and painting of the cuirass 90% done, started with heat treating the foam, then plastidip, then paint. I forgot about the forest green details on the armor plates, so that will be my task for today. Metal details will be next, I have some gunmetal acrylic arriving in a couple of days. I couldn't restrain myself from doing a quick umber wash and rub 'n buff. Ignore the garbage in the second pic.
IMG_20200831_154923.jpgIMG_20200902_134109.jpg

-I made these arms a while ago, but I don't think I've posted them. No detail yet, but they serve as a nice stand in. They connect via a buckle in the shoulders of the cuirass. I hate seeing upper arm and leg plates ride too low on otherwise gorgeous costumes, so getting that right will be a big focus for me.
IMG_20200818_015813.jpg

That's all, not as much progress as I would have liked. I'm pretty confident that i'm over the hump of the project (fingers crossed). Next will be the hips, then legs, then detailing. I'm not looking forward to the boots, because the original ankle design doesn't really have flexibility in mind. I'm sure I'll figure it out, but it'll be a pain.

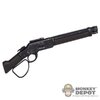
As for weaponry, I know it's sacrilegious, but I'm honestly not in love enough with the DOOM arsenal to replicate an in game model. I always thought Doomguy was missing a big bore lever action rifle, so I might try and design one for him. The super shotgun is cool, of course, but I think lever actions have that same old school charm + huge boom factor and are quite a bit less played out. It'd be fun to try and get the action to work realistically, the T2 spin-reload is definitely in the spirit of DOOM and I'd love to be able to pull it off. I like general shape of the Winchester below, but I think I'd keep the stock on.
BML0014-2.jpg

Thanks for reading, sorry for the long post.
 
Last edited:
Hey-o, since the last update I've got a ton of small things done that I wasn't entirely happy with. It's a long list, but most of it has to do with annoying asymmetry. Since I never use full templates, most of my eyeballing has to be corrected later on. The stuff I did:

-Fixed helmet lopsidedness as best I could. It's still there, but It's not really noticeable unless you look closely. I've found that battle damage is a great way to hide it; adding in a bit of intentional asymmetry makes the sloppy stuff less obvious.

-Finished painting helmet (mostly, ignore the spot on the top air intake). I decided to go with a really old, rusty finish to try and sell the "sat in hell for eons" look. This was all done with tons of washes of acrylic, mostly yellow ochre and burnt umber in different mixes and layers. I find that slopping a ton on mixed with plenty of water and dabbing it off with a paper towel is the best way to get an evenly grimy finish. I got some silver leaf rub n buff for the scuffs and dents, it really is fantastic. Applied it with a paper towel in extremely small quantities.
View attachment 295625

-Finally managed to get a nice finish on the helmet visor. I used really old, ratty acrylic and couldn't get it to a nice polish with any method I found. Headlight polish, sandpaper, and clearcoat used in tandem did nothing. After a few hours I finally found a post online that said to hit it with a heatgun, and it worked perfectly. Apparently it melts the surface scratches. This has had the convenient side effect of making my EL wire really light up the plastic. It's not as bright as I'd like, but in the dark it looks really fantastic.

-Redid the abdomen to try and slim down the waist and fix asymmetry. It definitely helped, but I'm never going to be able to get that in game slim thicc look, and there is an embarrassing difference between the two armpit regions. Can't see both sides at once though, so I'm not particularly worried. It looks fatter in the pictures than it really is, mostly because of the weight of the rest of the suit flattening it. I suspect my phone's lens' fisheye lens doesn't help either.

-Tons of little details in the sides, neck, and back. I tried adding texture to the leather areas by lightly scribbling with a rounded grinding stone dremel bit, and I like how it came out. It makes it look a bit more interesting, hopefully acrylic washes will really bring out the effect.
View attachment 295616View attachment 295617View attachment 295620View attachment 295621
-Got priming and painting of the cuirass 90% done, started with heat treating the foam, then plastidip, then paint. I forgot about the forest green details on the armor plates, so that will be my task for today. Metal details will be next, I have some gunmetal acrylic arriving in a couple of days. I couldn't restrain myself from doing a quick umber wash and rub 'n buff. Ignore the garbage in the second pic.
View attachment 295618View attachment 295619

-I made these arms a while ago, but I don't think I've posted them. No detail yet, but they serve as a nice stand in. They connect via a buckle in the shoulders of the cuirass. I hate seeing upper arm and leg plates ride too low on otherwise gorgeous costumes, so getting that right will be a big focus for me.
View attachment 295622

That's all, not as much progress as I would have liked, but I've been working on my car on the side. I'm pretty confident that i'm over the hump of the project (fingers crossed). Next will be the hips, then legs, then detailing. I'm not looking forward to the boots, because the original ankle design doesn't really have flexibility in mind. I'm sure I'll figure it out, but it'll be a pain.

As for weaponry, I know it's sacrilegious, but I'm honestly not in love enough with the DOOM arsenal to replicate an in game model. I always thought Doomguy was missing a big bore lever action rifle, so I might try and design one for him. The super shotgun is cool, of course, but I think lever actions have that same old school charm + huge boom factor and are quite a bit less played out. It'd be fun to try and get the action to work realistically, the T2 spin-reload is definitely in the spirit of DOOM and I'd love to be able to pull it off. I like general shape of the Winchester below, but I think I'd keep the stock on. A matching low-slung leather hip holster would fit the look well, I'm taking quite a bit of artistic license on this build anyway so why not go for it.
View attachment 295626

Thanks for reading, sorry for the long post.
That's all looking pretty good, I am new to the forum and I am just looking around and found your build, can't wait to see it finished! Nice job!
 
I've done a bunch of weathering and detailing; it's gone pretty well so far. next up will be clearcoat and then I'll try a oil paint wash or two to dull everything down. I found some "redrock pearl" Honda touch-up paint lying around, and luckily it makes a pretty impressive substitute for dried blood. It'll get you ripped without good ventilation though.
IMG_20200913_215713.jpgIMG_20200916_113944.jpg
 
I think I'm about done with the weathering, finally. My phone camera makes it look quite a bit more washed out than it is (also stretches it out in an odd way and makes the helmet look tall), but IRL the grime and blood pops quite a bit more and I'm very happy with it. Now onto making the rough shell of the waist, legs and boots, then detailing and paint. Hopefully this was the hard part, but I'm not looking forward to trying to get all those joints looking nice.
IMG_20200924_232318.jpg
IMG_20200924_232542.jpg
IMG_20200924_232816.jpg


I decided to go back to the super shotgun instead of a lever action, and I have a rough draft on foam below. The PVC pipes are 1-1/4. That makes it somewhere between a 2 and a 4 gauge, which seems like an appropriate payload.
IMG_20200925_125031.jpg
 
Last edited:
I've spent a while messing with my 3D printer and this build kind of fell by the wayside, so this is a much smaller update than I'd like it to be.

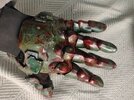
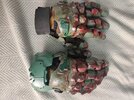
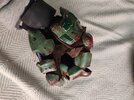
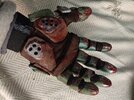
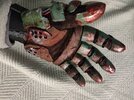
I have a set of gloves and wrist guards printed up from this thingiverse file. The paint is about 90% of the way there; I still have to so a bit of detailing with some oil and probably a little more gore (Blood for the Blood God model paint by Citadel), but I'll wait on that until I have the arms done too so it matches decently. I forgot how much finishing 3D prints sucks, even using filler primer it takes forever. The results are pretty cool though:

IMG_20201226_170356.jpgIMG_20201226_170456.jpgIMG_20201226_170405.jpgIMG_20201226_170410.jpgIMG_20201226_170349.jpgIMG_20201217_125350.jpg

I'm going to try and start doing foam work again soon, since I'd like to at least have the upper body and torso in a finished state before spring. It's absolutely frigid outside though, and I don't have much of an indoor workspace, so it's hard to get any momentum.
 
Last edited:
This is amazing. I'm excited to see how those gloves turn out, I saw the same thingiverse file a while back and didn't think it would work too well, but they look great from the photos. Keep up the good work man.
 
Thanks, I'm working on the arms now, so hopefully I can have the whole upper body done in a little while! I've got an airbrush on the way too, so I'll have some fun messing around with the paint.

I posted a make of the glove file on thingiverse with all the settings and sizes I used. It's actually surprisingly strong in just PLA and the comfort is decent with a tiny bit of discrete trimming, although I did have to slightly widen the index finger base joints with a little heat. The designer's entire page seems to be really high quality stuff. I saw a picture of his finished suit somewhere and the components all looked pretty much game accurate.
 
I've spent a while messing with my 3D printer and this build kind of fell by the wayside, so this is a much smaller update than I'd like it to be.

I have a set of gloves and wrist guards printed up from this thingiverse file. The paint is about 90% of the way there; I still have to so a bit of detailing with some oil and probably a little more gore (Blood for the Blood God model paint by Citadel), but I'll wait on that until I have the arms done too so it matches decently. I forgot how much finishing 3D prints sucks, even using filler primer it takes forever. The results are pretty cool though:

View attachment 300731View attachment 300732View attachment 300733View attachment 300734View attachment 300735View attachment 300730

I'm going to try and start doing foam work again soon, since I'd like to at least have the upper body and torso in a finished state before spring. It's absolutely frigid outside though, and I don't have much of an indoor workspace, so it's hard to get any momentum.
How did you attach the pieces to the gloves? Was it just super glue? Or perhaps something a tad stronger, like Contact Cement?
 
How did you attach the pieces to the gloves? Was it just super glue? Or perhaps something a tad stronger, like Contact Cement?
Just hot glue. I don't think super glue or contact cement would have worked as well, because there was a bit of negative space between the glove and the plastic that the hit glue kind of filled in. Adhesion seems to be fine, it's still solid.
 
Just hot glue. I don't think super glue or contact cement would have worked as well, because there was a bit of negative space between the glove and the plastic that the hit glue kind of filled in. Adhesion seems to be fine, it's still solid.
Intriguing. I'll have to apply this method to foam when I get to it. I always assumed hot glue was a bit weak than other glues.
 
It's excellent on porous surfaces like foam or fabric, although I usually score the heat treated side of the mats so it can have some texture to grab onto. Aside from that and the melting point (although I think the foam itself would deform before the glue did), it's basically perfect for my uses. The whole suit is about 20% hot glue at this point, conservatively, and it's really solid.
 
After yet another long break, I've gotten the arms fabricated and up to the base paint coat.
IMG_20210214_184417.jpgIMG_20210218_152926.jpgIMG_20210218_210704.jpg


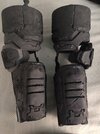
It took a bit of messing with to get the arm segments and elbow pads to stay in place, but I'm pretty happy with the range of motion and flexibility now. It's basically just a lot of soft foam padding to keep it pretty snug, and a taught nylon stretchy strap on the elbow so that the lower arm doesn't sag. The elbow pad itself has a rigid "U" shape that cradles my arm pretty tightly, which keeps it in place as well. I'm trying an Imgur link here, the compression is pretty bad but hopefully it shows what I'm talking about:

Excuse the crappy angle, my mirror choices are very limited and I'm too lazy to put it up on the wall.


As with all of these sci-fi suits, though, there's absolutely no way I could shoulder a rifle, and unless Doomguy just kept substituting in uppercuts a lot of the glory kills would require quite a bit of no-clip.


I did end up getting an airbrush:

IMG_20210214_192225.jpgIMG_20210214_184522.jpgIMG_20210214_192436.jpg


And I finally fixed the weak looking battle damage that had been bugging me for a while. It's a lot of fun to just go to town with a craft knife. Next up will be the right pauldron.

IMG_20210218_210919.jpg


The upper body is officially in a physically finished state, minus some helmet padding and a way to attach the wrist guards. That will hopefully be done very soon, along with the arm paint. So far it's surprisingly comfortable, I can move around fine and there's no pinching. I'll try to post some pictures or videos of the whole thing once the arms are done.
 
Last edited:
This thread is more than 4 months old.

Your message may be considered spam for the following reasons:

  1. This thread hasn't been active in some time. A new post in this thread might not contribute constructively to this discussion after so long.
If you wish to reply despite these issues, check the box below before replying.
Be aware that malicious compliance may result in more severe penalties.
Back
Top