DOOM Slayer Praetor Suit

Status
Not open for further replies.

ike

New Member
Hello all! I'm very new to this community--created my account just yesterday. I'm also new to cosplay, as I've always wanted to get into it but never had any chance to until now. I plan to make this cosplay for next year's Anime Expo, so that way I have a ton of time to prepare and won't have to stress about time constraints. Luckily, I've got a 3D printer at my disposal, so I'm going to be experimenting with printing out different parts of the Praetor suit, but I think for the most part I'll be using EVA foam. I'm not exactly sure which praetor suit iteration I'm going to go with yet; I've got the helmet from the DOOM Eternal Collector's edition, but I have 3d models from the 2016 praetor suit, so I'm still a bit on the edge. Although, I'm mostly leaning towards the 2016 praetor suit (it just looks cooler IMO). The main thing I'm concerned about right now is how I'm going to handle the material that comes underneath the armor, as well as the boots. The boots look pretty thick and massive and I want the cosplay to be as accurate as I can, so I'm not sure whether I should buy boots and surround them with foam or some other approach. What do you guys think? And does anyone have any tips for the material underneath the armor? A friend recommended a black jumpsuit but the areas near the shoulders and by the thighs are more leather-ish, and I'm not too sure as to what to do for those regions. I look forward to updating this thread as the cosplay progresses!


eternal-praetor.png
2016-praetor.png
 
It's been a few days, and mostly I've been waiting for materials to arrive in the mail. Today some sheets of EVA foam arrived along with some filament for my printer; I had printed the left shoulder of the armor using a model I found off of thingiverse to see if I wanted to go with 3d printed armor or foam armor, and I soon realized that Foam would be both cheaper and less error-prone to use. As far as 3D printing, I'm most likely going to use a minimal amount of 3D printed parts on the actual armor, using the printing more for props and weapons. As far as EVA, I purchased a model of the 2016 praetor suit off of Etsy for quite cheap, and I'll be using it for most of the armor. I'm hesitant to get started, though, as my contact cement has yet to arrive, and I've heard that hot glue isn't as good, so I might just wait until the glue arrives in the mail to get started on the armor. More updates will follow!

1593556482132.png
 
Another update! It's been almost 2 weeks since I started this project, and with the rate at which progress is coming along, its shaping up to be a lot bigger of a project than I originally expected (which is great! I'm having tons of fun doing it). Over the past few days, I've realized that it would save both time and money to 3D print the shoulder pieces and the chestplate, leaving foam armor for the rest of the suit. So far, I've started working on cutting out the pieces for the left arm of the suit, which has been an interesting process. Once all the pieces are cut out, I'm going to be sanding the cuts to be more smooth and clean (its my first time working with EVA foam, so a lot of my cuts aren't very clean) and attaching them with contact cement. I'm also 3D printing the shoulder armor in the meantime, which is coming along pretty great! A fantastic user on thingiverse uploaded some very well-designed models for a lot of the armor pieces from the suit, so I'm going to be using those models. I also am fortunate enough to have my own official DOOM Slayer helmet from the DOOM Eternal collector's edition, so I won't be having to make the helmet. I'm really excited to be working on this project, and am even more excited to share my progress with you all!
1594258357161.png
1594258496922.png
1594258577515.png
 
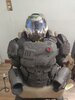
I've been working on my own Praetor Suit for about a month, all with EVA. I decided to not use templates, because every time I try to I end up changing it a ton anyway. All hot glue too, so this thing is definitely not done correctly. I find that hot glue fits my creation process pretty well though, as I constantly tweak stuff to my liking and you can't really do that with cement. I'm definitely not going to wear it in hot weather anyway, so I don't really have to worry about anything melting.

Regarding the leatherish stuff under the armor, my plan is to do all the solid looking padding in foam and wear a cheap leather jacket under it in order to fill in the bits that have to flex. It looks pretty good as far as I can tell, but I'll get a better idea once I paint the chest. The thing I've really had to make sure of is that the armor really sits far off of your body. In all the pictures of the OG suit, you can see that his shoulders are actually a little above where the green chestplate starts. Everything above that is just padding, leading right into the neckpad. My chestplate comes about 2-3 inches away from my chest, and the shoulders are about 3 inches wider than a doorframe. With the shoulder pads being so massive, I've found I can just add in foam underneath the actual plating and let the larger segments glide over it. Foam is really versatile depending on how you paint it, so I'm going to make it all look like worn leather with some acrylics. The downside of making the suit as bulky as it is in the game is definitely mobility though, but it's worth it.

Some tips I have:
-You can see that between the shoulders and chestplate I put some reinforcing horizontal pieces. These help to keep the shoulderpads in place. On the game model only the piece on the left is there, but I took creative liberties and put in a pretty well hidden one on the other side (and the same on the back.) The pieces aren't glued in place on both sides, but rather are glued onto the chest and connected to the shoulders with an elastic strap, to allow the shoulders to move in and out slightly. The shoulders are glued onto the chestpiece at the top, as I couldn't find a way to have the shoulders rest on my own arms and still look correct to the game.

-I see that you have an Eternal helmet, but if you decide to make your own I would use an EVA template off of etsy instead of 3D printing. The sanding required to make a print of that size look good makes me want to jump off a roof, and the helmet is a lot more durable when made out of foam. For the visor I bent up a piece of acrylic with a heatgun and fitted it in with a dremel (I goofed and cracked the acrylic on the right side when I tried to bend it and it was too cold. I'm too lazy to replace the whole visor so I just put a big gash in the side and passed it off as battle damage.) To get the glowing effect I lightly sanded where the acrylic meets the helmet and glued EL wire onto the inside of the acrylic. It looks fantastic in the dark but is pretty dim in daylight. EL wire is really cool, if you can I'd incorporate it wherever you can. I also put it into the red hole in the chestpiece.

-You should absolutely get a dremel if you can, it makes cleaning stuff up really easy. The variable speed ones are nice. It leaves little fuzzy bits sometimes but you can kiss it with a lighter and they'll dissolve.

-I put buckles in to attach the arms. It works well to keep them in place, but it's hard to connect them by yourself. They are glued onto the top of the bicep piece on the outer edge, and there is a strap hanging down from the shoulder that the other half of the buckle is attached to. The arm and forearm are both permanently attached with a nylon strap at the elbow.

As you can see, I'm nowhere near done yet so a lot of the other things I'm experimenting with might be changed. If you like, I can update you in the future. Hopefully it'll expedite your building process, although I went and did a lot of things I really didn't have to so it's been taking me a while.
IMG_20200710_125150.jpg
IMG_20200710_125011.jpg
 
That's amazing! Thank you so much for all of your suggestions and tips! You're pretty much the only other person actively working on a praetor suit that I've seen so far, so I'd love to see more of your progress as you go along! I'll definitely look into adding those horizontal straps to the shoulder & chest pieces, and luckily I already have a variable speed dremel, so that should help tremendously. As far as your helmet, I really like how you turned the crack into battle damage, it really goes well with the theme and looks completely intentional. For me, I'm going to be sticking to using the helmet I already have, though I agree that sanding a 3D printed helmet would not be very fun. Also, thanks for the suggestion about the EL wire! I was just thinking about how I could incorporate some lighting throughout the suit, maybe even a speaker to play some DOOM OST while I wore the suit- just some random ideas, but as the suit becomes nearer to being done I'll definitely start to think about incorporating things like that. I look forward to seeing more of your progress soon!
 
Thanks, right now I'm working on getting the abdomen figured out so I'll update you when I'm satisfied. It should actually end up looking pretty accurate to the game, which is cool since most of the Halo armors rely on the wearer having pretty ridiculous proportions. It's about 80% humidity and 95F where I live though, so progress is pretty slow. I was contemplating making a Doom Eternal style Doomblade on my 3D printer so I could just sit in my nice air conditioned computer room for the next few days, but I honestly preferred the first game's glory kills.
 
Looks good! I just got started on making the left arm pieces, but its a bit of a trial-and-error process, considering this is the very first time i've ever worked with foam. I've been having a bit of trouble with using contact cement, but I think I'll get better with it over time. Your suit's coming along really well! And yeah, having your own thread would probably be a good idea, though your contributions to this thread are still very much appreciated :) I also have been contemplating whether or not to build the doomblade or a crucible, but I figured that it might be confusing considering I'm going for a 2016 praetor suit look. I just finished the left shoulder pauldron, and am currently printing out the right shoulder pauldron as well.
 
Another quick update: Both shoulder pieces have just been finished, and are being held together with pegs (I plan on gluing them soon, not sure whether contact cement will work or if I should go for epoxy). My progress on the left arm has been both promising and frustrating- the forearm gauntlet is more or less complete, but the bicep region and the glove area are both not going too well. I think for those areas I'm going to just start over, as during the process I panicked and used a lot of hot glue, which then melted due to how hot it is in my area. So, I'm going to be re-doing those areas, but now I'm more used to working with EVA foam, so hopefully it'll go much better this time around.
1594678859724.png
 
Hey all, it's been forever since I last posted, and I mainly got caught up with schoolwork and other activities, so for a good few months I didn't make much progress on the armor at all. I've recently picked the work back up, though, and have been slowly making the torso of the suit. Making the arm pieces was very much a learning process, and I'm leaning towards redoing them altogether (they just didn't turn out as well as I thought they would), but for the time being I'm going to focus on making the torso section and making sure the dimensions are right. A user by the name of Onslovo (who commented on this thread before) has been making some incredible progress on a praetor suit as well, and honestly seeing their incredible work has really motivated me to continue making this suit with a kind of renewed vigor. I'll post more updates with progress photos as soon as possible.
 
Thank you, I'm really flattered. Let me know if you ever run into any issues, odds are I'll have stumbled through that part already and have a better way in mind that I wish I did, haha. Good luck!
 
Status
Not open for further replies.
Back
Top