You are using an out of date browser. It may not display this or other websites correctly.
You should upgrade or use an alternative browser.
You should upgrade or use an alternative browser.
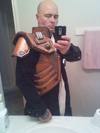
First attempts at foam armor.
- Thread starter jimbo only one
- Start date
- Status
- Not open for further replies.
Sky Dragon
Member
Dude your foam armor pieces are looking incredible so far! After my build I may consider the foam method - This was quite inspirational
really awesome, every piece is looking great!
the odd collection of colors had me doubtful for a second, but when the paint was applied, wow.
if i may ask, what brand and types of paint do you use? do you use primers as well?
the finish is great, is the paint flexible too?
i've got a breastplate that's going to need some paint soon, and i'm hesitant on painting it till i know a good paint to use.
Spartan247
Jr Member
this is cool man!!!
Jester1014
Well-Known Member
You usin an airbrush for your paint?
Oh and another thing, I don't know if it will help you or not. But when I sized my helm, I measured the width of my head and added an extra 3 inches. divided it by 25.4, entered in what I got in the width section. Printed and Viola my helm fit perfectly. Dunno if that would help ya or not. The 3inches was for Padding and comfort.
Oh and another thing, I don't know if it will help you or not. But when I sized my helm, I measured the width of my head and added an extra 3 inches. divided it by 25.4, entered in what I got in the width section. Printed and Viola my helm fit perfectly. Dunno if that would help ya or not. The 3inches was for Padding and comfort.
jimbo only one
Jr Member
really awesome, every piece is looking great!
the odd collection of colors had me doubtful for a second, but when the paint was applied, wow.
if i may ask, what brand and types of paint do you use? do you use primers as well?
the finish is great, is the paint flexible too?
i've got a breastplate that's going to need some paint soon, and i'm hesitant on painting it till i know a good paint to use.
Believe it or not: NO Airbrush! The paints used were: plastidip primer, Krylon metal flake silver, Applebarrel blk,Folkart burnt umber,Folkart Metallic bronze #663, Games workshops shining gold,mithril silver,boltgun metal.
The redlines in the first photo were marker where i was gonna add panel lines, rivets, and filigre'. All the lines and filigre' were added with aq dremel tool, going slow as to not be to deep. The valves added to the shoulders were CO2 canisters from a coffee shop!
By Starting with the plasti dip, sprayprimered the whole thing litely with the krylon metal flake, Sprayed again with Krylon hammered bronze. Then panted each pannel with burnt umber. After the umber was dry, lined every panel and bolt with thin down black. Useing a soft 2" brush, worked in the Folkart metalic bronze from the high points, down to the shadows, useing it like the piece was chrome. I picked out certain cracks/rivets with silver. Then i relined the highest points again with a 2" brush in gold and feathered it to the bronze. After painting give it a good two-four hours to dry completely, the paint will peel off if you dont seal it. I use testors dullcoat, but io know there is a cheaper option out there, just be sure to use a clearcoat on a warm day or it will fog up on your paint. Hope that helps.
jimbo
randomjedi 1138
New Member
Nice work on the foam dude, and beautiful steampunk armour also btw 
jimbo only one
Jr Member
Nice! yes thank you Jimbo, this really helps, you use a lot of the paints i do (eerily so in-fact), it's the plastidip primer that's the real change to my routine, im looking forward to painting this now, rather than dreading it.
Be sure to use an even coat of plastidip and let it dry completely. I had to bring mine in the house to let it dry. The air was so cold it wouldnt dry completely. After it is dry i spray it agin with the silver following al hard edges and seams. Then i paint the hammered bronze on in the large areas (spray). After that it is all about the brush. Good luck with your bilds.
Propcustomz
Member
Lookin good. Keep it up.
Your work is looking really good. I can't believe I missed this earlier! Also, I noticed that you mention this plasti dip stuff? Something I am assuming that you are using as a base coat before applying the actual paint? Where can I get this stuff? I hope it's not expensive. XD I was thinking about just fully airbrushing my armor to try and avoid having to worry about a primer/base coat when I can finally afford to start my armor. Of course my other concern is what to use to seal it after I have it painted. I know airbrush paint works great on t-shirts, but I have a good felling that the airbrush paint will rub off the foam without a proper sealer.
After reading all the threads of people that are making foam armor, I've been taking notes as to what supplies I will need to successfully make my own armor, but I keep hearing so many different things about what to use as a base coat before applying the actual paint color.
_____________________________________________________________________________________
Attachments
jimbo only one
Jr Member
plasti-dip is available at lowes and home depot in the spraypaint isle. It runs about $8 a spray can or $6 for brush on, i am useing both. It holds well and doesnt seem to peel/flake off like alot o other products. I have use one full can of spray so far. (!) I will be buying some spray and brush on tomorrow to finish some other projects. I am useing krylon matt clear to seal it. So far So good. No real problems. I also use a heatgun on low to help dry it more solidly. Airbrushes work fine i just dont wanna hassle with the cleanup as my compressor is in the garage (burr cold). If i run across anything that works as easily i will post it as well. hope that helps! 
It does help! It finally solves the mystery of where to get the plasti-dip! haha
I think at this time I should have everything I need to know to get started. Apparently, my husband also has a soildering iron..........or wood burning tool (one of the two) in the shed somewhere. XD At least I won't have to worry about buying one. However the bad thing is, it's probably burried somewhere in a tool box, our shed is small, and full of other stuff, and there is a Harley in the way. XD
_____________________________________________________________________________________
Attachments
Jester1014
Well-Known Member
Now I've spent a day looking for this thread.
The thinner Craft foam you're using, Are you using it for panels and design?
Just Curious, I'm about done with my Shin using foam. andwanted add some panel effects, just curious what you were using.
The thinner Craft foam you're using, Are you using it for panels and design?
Just Curious, I'm about done with my Shin using foam. andwanted add some panel effects, just curious what you were using.
DesertFare
Well-Known Member
Hay! thats my EOD pep :3
jimbo only one
Jr Member
real cheap craft foam about paper thin up to 1/4 inch is available as well at hobby lobby and other craft stores.
yep your eod...
yep your eod...
- Status
- Not open for further replies.


