You are using an out of date browser. It may not display this or other websites correctly.
You should upgrade or use an alternative browser.
You should upgrade or use an alternative browser.
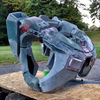
First build WIP - Halo 4 Recon Helmet / Halo 4 Mark VI Armor
- Thread starter T086
- Start date
- Status
- Not open for further replies.
Looks awesome! Out of curiosity, are you planning to do any black washing or weathering like that aside from the scratches?
I thought about it for a couple days back when I was into the paint process but then decided against it because I was worried about losing the 'pop' factor the paint scheme was giving off.
Chainsaw ninja
Jr Member

well played
 sweet helmet idk if itll show the pic i tried to put up there i tried
Holy bleeeping bleep. That helmet looks absolutely amazing. So jealous. Nice work, actually, AMAZING work. Can't wait to see a suit produced by you.
P.S. I want that BR.
P.S. I want that BR.
O.O...
I just...WOW! What in the heck is this still doing in the noob forum? Really beautiful work! The details are just breathtaking. The paint is eyecatching, the visor is...I'm sorry, I really have no other words. I love it. ^^ I agree, I can't wait to see a suit either.
I just...WOW! What in the heck is this still doing in the noob forum? Really beautiful work! The details are just breathtaking. The paint is eyecatching, the visor is...I'm sorry, I really have no other words. I love it. ^^ I agree, I can't wait to see a suit either.
well played
Holy bleeeping bleep. That helmet looks absolutely amazing. So jealous. Nice work, actually, AMAZING work. Can't wait to see a suit produced by you.
P.S. I want that BR.
O.O...
I just...WOW! What in the heck is this still doing in the noob forum? Really beautiful work! The details are just breathtaking. The paint is eyecatching, the visor is...I'm sorry, I really have no other words. I love it. ^^ I agree, I can't wait to see a suit either.
Thank you very much everyone! I bought the BR off of etsy actually, after seeing it I couldn't pass it up. I kind of knew the whole suit was going to be a mountain of work so adding a gun to my list of things to build wasn't in the cards. I'm continuing to slowly churn out the progress, this torso piece is a little more of a pain than I had hoped, but so far so good.
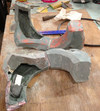
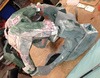
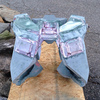
I also hoped to get more done today than I did but matching each shoulder piece isn't easy. What really slowed me to a crawl is when I found out the left piece is tweaked inward heavily. I decided the best fix was to break it... Yes... break it to fix it
Snapping it at the point I did allowed me to reposition the piece to get it to match the right side. After I repositioned it I braced it with some aluminum and added body filler to hold it in place. The repair is far from complete... That fun is for tomorrow night haha. And of course a pic, you can see where I'm making the tweak repair:
Attachments
I really like the BR too. I saw it on etsy but decided to try and make my own.
Chainsaw ninja
Jr Member
I think may get one what's test tho? I tried googling it but got baby photographers XD
I think may get one what's test tho? I tried googling it but got baby photographers XD
If you are talking about the battle rifle here's the link: http://www.etsy.com/listing/127214010/halo-4-battle-rifle-finished?ref=cat_gallery_1
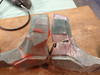
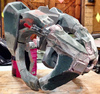
To give you guys a better idea of how tweaked the shoulder piece was, here is another picture from right now. I just repositioned it again but you can clearly see how much I had to cut and trim the piece in question. After a billion measurements it's as close to matching the other one as it's ever going to get.
ok must put the iPhone down and get back to work, time to make the body filler magic happen lol
Attachments
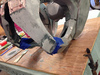
Worked like crazy the last two nights; I'm happy to say that the bulk body filler shaping work is complete on the shoulders. The tweak was corrected and they are matched! Next I will start on the thruster packs of which both have issues off the bat. Remember how I filled them with spray foam? Well I guess I went slightly overboard because over the last week it fully cured and expanded. Needless to say, the resin coated pep work of the thrusters is now a little bloated and distorted. This time I will do the corrective work on both first before beginning my body filler stage.
runcornstuntman
Member
Nice build. Looks clean so far. Good to see more off the newbies paying attention to detail instead of rush rush rush. Well done good sir. On a different note I've been away for a long time and am quite interested in the location of the halo 4 recon helmet. It looks immaculate. Good luck with the rest of the build. Ill be lurking and keeping an eye on your progress
Nice build. Looks clean so far. Good to see more off the newbies paying attention to detail instead of rush rush rush. Well done good sir. On a different note I've been away for a long time and am quite interested in the location of the halo 4 recon helmet. It looks immaculate. Good luck with the rest of the build. Ill be lurking and keeping an eye on your progress
Thats one sweet looking helmet.
Great looking build, Keep us posted.
Thanks for the positive feedback! Runcornstuntman, if you mean the pep file for it, I found it here: http://www.4shared.com/file/DR4xp4tu/h4_recon_by_monkeyfuj-unfold_s.html
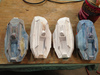
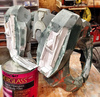
So anyway... I've moved onto the thruster packs for general shaping now. I said earlier that the packs had warped from the spray foam I filled them with and I was was in the process of correcting them. Well... I got about five minutes into my correction work and stopped myself. It wasn't worth the time and effort making them right again. So yesterdy and today was dedicated to peping new ones and coating the insides with my liquified body filler. It's nothing special to look at but below you can see the old and new ones together.
It's mid afternoon right now and I needed a break but possibly tonight the actual shaping could begin on those.
Attachments
Chainsaw ninja
Jr Member
You don't mind if I use that hex pattern idea on my visor do you?
You don't mind if I use that hex pattern idea on my visor do you?
Not at all, go for it. I actually linked to where I got it on the first page.
In other news, the work continues on the torso. I may not update here for a week or so because I would like the next one to show significant progress.
I'm alive! So maybe I haven't been gone all that long but its been awhile since a good update. I've been working some serious magic on this torso, so without further delay here are the progress pics ordered from when I last posted till tonight.


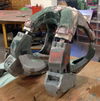
Here is the latest and greatest from tonight (some parts of the torso are removed so i can actually work on it):


This took a ton of luck/sweat/hard work/ to make all these pieces come together in such awesome fashion, not to mention what happens when you accidentally drop a thruster pack on a concrete floor after it only has bondo coating the inside, that was a fun night haha (sorry no pics of that).
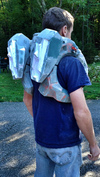
And yup, that's me above, after working all day on it... in need of a shower.
There is still a mountain of work to pull off on this piece but after fighting all the tweaks out of it I finally have a good handle on it and know exactly where I'm going.
Here is the latest and greatest from tonight (some parts of the torso are removed so i can actually work on it):
This took a ton of luck/sweat/hard work/ to make all these pieces come together in such awesome fashion, not to mention what happens when you accidentally drop a thruster pack on a concrete floor after it only has bondo coating the inside, that was a fun night haha (sorry no pics of that).
And yup, that's me above, after working all day on it... in need of a shower.
There is still a mountain of work to pull off on this piece but after fighting all the tweaks out of it I finally have a good handle on it and know exactly where I'm going.
Attachments
-
 9934745934_508f61bc9b_c.jpg341 KB · Views: 336
 -
 9934857273_102a7f92bb_c.jpg271.3 KB · Views: 318
 -
 9934758194_9a17fa7342_c.jpg275.2 KB · Views: 330
 -
 9934721896_7ec52d2bea_c.jpg315.3 KB · Views: 332
 -
 9934743746_20bbe34e44_c.jpg415 KB · Views: 326
 -
 9934730285_997e84ef94_c.jpg302.6 KB · Views: 339
 -
 9934745856_f38f02676c_c.jpg421.2 KB · Views: 333
 -
 9957916426_3c3f33ffc3_c.jpg448.9 KB · Views: 338
 -
 9958007463_4fd6e2beb7_c.jpg478.2 KB · Views: 338
Chainsaw ninja
Jr Member
Judging from that awesome helmet this will b on the elite builds all awesome progress
awesome progressJudging from that awesome helmet this will b on the elite builds all
Thanks a lot, I'm really glad you like it.
In other news, I've switched over to Flickr for my image hosting needs and updated the link in the first post of this thread to reflect it. If you are interested in seeing all the pics in one place check it out here: http://www.flickr.com/photos/101928356@N07/sets
Excellent start to this Saturday, no work today for once, so I have all day for armor-making. Fired up the wood stove to take the chill off the workshop then got right into meshing the lower halves of the chest plate with the bottom of the shoulder pieces. Here you can see the connection in its incomplete state.

Attachments
Really nice build on the helmet. Iam excited for the upcoming progress. but i really have to ask a a question.
i wanted to use the halo 4 recon helmet by monkeyfuj too, but i have a really big problem with the flat forehead near the top side of the visor. how did you managed this problem? ignoring it? the final helmet doesnt look exactly like the pepakura process pics.
can you describe was you did?
edit:
here are two pictures of your build.
pep version
http://www.flickr.com/photos/101928356@N07/9934595653/in/set-72157635880761835
finished version
http://www.flickr.com/photos/101928356@N07/9934595653/in/set-72157635880761835
the installed visior looks normal and but the pep version does have a flat visior and the the forehead is flat too... i want to get the forehead (not only the visior) a little more curvy and in my opinion you managed this.
Here is another picture of the 3D render of the original 343 recon helmet:
http://s.cghub.com/files/Image/351001-352000/351509/628_max.jpg
- Status
- Not open for further replies.
Similar threads
- Replies
- 2
- Views
- 465