First build WIP - Halo 4 Recon Helmet / Halo 4 Mark VI Armor

Status
Not open for further replies.
THIS GUY! I saw your helmet before and never commented on it, but I am amazed at the level of perfection you create. Also what are you using for the under suit top I saw in one of your updates? How much did it cost?
 
Dang man that's the price for amazing work

really great job! I love that oni detail! Keep up the work and look foward to more pics and creations!:cool

Thanks!

THIS GUY! I saw your helmet before and never commented on it, but I am amazed at the level of perfection you create. Also what are you using for the under suit top I saw in one of your updates? How much did it cost?

Thank you! The undersuit top is right here: http://www.amazon.com/gp/product/B0097JUR44/ref=oh_details_o05_s00_i00?ie=UTF8&psc=1

Its rather expensive and I still don't know if I'll actually use this exact one but we'll see.

Annnnnd the update:

10389465576_49628b43e9_c_d.jpg


10389622943_25c216f9e9_c_d.jpg


10389443485_eb7513f160_c_d.jpg


^The above three images are the side details for the thruster packs, wanted to get them out of the way but I haven't attached them yet.


10389615936_4866062331_c_d.jpg


^UNSC resupply airdrop, four more gallons of everglass filler that will hopefully take me all the way through the rest of the project.

10389618776_82dbd3c64c_c_d.jpg


10389774433_67daa5f63e_c_d.jpg


^After I finished working on the side details for the thruster packs I jumped back to the front of the torso and worked my way up. You can see the upper part that has primer on it has not been smoothed yet.

More coming at ya soon!
 

Attachments

  • 10389465576_49628b43e9_c_d.jpg
    10389465576_49628b43e9_c_d.jpg
    322.3 KB · Views: 172
  • 10389622943_25c216f9e9_c_d.jpg
    10389622943_25c216f9e9_c_d.jpg
    460.5 KB · Views: 175
  • 10389443485_eb7513f160_c_d.jpg
    10389443485_eb7513f160_c_d.jpg
    287.5 KB · Views: 163
  • 10389615936_4866062331_c_d.jpg
    10389615936_4866062331_c_d.jpg
    283.8 KB · Views: 170
  • 10389618776_82dbd3c64c_c_d.jpg
    10389618776_82dbd3c64c_c_d.jpg
    402.1 KB · Views: 176
  • 10389774433_67daa5f63e_c_d.jpg
    10389774433_67daa5f63e_c_d.jpg
    332.8 KB · Views: 153
Those mounts look really cool, even though they're slightly inaccurate.

Nice job mate, this is a truly impressive build... even though I've said that a dozen times already.
 
Thanks guys, I had to suffer a blow to the accuracy of the piece for real world functionality with the latches. Like you said I think they look really cool and certainly don't detract from the aesthetic of the piece. They have that militarized look to them.
 
Oh my god! I have sOOOOO many questions about this build! But currently what I want answered is where did you find the stencil pattern for your helmet?
 
Well my next question is why do this bondo stuff instead of EVA Foam Mats? Or whatever that grey stuff is you're using on top of your Pepakura Model.
 
Well my next question is why do this bondo stuff instead of EVA Foam Mats? Or whatever that grey stuff is you're using on top of your Pepakura Model.

You can use either one, I just prefer body filler because I'm all setup to work with it and I like the durability of filler armor. Now keep in mind I've been using everglass, in my opinion it's in a whole class of its own compared to actual bondo. Everglass contains short stand fibers and kevlar, it won't crack and break like bondo. Also, while you're working it it doesn't run all over like bondo, it pretty much stays put till it sets up.

The grey stuff is just primer, but the dark green/green colored stuff is the filler. Yeah this particular filler seems expensive because it runs 50-60 USD a gallon but when you consider I built the entire helmet out of a half gallon, it really isn't that bad.
 
Well Im trying to create an accurate Halo 4 SCOUT armor, I plan to build the armor myself but Im a Noob at it so I need to know what my options are. Currently looking into EVA Foam to see if that works, but no one so far has made the appropriate templates for me to use. I can make the Pepakura Model yes, but everything from there is a mystery to me.
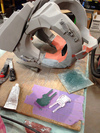
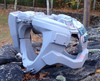
 
I'm sure this will make it into the Elite Showcase when completed :) Kudos on the details, wonderful paint on the helmet. Looking forward to seeing the rest of this build!
 
torso file
Hey there, i was wondering if youd mind sharing the file you used for you torso.. every file iv come across wasnt game accurate also how you sized your torso is amazing its perfectly scaled. so shedding some light on that to would be great. looking for ward to your reply.
Preferably to jdivona@gmail.com
 
Long time no see... UPDATE!

I took off and went on vacation to Costa Rica for the past week but now I'm back in the states and continuing work on the torso.

Halovet: I hope that file by AZTLAN I PMed to you is working out for you. It's truly awesome.

JayOneSeven: thanks!

Here's the progress I made right before I left up till now since I've been back, I may have more pics after today as well since I'm actually working on it right now.

10649154673_99d06cb8a1_b_d.jpg


As an extra little treat I received this in the mail while I was gone courtesy of Branfuhr Studios:

10648921526_3ae053ac89_b_d.jpg
 

Attachments

  • 10649154673_99d06cb8a1_b_d.jpg
    10649154673_99d06cb8a1_b_d.jpg
    274.4 KB · Views: 163
  • 10648921526_3ae053ac89_b_d.jpg
    10648921526_3ae053ac89_b_d.jpg
    158.5 KB · Views: 166
Made some progress on a new front:

I started the boots.
10700943845_1a16b76497_b_d.jpg

10701192543_5311cc552d_b_d.jpg


This week has been/is looking quite busy for me so I don't expect much progress on the torso until Saturday and Sunday. Hopefully though by the time Sunday night rolls around I'll be left only with smoothing to do and minor detail work next week... Then paint begins! I can't wait to have the torso complete considering I started it in the beginning of August.

Stay tuned.
 

Attachments

  • 10701192543_5311cc552d_b_d.jpg
    10701192543_5311cc552d_b_d.jpg
    315.4 KB · Views: 164
  • 10700943845_1a16b76497_b_d.jpg
    10700943845_1a16b76497_b_d.jpg
    281.1 KB · Views: 189

Attachments

  • 10719090303_aa009cb6f2_b_d.jpg
    10719090303_aa009cb6f2_b_d.jpg
    206 KB · Views: 180
  • 10718891124_8fd9554f44_b_d.jpg
    10718891124_8fd9554f44_b_d.jpg
    325.5 KB · Views: 177
  • 10766356094_35c3c2e3e9_b_d.jpg
    10766356094_35c3c2e3e9_b_d.jpg
    179.4 KB · Views: 161
  • 10766353914_6f0b3594f6_b_d.jpg
    10766353914_6f0b3594f6_b_d.jpg
    254.2 KB · Views: 174
  • 10766256725_97f61557fe_b_d.jpg
    10766256725_97f61557fe_b_d.jpg
    428.2 KB · Views: 172
Truckin along with a heck of a torso piece to go with that helmet! It always amazes me how a piece can look so different through each phase of the creation process. Yours is looking so pristine after that primer, it's hard for many to see how much work went into getting it so smooth and sharp. I am so excited to see this go through its many stages and end up at the same level as your helmet.

Congratulations on the Waypoint post; you definitely deserve it!! ^__^
 
Status
Not open for further replies.
Back
Top