- Member DIN
- S314
Heyo everyone! I decided to follow RandomRanger's video guides as he releases them on making foam armor! I won't be doing all the crazy shoe goo that he does to make his armor indestructible but rather use it as a learning experience to get experience with foam! Considering I'm printing my main suit with 3D printers and my last two were pepakura, Foam is the last mountain to tackle! I don't resin cast and won't unless I get a lot more space and money. ANYWAY PLANNING STAGE!
I'm thinking of making this an EOD reach spartan or a reach spartan suit with a Mk. VII helmet from infinite! (I love that helmet) At any rate, we'll see!
I'm considering going funky with this suit. First was gold, second purple and yellow, Third is going to be orange and green (my favorite colors) and maybe this time I wanna paint it something funky and fresh like a summer picnic! What goes better with a summer picnic than watermelon? Anyway I want to make a pink and green suit.

Look at it! beautiful! If anyone has other suggestions for another color let me know. I was kind of leaning towards olive drab green like Mister Chef as well. Or maybe black and yellow. But that's kinda boring, isn't it? Anyway on to what I have of the build so far! I just finished putting together the handplates from the patterns and guide provided through this video!
the guy is a legend^
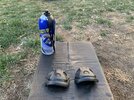
Here are my results!

the seams aren't perfect but another RandomRanger video was just released addressing how to make invisible seams! They seemed a little flat and oval-y to me so I took a heatgun and curved the whole part.

much better. I also used kwik seal to fix up the seams and then blasted them with a couple of layers of plasti-dip! (don't tell Ranger, he prefers to use leak seal)((I just got a can of leak seal don't worry))

I used the general trick for making spray paint evenly with bathing the can in warm water before I went to spray. In doing so I think I warmed it up too much or pushed the nozzle down too hard and broke the seal which just caused the can to kinda explode.... good thing I was wearing gloves and my respirator! SAFETY FIRST!!!!
I'm glad I at least got these coated out of one can. Now it's time to get to work on the second video in the series Ranger has released.
https://www.youtube.com/watch?v=xmP3MlwaJmo
I have the patterns printed out and it's time to get to work!
.jpg")
sorry it's sideways my phone hates me lol. Anyway if anyone has anything to add or any color suggestions I'm excited to hear them!
I'm thinking of making this an EOD reach spartan or a reach spartan suit with a Mk. VII helmet from infinite! (I love that helmet) At any rate, we'll see!
I'm considering going funky with this suit. First was gold, second purple and yellow, Third is going to be orange and green (my favorite colors) and maybe this time I wanna paint it something funky and fresh like a summer picnic! What goes better with a summer picnic than watermelon? Anyway I want to make a pink and green suit.
Look at it!
beautiful! If anyone has other suggestions for another color let me know. I was kind of leaning towards olive drab green like Mister Chef as well. Or maybe black and yellow. But that's kinda boring, isn't it? Anyway on to what I have of the build so far! I just finished putting together the handplates from the patterns and guide provided through this video!Here are my results!
the seams aren't perfect but another RandomRanger video was just released addressing how to make invisible seams! They seemed a little flat and oval-y to me so I took a heatgun and curved the whole part.
much better. I also used kwik seal to fix up the seams and then blasted them with a couple of layers of plasti-dip! (don't tell Ranger, he prefers to use leak seal)((I just got a can of leak seal don't worry))
I used the general trick for making spray paint evenly with bathing the can in warm water before I went to spray. In doing so I think I warmed it up too much or pushed the nozzle down too hard and broke the seal which just caused the can to kinda explode.... good thing I was wearing gloves and my respirator! SAFETY FIRST!!!!
I'm glad I at least got these coated out of one can. Now it's time to get to work on the second video in the series Ranger has released.
https://www.youtube.com/watch?v=xmP3MlwaJmo
I have the patterns printed out and it's time to get to work!
sorry it's sideways my phone hates me lol. Anyway if anyone has anything to add or any color suggestions I'm excited to hear them!